


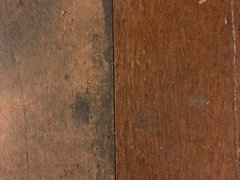
Removing mystery finish and refinishing 120yo pine floor
e gwynne
4 years ago
last modified: 4 years ago
Featured Answer
Sort by:Oldest
Comments (30)
Related Discussions
Refinishing old Pine floors
Comments (4)I have only come across this issue once. A floor had area rugs on them so long that the light had bleached the perimeter of the room. Just like yours, it did not sand out. The only solution I can suggest is to find a light/medium stain that would be close to the color of the centers of the rooms and stain the entire floor. IMO, trying to stain the areas different isn't likely to work. For the best result, apply a light coat of water to the entire floor, let it dry then apply the stain. You can add up to 8oz. of the same stain to each gallon of oil-modified polyurethane and apply two coats of tinted poly, abrading lightly between coats. Abrade the second coat and apply a final coat of clear satin oil poly. It would be ideal if you have an area where you can make a sample first. This process should make the center of the room slightly darker and the edges of the room much darker, and address the issue of the Pine possibly being splotchy from the staining process....See Morepine flooring refinish
Comments (71)Hi, Congrats on acquiring such an interesting home. I think the mystery finish is a faux wood graining; when the original finish (probably shellac or oil varnish) became tatty looking, to save a complete refinishing, somebody decided to cover the flaws with the paint/stain/varnish method. Graining is notorious for being nearly impossible to touch up. The steps involved would be a very deep cleaning to remove gunk. Then any chips in the grain coat may be filled in with artists colors (even wood-tone sharpie-type markers) and finally a new layer of varnish to protect the artistry for another few decades. The aptness of the colors mixing and application will tell in the finished product. If you did decide to strip it to the original finish (maybe it's some fabulous hardwood!) the job will be more or less difficult depending on how much grain base paint embedded itself in the pores and scratches of the wood. You would probably find yourself touching up the indelible paint spots with markers or paint to color them to match the hardwood. Casey...See MoreRecovered wide pine floors/refinish
Comments (8)I, too, have wide old board (early, old growth white pine) floors - mine were set in when the house was built in the 1840s. But every year in the heating season they contract, opening a gap between the boards that one can loose a chopstick in. Then they swell up, reaching their maximum dimension in mid-September. So I don't think age really affects dimensional stability, particularly across the board width. What would keep them more stable would be constant temps and, probably more importantly, steady humidity, which I can not supply in a wood heated, un-airconditioned house with a full cellar located in the humid NE. However, the boards can shrink or swell, and it doesn't concern me in the least. Mine are thicker (1 3/16") than yours will be after planing, but I have reluctantly abandoned the idea of installing radiant (hydonic) heating in the floor because wood that thick will not be a very efficient transfer of heat and the heat necessary to make them warm up would be hard on them, and probably on my pocketbook as well. In my case this is exagerated because my building is so energy-inefficient and my climate so severe that my heat load would be considerable even without the issue of the thickness of the wood. The only good thing to be said for my floor in relation to radiant heating (which I crave) is that I have full unhindered access to the undersides of the boards, making retro-fitting very easy. That said I once owned a house with modern strip red oak flooring and radiant floor heating on a slab. Heat transeferred just fine, but some of the seams did open up every year. Nothing more than cosmetic issue, in my opinion, but it did raise questions at resale because one of the reasons the boards might shrink is due to a leak in the system, which was not the case. I happened to find a buyer who saw it both closed, open and then closed again, so she believed me when I said it was a normal thing not the result of a recent trouble. Other would-be purchasers who saw it in its gap-y state at the end of the heating season were more sceptical. What do you plan to use for subflooring under your wide boards? I don't meant to discourage you from using the boards, just sound a note of caution about using thick, old growth boards as radiant transfers. Unless they are severely cupped I would think about laying them without planing. How are they edged; would you have to have T&G put on them? Many of the boards in my barns and attics are apparently identical to my flooring, but usually not as nice. I have used them to make small patches or repairs, though. One other thing has to do with the varying widths. It can be a bear if you have too much variation and need to match up with an exact dimension to span the floor. Depending on the length of your boards and the width of the room, you may have an easier, or more frustrating time fitting them to the space. In my house the boards are so long they go under the partitions and span most of the rooms. Good luck, your floor sounds great and I am a big believer in re-using parts. Molly~...See MoreHow to refinish 160 year old pine floors
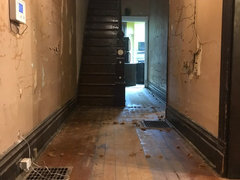
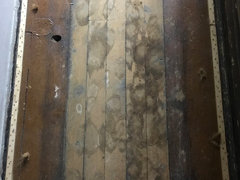
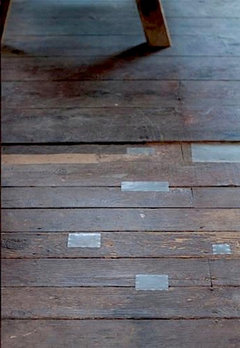
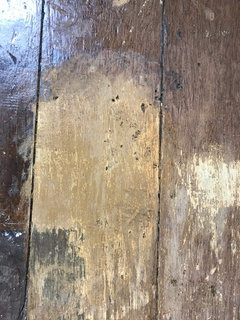
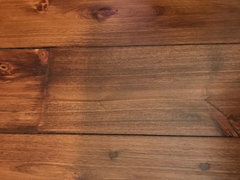
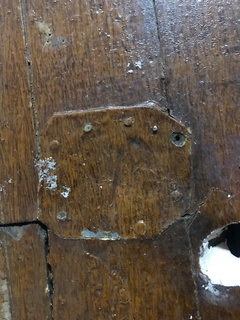
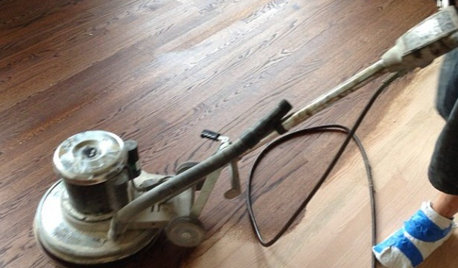
Comments (4)Looks like a soft pine (white pine or spruce) therefore getting a commercial drum sander to remove the paint is going to remove a lot of material in a hurry. Then applying a finish like polyurethane, which can only be removed by sanding (again) locks you into a cycle wherein your historic material is carted to the landfill as dust in garbage bags. Within a few cycles, the flooring will be abraded down to the t&g, and effectively ruined. The good new as I see it is that these floors have not been previously sanded, as they apparently been covered with area rugs and a painted border (a very typical treatment in the 19th century). There's no reason why you couldn't repeat this, and choose your personal floor paint color, and use a Persian (or a modern rug) of an appropriate size. It would look 100% authentic. There is an issue of which I must make you aware. Those never-painted central patches are never going to match the wood underneath the painted borders if both of them are stripped down. The bare patches have 160 years more oxidation head start, and will be darker when varnished. Artful (painfully so) staining work can diminish the differences a great deal, as will a flat finish, but this is really an art, and a historic floor specialist (or experienced, determined homeowner who's good at wood finishing, or gets ones self to that point) would need to take charge. We hand scrape old/historic floors where there is high regard for them or they are nearing the point where the t&g will become exposed. Our hand scraping bears no relationship to the current factory process of intentionally putting scraper tracks into material for the sake of added texture. We are scraping to have total control inch by inch over how much material gets removed, where; to keep material removal to the minimum level to render the floorboards smooth and finish-ready. The scraper gives complete control and can leave an even layer of oxidised wood (patina) that a power-sanding would render very much flatter, but with infinitely varying degrees of patina. With a cupped board, fo instance, a sander will sand the cupping completely out, in the process removing less material at the center (low point of the cup) and greatly more material at the edges, rendering two lighter stripes and a darker center. On wide pine boards this is very pronounced. This is too long, sorry, here is a pic of one of our scraped-process floors, of wide heart pine, where there had been very bad weathered. sun-faded patches in line with the window, and the 14-16" wide boards would not have withstood drum sanding. Casey...See More
e gwynne
4 years agoe gwynne
4 years agoe gwynne
4 years ago
mainenell
4 years agoe gwynne
4 years agoUser
4 years agolast modified: 4 years agoe gwynne
4 years agoptreckel
4 years agoUser
4 years agoe gwynne
4 years agolast modified: 4 years agoUser
4 years agomainenell
4 years agoe gwynne
4 years agoe gwynne
4 years agoUser
4 years agolast modified: 4 years agoe gwynne
4 years agoUser
4 years agoUser
4 years agoe gwynne
4 years agoUser
4 years agolast modified: 4 years agosandk
4 years ago
Related Stories
GREAT HOME PROJECTSWhat to Know Before Refinishing Your Floors
Learn costs and other important details about renewing a hardwood floor — and the one mistake you should avoid
Full Story
FLOORS11 Distinctive Finishes for Original Floorboards
Whether you go for glossy, painted or matte boards, make your wood floor the star
Full Story
REMODELING GUIDESWhat Lies Beneath That Old Linoleum Kitchen Floor?
Antique wood subfloors are finding new life as finished floors. Learn more about exposing, restoring and enjoying them
Full Story
FLOORS10 Ways to Make the Most of Your Home’s Original Floors
Save yourself the cost of replacing your old floorboards with these tips for a new finish
Full Story
REMODELING GUIDESDesigner Confessions: Torn Between Wood Floors
19 Photos to Help You Choose a Wood Floor Finish
Full Story
REMODELING GUIDESContractor Tips: Smooth Moves for Hardwood Floors
Dreaming of gorgeous, natural wood floors? Consider these professional pointers before you lay the first plank
Full Story
FLOORSHow to Paint Your Hardwood Floors
Know how to apply nail polish? Then you can give your wooden floors a brand-new look
Full Story
KITCHEN DESIGNEye-Catching Colors for Your Kitchen Floor
Revitalize a tired wooden floor with a paint or stain in an unexpected color
Full Story
WALL TREATMENTSThese Are Not Your Grandfather’s Pine Walls
The knotty look went from popular to pariah in years past, but today’s designers are finding new and stylish ways to embrace it
Full Story
HOUSEKEEPINGHow to Clean Hardwood Floors
Gleaming wood floors are a thing of beauty. Find out how to keep them that way
Full Story


DavidR