


What Lies Beneath That Old Linoleum Kitchen Floor?
Antique wood subfloors are finding new life as finished floors. Learn more about exposing, restoring and enjoying them

Some might say that renovating an old home is like slicing through an onion. It can make you cry, and it reveals itself in layers. The latter is especially true of many kitchen floors in these homes, where layer upon layer of linoleum, vinyl or other resilient flooring material was installed throughout decades of use. Curious homeowners, or those who have remodeled or moved a wall, have likely discovered that wood often lies beneath it all.
This wood floor, called the subfloor, was probably never intended to be seen or used as a finished floor. The question is, can it be?
This wood floor, called the subfloor, was probably never intended to be seen or used as a finished floor. The question is, can it be?
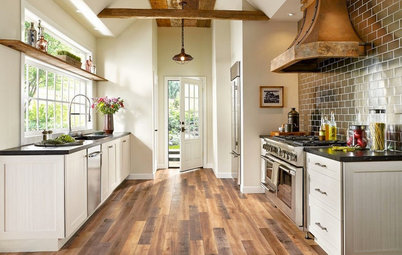
An addition and renovation in a 1936 San Francisco Bay Area home exposed a tongue-and-groove Douglas fir subfloor in the dining area adjoining the kitchen. The kitchen features old oak-strip flooring.
Where you’ll find a wood-plank subfloor. Your first step in determining your subfloor’s construction is knowing the age of your house. “A home built around or prior to the 1960s is more likely to have a wood-plank subfloor, rather than plywood,” says Emily Paprocki, architect and owner of design-build firm Rock Paper Hammer in Louisville, Kentucky.
It’s easy to check for a wood-plank subfloor without tearing up your finished floor. If you have a crawl space or basement without a finished ceiling, you can look up from below the floor. If you have a floor register, you can pull that up for a cross-section of your floor. This is something a professional can help you with. The challenge is assessing your subfloor’s condition, which will determine whether it can be used as a finished floor. You won’t fully know this until you expose the entire subfloor.
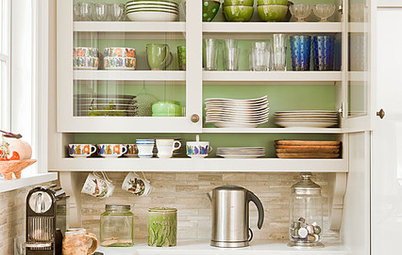
Subfloors run through the entire house, as they are an essential structural ingredient in the home’s construction. In older homes, you’ll most often encounter a wood subfloor during a kitchen or sunroom renovation. These spaces often are covered with a resilient flooring material, such as linoleum, that homeowners are looking to replace. The rest of the house would’ve received a finished wood floor above the subfloor.
Where you’ll find a wood-plank subfloor. Your first step in determining your subfloor’s construction is knowing the age of your house. “A home built around or prior to the 1960s is more likely to have a wood-plank subfloor, rather than plywood,” says Emily Paprocki, architect and owner of design-build firm Rock Paper Hammer in Louisville, Kentucky.
It’s easy to check for a wood-plank subfloor without tearing up your finished floor. If you have a crawl space or basement without a finished ceiling, you can look up from below the floor. If you have a floor register, you can pull that up for a cross-section of your floor. This is something a professional can help you with. The challenge is assessing your subfloor’s condition, which will determine whether it can be used as a finished floor. You won’t fully know this until you expose the entire subfloor.
Subfloors run through the entire house, as they are an essential structural ingredient in the home’s construction. In older homes, you’ll most often encounter a wood subfloor during a kitchen or sunroom renovation. These spaces often are covered with a resilient flooring material, such as linoleum, that homeowners are looking to replace. The rest of the house would’ve received a finished wood floor above the subfloor.
A Douglas fir subfloor in the dining area meets oak-strip flooring in the kitchen of the same Bay Area home shown in the previous photo.
The Louisville kitchen shown here had its 1920s subfloor exposed during a recent renovation. The architects needed to patch a section of the wood. They intentionally didn’t try to match the patch with the rest of the flooring to show the contrast between old and new.
Why Use a Wood-Plank Subfloor as a Finished Floor
Why Use a Wood-Plank Subfloor as a Finished Floor
- To add unique beauty: “It adds a lot of character,” says Paprocki, who has exposed and refinished wood subfloors in several projects, including her own home. “[They have] a color and character you can’t find in new pine,” she says. As these floors weren’t necessarily installed to ever be exposed, they are by no means precious. It’s important to know that they are bound to have imperfections and irregularities that don’t suit all tastes. “They’re usually fairly rustic,” she says.
- To celebrate your home’s history: These floors have been a part of the home since its construction and have worked hard to hold it up. Revealing this material is, in a way, celebrating the home’s history and structure. These floors also are made from a material that isn’t available anymore, unless you buy reclaimed old-growth wood.
- To salvage a material that’s already in place: Homeowners don’t have to buy new flooring material, which can be beneficial to the budget as well as the environment. Since the floor is already in place, and has been for decades, it is acclimated to the home’s environment and has strengthened over the years. “The older it gets, the harder it gets,” says architect Mark Lawrence of EL Studio in Washington, D.C. It isn’t likely to bubble or cup, like some newly installed floors do when they’re acclimating to the home. “I’ve never had those cup on me,” Sohm says.
The kitchen in the 1930s Washington, D.C., home that architect Mark Lawrence inherited from his grandmother used to have linoleum, and the dining area featured a solid oak floor. After tearing down the walls separating the two rooms, he didn’t have the budget for new wood flooring in the kitchen. Since the pine subfloor under the linoleum lined up with the oak and was in great shape, he decided to use it as his finished floor. He had everything sanded down and applied turquoise Minwax stain to both materials.
Considerations
Considerations
- Nicks and scratches: Subfloors are old, sometimes 100 years old or more, and have hardened over time. But they are still softwoods and are more susceptible to scratches and dings than other wood floors. “Old pine is still softer than an oak,” Paprocki says. “It will get more nicked and leave more impressions.” Area rugs can protect the wood, or you can embrace that these floors won’t stay perfect.
- Transitions: In some instances, the height of the subfloor lines up perfectly with the surrounding flooring, as it had originally been covered with an especially thin material. Other times, you may need to create a transition between the room with the subfloor and the surrounding rooms. “There are always floor height transitions to pay attention to,” says Cameron Habel, contractor and president of Cameron C. Habel Construction in Oakland, California.
- Dirt and dust: Dirt and dust will most likely find their way into cracks and gaps in the wood, even after patching or filling. If you have a living space or basement below without a finished ceiling, dirt and dust may float down into that room.
- Heat loss: Although dirt and dust can be a concern if these floors are above a basement with an unfinished ceiling, heat loss is not, as the home’s envelope is still intact. If these floors sit above a space that is otherwise open to the environment, you can add insulation beneath the floors.
Lawrence has rented out this D.C. home, shown here and in the previous photo, since 2011. Before that, he lived in it for five years and was happy with the floors — although he’s not sure his grandmother would have been. “She probably wouldn’t be in love with what I did,” he says, “but it was time for a fresh look.”
Safety and building codes. Safety is something a flooring professional will need to determine. If the subfloors are in good shape, there isn’t a structural concern with using them as the finished floor. “NWFA recommends minimum subfloor thickness requirements based on joist spans for new installations,” says Brett Miller, vice president of certification and education for the National Wood Flooring Association. “Wood flooring has been used for hundreds of years as subflooring material. It is not uncommon to find old oak, pine or Douglas fir floors that were laid directly over the floor joists,” he adds. “For new installations, this is not permissible.“
If a flooring professional determines that the floor can be used as the finished floor, no permitting or approval process should be required. “Code comes into play when the structure is changing,” Miller says. “Refinishing existing flooring should not affect the structure of the building and therefore would not need to fall into code compliance.”
Whom to hire. This is a job best left to a professional, both because of the expertise it requires and the cost you’ll incur renting the tools to attempt it yourself. “It’s a dirty, dusty job,” Lawrence says. He speaks from experience, as he did the sanding of his home’s wood subfloor before hiring a professional to finish the job.
While sanding, filling and finishing the floors, there’s a lot of opportunity for a DIYer to go wrong. “They really need a hardwood floor finishing specialist or expert,” Sohm says. Sohm, who has run his flooring business, Sohm Flooring Consultants, for more than 24 years, says that you also should look for a professional with a passion for this type of project, as some flooring professionals won’t be bothered to even attempt it. “There is a lot of problem solving engaged in it,” he says.
Find a flooring professional on Houzz
The original Douglas fir subfloor was exposed and refinished after hiding for 70 years under linoleum in this San Diego kitchen.
Best time to do this project. If the floor you’d like to expose is in the kitchen, you most likely would want to do this during a kitchen remodel. If you’re attempting this project in another room, you won’t be able to use that part of the house and will be advised to move out during the days that this project takes place.
Cost. Depending on the condition of the floors, this can be an affordable approach to solid wood floors. “You don’t have the costs of new flooring or the labor to install it,” Habel says. Paprocki estimates that this saved one set of clients at least a few thousand dollars on their remodel, as they had planned to install new wood floors.
However, this is by no means the most affordable flooring option. “It’s very labor-intensive,” Sohm says. You will have to pay for sanding and refinishing the wood, as well as filling all existing holes or penetrations in the flooring. Because each floor is unique, and most likely hidden under another layer of flooring, it can be hard to predict the cost. “It’s a time-and-materials job, not just per square feet,” Sohm says. “It can come out to quite a big-ticket item.”
After walls were removed during the remodel of the 100-year-old home in Toronto shown here, large holes remained in the upstairs oak flooring. The owners “didn’t have it in their budget to put a new hardwood floor down,” Bellsmith says, and it would’ve been cost-prohibitive to repair and patch the existing wood floors. When the team pulled up the oak floors, anticipating replacing them with another material, they discovered that the pine subfloors were in great shape. “It was a happy discovery,” Bellsmith says.
The Process
1. The flooring material above the subfloor is carefully removed to minimize damage to the subfloor. The contractor or flooring professional determines whether an abatement specialist needs to be brought in, as lead paint or asbestos tile may have been used in the old construction.
2. After the flooring is removed, it’s time to assess if the subfloor can be used as a finished floor. To do this, the professional may first sand a small area of the floor. If the professional and the homeowner agree that they still want to move forward, the entire floor is sanded to remove surface imperfections or any existing finish.
3. Any holes left from moving walls or any floor pieces that need to be replaced are patched with new or reclaimed wood.
4. For other imperfections — such as gaps between floorboards, holes left from nails or nails protruding above the wood — a flooring professional will help you decide how to proceed. “Some of these old board floors in these houses are top-nailed,” Sohm says. Protruding nailheads have to be countersunk or otherwise dealt with, he adds. Depending on the size of the gaps between the boards, the professional will leave them or will fill them with a mixture of flexible materials that will move with the planks and not crack or pop out.
5. After the floors are sanded and filled, it’s time to finish them like any hardwood floor. Imperfections or patches will show through anything short of paint, but that is something a fan of these floors will likely celebrate.
The subfloor in this media room needed to be patched in some areas, but the team embraced the contrast. “The floor added to the character,” Bellsmith says.
Maintenance and life span. Well-finished subfloors will “perform like any other wood floor,” Lawrence says. If property cared for, “they’ll last the life of a house,” Sohm says. “They were built to last hundreds of years.” If there is enough wood left, you’ll be able to sand them down and refinish them again, if you choose. Additionally, the finish can be sanded off, and they can be covered by another material in the future.
Maintenance and life span. Well-finished subfloors will “perform like any other wood floor,” Lawrence says. If property cared for, “they’ll last the life of a house,” Sohm says. “They were built to last hundreds of years.” If there is enough wood left, you’ll be able to sand them down and refinish them again, if you choose. Additionally, the finish can be sanded off, and they can be covered by another material in the future.
The original pine subfloor runs through this 100-year-old apartment in Brooklyn, New York.
What you should know. This isn’t a project to undertake if you are looking for an inexpensive quick fix. “These types of restoration jobs are time-consuming,” Sohm says. “There is a lot involved,” from possibly needing to re-secure the flooring to the joists to filling and patching the wood pieces.
Although the old wood lends lovely texture, color and heritage to a space, these floors aren’t going to be perfect, especially if they require patching. The various patinas and discolorations probably won’t be completely covered by a finish. “The homeowners have to embrace that history or that philosophy to go this route,” Habel says.
And it’s not always feasible. If there are extensive gaps, knots and splits, many professionals will recommend that you cover the floor with another material. You may have found someone willing to go the distance to expose and finish these floors, but understand that even they may advise you to cover them up. “It’s not something I like to plan for,” says Paprocki, who estimates that it works out in about a quarter of her kitchens.
Next steps. First, determine whether you have a wood-plank subfloor. This is something a handy homeowner can do, or your contractor should be able to determine this for you. “Whoever is involved in the project is going to need to do some discovery,” Habel says.
Set realistic expectations and have a plan B. “I wouldn’t let it drive the design from the beginning until you know what the condition of the underlying floor is,” Paprocki says. “Depending on the project, it can be a very nice option that saves money and has some character.” Just make sure that you have contingency money, Bellsmith adds. Not until you see everything exposed will you truly know if it is a realistic option and how much finishing the floor will cost.
If you are able to complete this project, you’ll be left with a one-of-a-kind floor that celebrates your home’s history and should last for years to come.
Related Guides
How to Clean Your Hardwood Floors
See more flooring guides on Houzz
More Resources on Houzz
Browse wood flooring materials
Find a general contractor near you


Let’s be clear: Turning a subfloor into a finished floor is not for everyone and not suitable for every project. But under the right circumstances, when given the opportunity to expose and enjoy old-growth wood floors, you can end up with something pretty special. “There’s a gratifying experience to pulling something like this off,” says New York-based wood flooring specialist Glenn Sohm.
What is a subfloor? “The floor that goes under your floor, essentially,” says Christian Bellsmith, a Toronto-based carpenter and owner of Bellsmith Carpentry. Layered between the floor joists and your home’s finished floor, the subfloor helps hold your home’s structure together and is the foundation layer for the floor you walk on. Today, subfloors are typically made from plywood, OSB, particleboard or another affordable, durable and easy-to-install material. A single layer of these materials is not recommended to serve as a finished floor.
The subfloors in older homes, those built before the middle of the past century, were made from solid wood planks. “In North America, our softwoods were used as plank subfloors,” says Stephanie McCarthy, sales manager of British Columbia-based Cancork Floor. This usually means some species of old-growth pine or fir.
The wood planks, typically 3 to 5 inches wide and three-quarters to 1 inch thick, would be nailed onto the floor joists as tongue-and-groove boards or straight boards, often running on a diagonal to better tie into the structure. Material availability and increased labor costs mean that these plank subfloors are no longer used in home construction.