


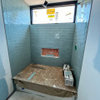
mud tracked in during framing/sheathing
rprodgers
7 years ago
last modified: 7 years ago
Featured Answer
Sort by:Oldest
Comments (11)
 PRO
PROCASEY BUILDING SOLUTIONS
7 years agomidwest gal
7 years agoRelated Discussions
Drywall question
Comments (10)The walls are insulated with fibreglass batts, and plastic sheeting was tacked over the studs to serve as a vapour barrier and stop air infiltration, before applying the plywood sheathing. The bare plywood was in place for about 3 years before the drywall was applied, and the drywall was in place several weeks before the mudding was done. In a circa-1915 addition, drywall has been applied directly over the original wooden tongue-and-groove wall board (the old fashioned stuff about 1/2" X 3ý" with the fake groove down the middle, often used for wainscotting). The drywall was put up decades ago before I owned the house, and still shows no signs of cracking. The plywood is 3/8" unfinished both sides, like what is used for exterior sheathing, but applied to the interior sides of the studs over the plastic sheet. I won't rip it all down. Since these are only hairline cracks and some joints haven't cracked at all, I'll just go ahead and finish the drywall and paint over. If the cracks re-appear I'll live with them or if they become too objectionable, try covering with wall paper. Wall paper always did a pretty good job of hiding cracks in the original plaster; the only problem, we sometimes get silverfish and they love it. The only alternative would have been to re-do the plaster and lath work. The studs are irregularly spaced and too far apart (some as much as 2' 4") to support drywall directly over the bare studs. Right after the plaster and lath were removed, I tacked a test sheet of very heavy 5/8" drywall over the studs and sure enough, you could push on the sheet, and it didn't take a lot of force to actually see the wall move inwards. If the studs had been standard 16" o.c., two layers of 3/8" drywall would have worked perfectly. This house was built in the Civil War era using good heavy material, but the carpenters didn't do a very careful job of putting it together. I have even seen what appear to be splinters of old furniture used for shims in the framing. The original fasteners in the old part of the house are square cut nails and wooden pegs. Another thing, I ran a wood burning stove in the room all winter. I noticed that caused some hairline cracks to appear in the 150 y.o. mantel piece as well, even though the stove is far enough away from the wood according to the manufacturer's specifications. The rest of the house is heated with propane and electricity. But my original question still is, whether it might help to apply paper tape over the joints before adding the finishing coats of joint compound....See More245 Haldey Ave Oakwood Ohio
Comments (7)Sounds like a pretty typical inspection report for a home built in 1930. Seems to me that this wanna be buyer doesn't have a clue about old homes and thinks they are being cute by posting this report. For a price in the ballpark of 150,000-165,000, I'd think this is a very fine house!...See MoreGardening!
Comments (55)Skybird, I bought it in one of those terrible bare-root packages that are so popular in the spring. It went in in 2013...and nothing happened. I assumed it died underground. Much to my surprise, it emerged in fall of 2014...like a little bullet poking from he ground. And promptly turned brown at about an inch tall. Oh well. In spring 2015, it grew about 6 inches high, sort of like a little tuft of grassy leaves, not unlike liatris before it blooms, and stayed that way the whole summer, despite being mashed by hail in June. This spring, it emerged again like a bullet, but much thicker. The leaves grew 18-24 inches long, like straps about an inch wide. The flower head started to emerge in May, and quickly grew to about 48 inches in height, at the very top. Right now it still has all of it's foliage, and that might be because it is enmeshed in a large sweet marjoram plant that shelters the lower growth and sort of provides a living mulch. Yesterday, I noticed on Kipling Blvd between Alameda and Jewel, there are several plantings of foxtail in the center median that still have their foliage, and are blooming, but the leaves look brown about halfway down from the tips. I expect mine will brown up at some point during the bloom phase. I saw them years ago at Denver Botanic Gardens - they had hundreds of them in multiple colors, and I knew then when I bought my house they would be one of the first things on my list. Now that I've been successful...even though it took a while, I feel a bit more confident about planting more of them. My biggest fear right now is the hail. At this stage, it would be the end of that magnificent bloom! Thanks for your kind words, and best wishes for your foxtails!...See MoreLiving upstairs during the reno: how to minimize the dust?
Comments (32)The demo has started and I'm so relieved to report that we've been able to keep pretty much all of the dust out of our upstairs living area! Due to time and budget, we weren't able to put in place all of the controls I'd originally planned but here is what's working: Tape plastic sheeting over all doorways to/from construction area. The sheets of poly have been, by far, the most effective dust control we've put in place. VERY impressed with how simple and effective the poly sheeting has been! We used heavier poly for the areas that would see more traffic (e.g. over doorways, our fridge) and the light stuff for items that won't be touched (e.g. window coverings, furniture). Use zippers for doorways we still need access to. We also put one zipper wall at the bottom of the stairs and another at the top of the stairs. With that double layer I didn't have to cover up each bedroom door upstairs nor cover/pack up all our items upstairs... thank goodness!! Direct a fan outside to create a vacuum to pull dust out. This helps A LOT during very dusty work like demolishing our floor tile. I just used an old stand up fan that I no longer needed. Sweep and vacuum with a shop vac as often as possible. Pack up as many items as possible and cover/tape up anything that has to remain. So far our poly sheeting has held up very well. Even strong gusts haven't ripped them off the walls. It was very time consuming to put up but SOO worth it. We first applied painters tape to the walls/ceilings. Then we stuck the poly to the painters tape using contractor's "technical tape". Here in Canada the brand we use is Tuck Tape. I believe in the US Tyvek tape is equivalent? I hope this helps others also having to live in their reno....See More PRO
PROMark Bischak, Architect
7 years agohomechef59
7 years agoUser
7 years agomidwest gal
7 years agorprodgers
7 years agoschreibdave
7 years ago PRO
PROAnglophilia
7 years agoUser
7 years ago
Related Stories

PETSDealing With Pet Messes: An Animal Lover's Story
Cat and dog hair, tracked-in mud, scratched floors ... see how one pet guardian learned to cope and to focus on the love
Full Story
BUDGETING YOUR PROJECTConstruction Contracts: What to Know About Estimates vs. Bids
Understanding how contractors bill for services can help you keep costs down and your project on track
Full Story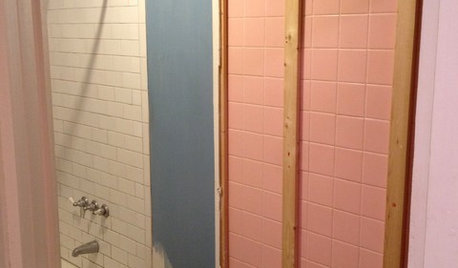
REMODELING GUIDES5 Ways DIY Remodels Get Derailed — and How to Deal
Keep your remodel on track by knowing the potential pitfalls ahead of time
Full Story
DESIGN DICTIONARYSteel Stud
This steely version of the wood stud can frame a home with a few extra benefits
Full Story0

GREEN BUILDINGInsulation Basics: Designing for Temperature Extremes in Any Season
Stay comfy during unpredictable weather — and prevent unexpected bills — by efficiently insulating and shading your home
Full Story
PETS15 Doggone-Good Tips for a Pet Washing Station
Turn a dreaded chore into an easier task with a handheld sprayer, an elevated sink or even a dedicated doggie tub
Full Story
DESIGN DETAILSThe Secret to Pocket Doors' Success
Pocket doors can be genius solutions for all kinds of rooms — but it’s the hardware that makes all the difference. See why
Full Story
MATERIALSRaw Materials Revealed: Drywall Basics
Learn about the different sizes and types of this construction material for walls, plus which kinds work best for which rooms
Full Story
REMODELING GUIDESBathroom Workbook: How Much Does a Bathroom Remodel Cost?
Learn what features to expect for $3,000 to $100,000-plus, to help you plan your bathroom remodel
Full Story
ORGANIZINGSmall Steps to Organizing Success
Take care of bite-size projects, and your home's big picture will be an organized dream before you know it
Full StorySponsored
More Discussions


just_janni