Last June I had lived in my ”new to me” little house for nearly a year and I was ready to embark on a full kitchen renovation. The old kitchen was pretty ugly with a drop ceiling, brown paneling, old inefficient appliances, and an unattractive, unusable chimney along one wall. Commence Pinterest board obsessions turned vision board!
I knew enough to be scared of what the hell I was getting myself into so I started thinking about how to surround myself with those who could help me start in on — and more importantly, finish — a major project like a kitchen reno. Lucky for me I found a talented woman named Anna León based in Richmond: an artistic, intelligent, socially-aware designer who had a sweet and humble profile here on Houzz (@Haus of León). So I reached out with an intro. Much to my surprise she was interested! And available! We met up and came to a very reasonable arrangement where she would help consult me on design plans as needed, connect me to her network of contractors, and hook me up with her pro discounts. We were off!
Anna has a wonderful eye for design, she’s practical, and also helped push me out of my comfort zone to take a few risks from time to time in a way that helped level up my original vision. Exactly what I needed.
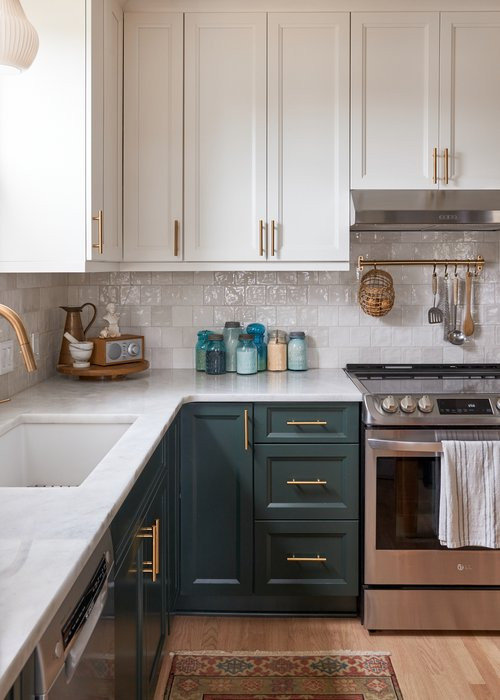
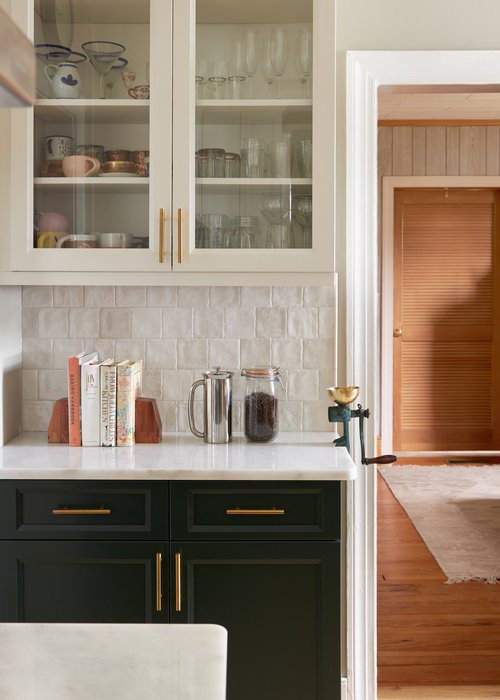
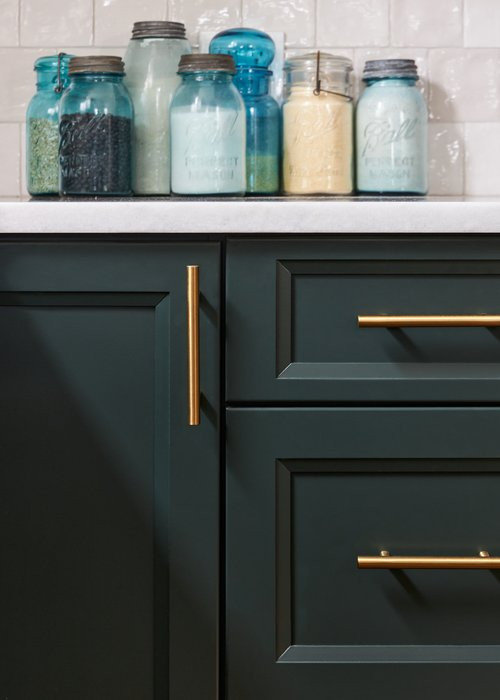
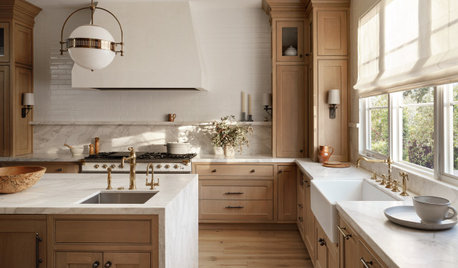
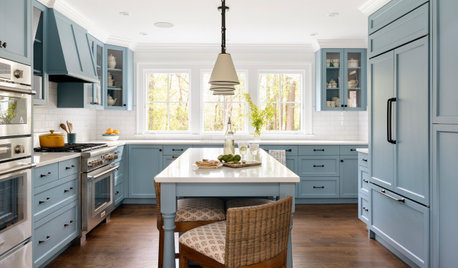
I was also introduced to a local cabinet installer named Jason (@SMITHBUILT) from my co-worker. The three of us went over a variety of layouts and finally came up with our plan and built out the cabinet layout. I selected semi-custom painted cabinets with a soft close made in Elkins, WV, from a company called Siteline Cabinetry. By November or December we had a plan and put them on order. We selected a “tavern green” for the lowers and a slightly off-white “opal” for the uppers with a few areas with glass fronts, but the rest being solid fronts.
In January I had everything lined up including a commitment from the contractor to start the job. Anna connected me to Ricardo Ramirez and his crew. I got a head start by moving literally everything out into other rooms of my already small house, setting up a temporary prep and cook space, and then ripping out the paneling, trim, and taking down the drop ceiling. My dad helped install a little utility sink in the laundry room to hold me over, and found a perfect new window at his local window factory outlet.
Next up came the chimney, floor and wall demo. The chimney was the original 1939 heat source but had no potential to be repurposed or used. So down it came! 🧱
All that was a huge mess but opened up the room to make space for a new layout, putting the range in the center of the kitchen and away from the mud room. I pulled off all the plaster from the walls (so dusty!!!) and then started pulling up the linoleum layers. The contractors with Ricardo’s crew scraped up the glued multi-layered flooring, and I began pulling literally hundreds (thousands?!) of nails and staples from the original wood floor (used to hold down the various layers of tiles and linoleum). The wood turned out not in great shape to use as the final floor plus I wanted a subfloor. But we still needed to remove all the staples and nails to get staged for new wood floorings, so I kept on, one staple at a time. 🔨
The little original window came out, and a large new opening was cut to place the new window. That immediately brought in much more light, and the space felt huge! 🪟 In addition, we fixed a funny situation with the mud room being 3-4 inches lower than the kitchen floor. So we raised the exterior door to the porch, and raised the mud room floor so we could run the final hardwood straight through from the kitchen, into the mud room, and have the step down occur onto the porch rather than into the mud room. (Before I lived here, there was an elderly man in a wheelchair so there was also a handicap ramp that spanned the kitchen floor to the exterior door and then down off the back porch. All that came out.)
Dad came in to rewire the kitchen which was a huge job. Original 1939 wiring (more to come on this for the remainder of the house!)! We added a new sub-panel, relocated the floor outlet for the new range location, set ceiling boxes for new pendant lights, new outlet locations all across the kitchen, prepped for a dishwasher (not present in the old kitchen), and planned for under-cabinet lighting (a tricky one, I discovered). Phew! ⚡️
Next up we were able to insulate the walls (there was zero insulation prior!), drywall the ceiling and walls, prime paint, prep the subfloor and lay down the red oak floorboards which had been acclimating for the past few weeks in my living room. This stage was transformative! It was finally looking like a new kitchen! It was light, bright, and clean. Part of me wanted to just preserve this stage as is. ✨
By the time we wrapped all this up, the cabinets were shipped and delivered directly from Elkins to my front door. We loaded them into my living room and they took up every bit of space in all the big boxes. But that was a short duration as they soon got installed by Jason’s and his brother (the SmithBuiltVA team). I was in awe of the precision and detail with this stage. Everything lined up as planned! I’ll admit when I stepped into the kitchen again I had a little moment of fear that I had chosen the wrong design with so many cabinets, lower and uppers. Contrasting with the feeling of openness when nothing was installed, this felt like it was starting to close in. But I relaxed and just reassured myself that we had a plan, and to trust the process.
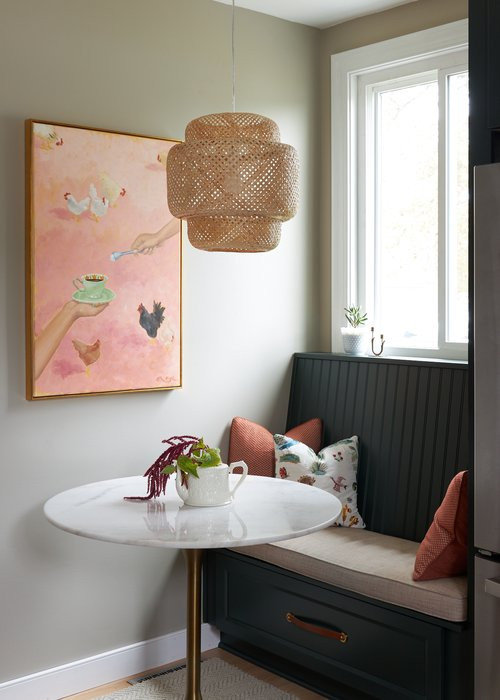
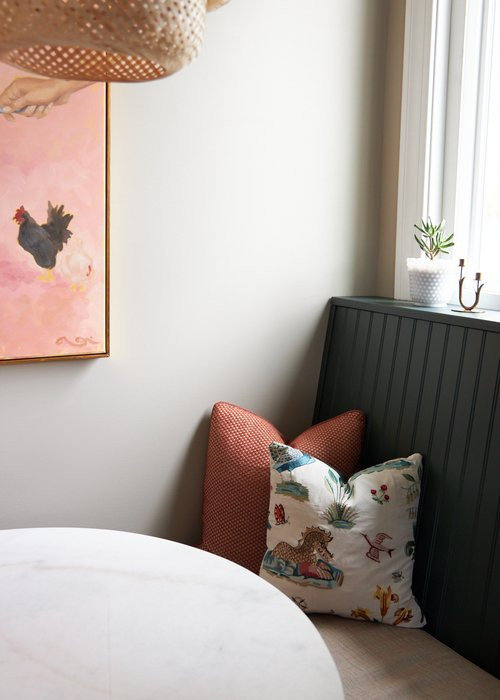
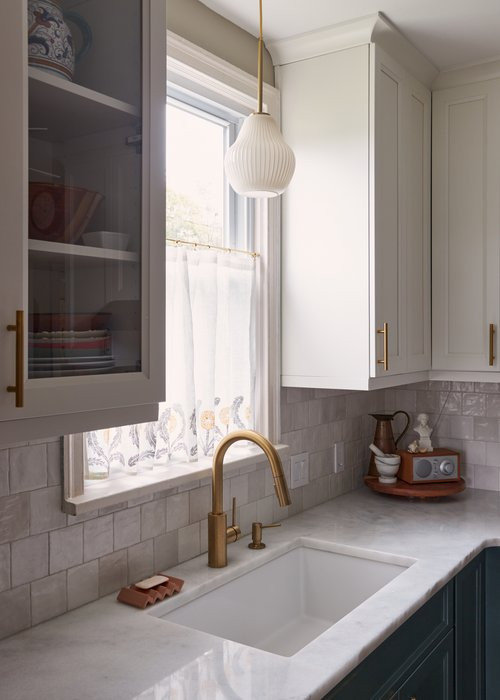
Jason set the sink as his final step, building a little structure in the cabinet to support the 75 pound under-mount fire clay sink. This meant the counters could get installed. Anna had found an incredibly beautiful and reasonably priced slab of marble at Classic Granite, and I had done the level of research on these counters to understand what I was choosing. They are natural, classic, beautiful, interesting (with light veining throughout) and will age (hopefully gracefully if I pay attention!). It reminds us of those amazing ancient kitchens in Italy that just get better with time. Did I mention it matches my round pedestal table for the nook? Once the counters were installed, and with the new large window in place, everything started to shine and look so fricken’ beautiful!! I couldn’t stop touching it and taking pictures!! Gah, I truly do feel lucky, #blessed, and like my hard work is truly paying off. Also, I fully recognize this privilege I have and so thankful for family and friends’ support!! 💜
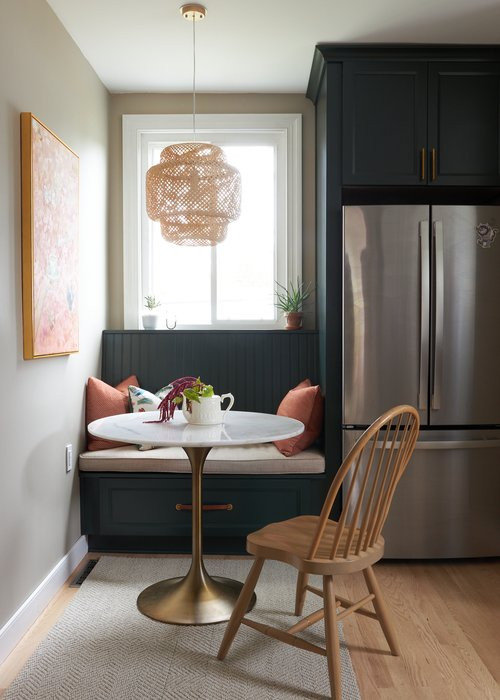
So — this brings us to the breakfast nook. This section of the kitchen design was so carefully planned and we went back and forth on an “L” shape vs a straight bench w/ space for chair seating. Ultimately went with the latter and honestly it’s the only layout that would have worked in this space with the fridge in the location we settled on. Anna again helped line up a carpenter she works with - John Charles of @undefined LLC. He built the only truly custom piece in the kitchen, which is the backrest component of the seating area. The seat section came from Siteline. But he also did a color match working with Benjamin Moore to match the tavern green. It looks so intentional and seamless! The angles are perfect and it’s the right depth at the window sill to hold a few plants and knick-knacks. 🪴
While I was ready to finish the electrical and plumbing, I held off on this stage for a bit. Not due to supply chain issues or budget, but rather to allow for Dad to heal after an incident that resulted in a cracked vertebrae. Everything had been going according to plan and I was very happy to have gotten to this stage. So a few more weeks of ordering takeout and cooking with a hotpot in my laundry room was no problem. Dad really wanted to finish the job with me and of course I wanted that too!
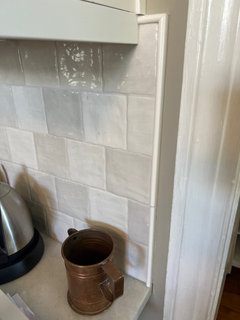
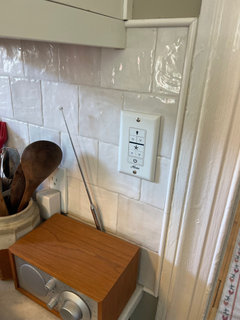
This gave us time to get the Moroccan-inspired tiles installed along the whole middle of the kitchen (filling the space between countertops and cabinets). Ricardo’s crew did this step, and Anna had consulted on the layout, tile choice, and grouting color. I chose the 4”x4” Riad tile from The Tile Shop with an alabaster greige grout. The tiles have a slight color/tone variation, they are slightly glossy, and have a moderate texture that makes them feel handmade, but without the sticker shock from truly handmade zellige tiles. We kept the grout spacing to a minimum, not using any spacers (or rather only when needed for alignment).
Once Dad’s doctors cleared him and he felt better to get back on the road and do certain tasks, he came for a long weekend.
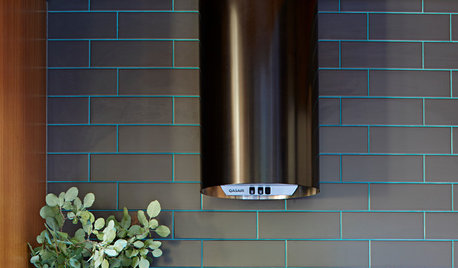
Together we installed the dishwasher (a small but quiet 18” unit) plumbed the sink and installed the faucet and garbage disposal, installed the range hood fan (with venting out through the area where the chimney was), two new pendant lights, assembled and installed the ceiling fan/light unit, wired the new outlets and light switches, and figured out the surprisingly tricky under cabinet lighting setup. Dang, I learned a TON about electrical work and I’m so humbled by what Dad and other electricians do on a daily basis! I have no idea what the phase would have cost, but I’m sure we saved thousands of dollars in labor costs. Plus I got to learn more about electrical and plumbing services and do a long project with my Dad! 👨🏻🔧👩🏻🔧
Are you still with me? 😂 As they say, we shall persevere. Have I mentioned I have a full time job and two bouncy dogs to take care of? It’s been a year, y’all.
Onward, to wall painting. I chose a velvety neutral “greige” wall paint called Pashmina by Benjamin Moore in a flat matte sheen. I love it so much! It’s a warm grayish-beige but has a hint of purple and a hint of sage green, whatever it is I think it goes perfectly with not only the kitchen cabinets and dark green, but also ties in the kitchen with the rest of the house which has a light grayish-beige wall paneling. It actually makes it all line up! I no longer see the greige wall paneling with disdain. It all makes sense. Ding ding! 🛎
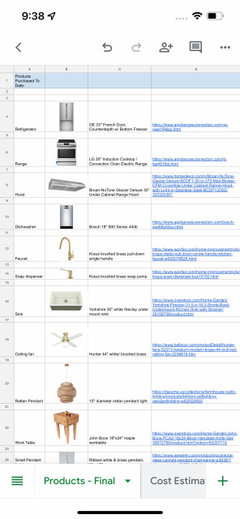
Ricardo’s crew came back to finish the floors, install the trim, and install the range. My range is an all-electric induction stove by LG with an oven that has multiple bake options including convection, roasting, and conventional bake mode. I love the tactile knobs (I’m old school and don’t love beeping buttons). The only regret I have is that now these units qualify for a healthy appliance rebate through US DOE and the federal Inflation Reduction Act. Soon available to you and yours! But that was a small price to pay for me to keep this all on scheduled, and I didn’t have a crystal ball to forecast Senator Joe Manchin’s political shenanigans 😂
So! What’s left? Finishing touches!! To me, finishing touches meant soft-goods, art and layout. Sounds easy peasy, right? Yes! But wow these last steps all add up in cost. In hindsight I really underestimated the cost of this phase when writing out my budget line-items. But, I have no regrets in what I selected.
First, the rugs. I looked and looked and looked and kept coming back to a wool, vintage-inspired, hand-knotted rug from Rejuvenation (a company with Portland roots), called Langdon. This is one of the few companies that offers a small runner rug in the 2.5’x6’ size that’s actually made of natural materials. The size is exactly what fits in my space, not too big, not too small. I love the colors and design of the Langdon rug, it is cushy enough to stand on at the sink, and truly hides dirt. It’s easy to spot clean, and thick enough to run a vacuum across without getting pulled around. Highly recommend! It was a bit of a splurge in my opinion, but it’s something I appreciate every single day. With a rug pad, it doesn’t slip around and gives an extra bit of cushion. Check out their line of rugs! No, I’m not sponsored to say this. Another bonus of working with Anna and her crew at Haus of Leon, she passed along her pro discount and took care of ordering the product. Bonus!
For the breakfast nook, the soft goods included the bench seat cushion and cushion cover, a variety of pillows, and another smaller rug to stay cozy at the table. Each of these ended up being custom, or semi-custom in the case of the rug. Starting with the rug, Anna reminded me about Flor — a sustainable carpet tile company founded by Ray Anderson that I remembered learning about in the early 2000’s which helped launch the field of corporate sustainability. I hadn’t realized they were doing residential product design! This presented a highly affordable and customizable rug option in a space that has unique size requirements. With Flor tiles, you can select from dozens of colors and patterns and create an online layout using square carpet tiles and smaller slices to create the shape and size needed. Talk about going down the rabbit hole of options! So I ordered samples and started playing with colors and patterns and shapes. For less than $150, I ended up with a perfect solution in a custom size that also feels great to rest feet on. And the dogs love laying on it too, sometimes right at my feet. I chose “Suit Yourself” in Linen, a subtle chevron textured pattern in a neutral color to not compete with the Langdon rug nor the colorful pillows.
For the built-in seat cushion, I selected a durable commercial upholstery that Anna had in her sample library: Architex Nonchalant in Lilac. This isn’t something I could have accessed on my own, only pro designers like Anna could order something like this. It’s very durable, has an interesting color and design, subtle yet unique. Shoutout to Bob McRae who made the cushions and sewed the covers! He does great work. 👍
For the pillow covers, I took a few trips to U-Fab and came home with hands full of samples to play around with. After the rug arrived, I was really able to see it come together. I chose a combination of rusty-dusty-coral colors in a variety of textures. Two matching pillows use a solid back and a small graphic pattern so they can be flipped around in different combinations. The other two pillows add a pop of design, one with a green corduroy back paired with a spare sample Anna had from Schumacher in a super fun yet classic “Royal Silk Embroidery” pattern featuring a dragon that I swear is my dog Timber’s ancestor lol 😂. Anna gave this to me at no charge (it was a sample), but we joked about how much the pillow would actually retail for… this fabric costs around $1,200 per yard!!! 🙀😭 ☠️ We resourceful 😉
Fun fact: What Makes It Special (from Schumacher):
“In 1599, Nicholas Hilliard painted an iconic portrait of Queen Elizabeth I wearing an intricately embellished gown, a gift from Bess of Hardwick that demonstrated her unwavering support of the Queen. It is that gown that was the inspiration for Royal Silk Embroidery, the debut design in our Schumacher Masterpieces collection, which focuses on creating the most rarefied patterns in an effort to support age-old techniques. With its lavishly embroidered mythical sea creatures, exotic flora and fanciful birds—each painstakingly hand-stitched on a fine pearl-hued silk-linen ground—the fabric captures the elegance and eccentricity of the original dress. Remarkably, it takes a team of 25 artisans—including weavers, dyers, embroiderers and more—a total of 30 weeks to produce just 100 yards of this exquisite fabric that contains 58 distinct, hand-dyed colors. We think it’s still a design fit for a queen!”
(link here: https://fschumacher.com/catalog/products/79690)
I digress…
Another detail that I carefully researched and selected is the hardwood floor and wood finish. I knew I absolutely didn’t want vinyl. Full stop. Nor tile or luxury vinyl tile. I had originally considered Marmoleum tiles from Portland’s Green Building Supply. Marmoleum is naturally derived from linseed, and comes in a variety of color and installation options. But ultimately I chose painted cabinets (in two colors) and therefore went for a more simple wood finish. I also thought it would stay in line with the rest of the house, and doesn’t break up the space too much. A classic black and white tile pattern or colored floor could work well in some designs and I love the look, but it wasn’t right for this house, or with these cabinets.
So, for the flooring I ended up selecting 2 1/4” red oak floorboards from Southern Hardwoods with a Bona TrafficHD, Commercial Satin finish in Natural. This had very little off-gassing, and it was set within a day. Plus it’s super durable! It should prevent any kind of “orange” darkening, and it really goes with the rest of the kitchen. It even matches my chairs that I found at Class and Trash for $15 each! I’m sure the color will change or darken over time but it’s been a great floor so far, easy to clean, and minimal stretches from the dogs’ paws. Ricardo’s team did a great job with the floors.
Once the floors were finished and cured, and with the help from my Aunt and Uncle while they were in town, I moved into place the chunky solid-wood island made by John Boos, which I had found on sale. It’s the smallest size in this style, a mere 18”x24”. But it fits perfectly and gives me that extra bit of surface space for chopping, baking, or setting keys and a cup of coffee or a glass of wine. And I can still easily access the oven and dishwasher doors (thanks to some careful layout planning with Anna and Jason). ✔️
I’ve thought about where I could have saved money or done more myself, but honestly I think I truly struck the right balance. If I hadn’t found Anna, Jason, Ricardo and the others, along with my Dad’s help, I literally wouldn’t have made it past the first dreamy Pinterest board. I’d still be staring at ugly vinyl flooring and gross 1980s paneling. With Anna et al., we made progress! We kept on schedule! And (mostly) on budget! I still can’t believe that we didn’t have supply chain disruptions or COVID lockdowns or crazy surprising discoveries along the way. At each meeting (which we used sparingly to save my budget), I learned of new business developments Anna was taking. Hiring a project manager. A business and accounting manager. Taking on commercial clients! Yet she remained accessible, responsive, and affordable! She launched “Haus of León” and now has an amazing new website. Check out the profile of my project! The photos capture the spirit and practicalities of my kitchen beautifully.
Let me know if you have any questions! I’d love to hear what you think. 🤗
https://www.hausofleon.com/projects/bryan-park
Photography by Ethan Hickerson


 PRO
PRO


Jilly