


Rooting methods that work best for your soil and climate
strawchicago z5
2 years ago
last modified: 2 years ago
Featured Answer
Sort by:Oldest
Comments (39)

strawchicago z5
2 years agolast modified: last yearRelated Discussions
Best Method for Rooting Cuttings?
Comments (19)There are three terms you might benefit from understanding. "Dormant", "soft wood", "hard wood". Dormant in my climate means wood which is removed in late winter/early spring BEFORE the plant begins pushing foliage and flowers. Some years that period seems not to occur, most years, it does. Hard wood is the growth BENEATH that which has most recently flowered. Sometimes it has older foliage on it, others, it doesn't. Sometimes that can be "dormant". Soft wood are the most recent flowering stems, usually those which have recently shed their petals. Wrapping, or "The Burrito Method", traditionally works most successfully with dormant material, though it CAN work wtih hard wood cuttings under optimum conditions. Most often, methods such as the "baggie", "terarium", mist, etc., require soft wood material, that which has recently borne a flower after the bloom has fallen. Dormant and hard wood material is "harder", it won't wilt easily and is usually more durable against harsher conditions. Its buds are more "dormant", requiring more time to mature before being stimulated into growing. Soft wood wilts rather easily as it is "softer", more juvenile. It usually contains more readily available nutrients, hormones, auxins, etc. which push new foliage and flowers. Under ideal conditions, it can often root very quickly. When I volunteered at The Huntington Library, propagating for the sales and gardens, I used soft wood material under their mist propagation set up. A flowering stem which had recently shed its petals could root under the usual summer conditions in the mist table in seven to ten days. Hard wood took several weeks under mist. Hard wood and dormant cuttings over winter in the green houses required three to four months. What is optimum for you to use depends upon a wide range of variables. You can study suggestions from other climates for each method, but you have to experiment with them where you are to determine which works best for you and at what times of the year. A rose breeder friend in Rancho Mirage has his best success in November using soft wood, if that helps. Kim...See MoreRooting Cuttings - What's Your Method?
Comments (32)from my experience, the wicking quantity is more determined by the level of water in the container below that the length of the string. I have some of those huge plastic 'stuff' boxes that hold 10 1-gallon pots on top each. my strings are all pretty long but when the water level gets down to about 2 inches in the big containers, the wicking is greatly decreased. I start out with the containers about halfway filled, when it gets low, I have my hubby help and together we lift the top off with the pots on, then I empty and clean the container and add fresh water (about every two months or so)....See MoreWhat is the best method to root brugmansia?
Comments (9)I have been growing brumansia and I have great results with a lot of methods. CLICK HERE FOR A STEP BY STEP TUTORIAL ON BRUGMANSIA PROPAGATION usually put my cuttings in water. Make sure that you change your water every couple of days. I always use bottled water. If you get your water from a well, it is probably okay to use. The chlorine in town and county water can stunt the growth or kill your plant. You can take a container and fill it with perlite.You will need to poke holes in the bottom of the container, like a flower pot has. Next, you will need a pan that is larger in diameter that the bottom of the container that the perlite is in. sit the continer with the perlite in it in the pan. Fill the pan with water past the holes in your perlite container. This will allow the perlite to act as a wick and your plants will not rot. Stick your cuttings in the perlite alittle over half way. You can put some clear plastic over the set up or just the container with the cuttings in it. This will speed up the rooting process and it will also give you a better success rate. This is the way that you root tropical hibiscus (rosa senensis). They just take a little longer. I have included a link to my squidoo lens about brugmansia propagation. It has a tutorial with pictures on several ways to propagate brugmansia plants. It also has a lot of other helpful tips that will be helpful to you. Please leave a comment when you visit and sign the guest book. If you want me to research anything for you, or if you need help with something, just let me know what you need and I will create a Squidoo lens about that topic. I have a passion for writing, I like heplping people and I like to research things too. I would love to hear from you all. If you will sign my guest book and leave your email I will send you a free brugmansia cutting if you will handle the shipping. See Ya and Happy Gardening.!!!!!!!!!!JAMES COLEY Here is a link that might be useful: easy brugmansia propagation...See MoreBest rooting method of pelagoniums
Comments (3)I pot my Pelagonium geraniums in soiless mix. I have taken cuttings for years and I tried many methods but this is the best. This is how I do it--taken from my plant file TAKING GERANIUM CUTTINGS First you must make sure everything you use is very clean. Take your cuttings: With a sharp knife or razor blade cut a 4 or 5 inch piece from the growing tip, cutting just below a leaf. All roots and branches come from a leaf joint. Remove all but the top 3 or 4 leaves. Let your cuttings callus over--Lay them out somewhere on newspaper. Mine sit on my spare room floor. Let them sit for about 3 days or so. The leaves will look wilted and dead but they're not. The cut end will shrivel and dry. Letting them callus over and watching the water cuts down on blackleg a deadly fungal disease especially to cuttings. Now plant your cuttings. In a clean pail mix your soil with the water so you make sure the soil is damp right through. Use a soiless mix like pro mix or one that is formulated for seeds and cuttings. Just make sure it has no fertilizer in it. You want the soil wet but not too wet. Squeeze a handful and some moisture should come out but not a lot. Fill your pots and make a little hole in the center with your finger or something else that will make a small hole. Dip about 1/2 inch of the cut end in rooting hormone. It comes in powder or gel, either is OK as long as it's for soft wood cuttings. I use Stim-root NO. 1. After it's dipped put it in the hole and cover it in, and you're done. Keep the soil moist but not overly wet and make sure they have enough light--Mine go under grow lights with a humidity dome. They will look wilted at first but that will change as it starts to grow roots. You will know it's rooted when it starts to show new growth. If you are going to plant it outside, wait until it is rooted well before you set it out. Using this method I still lost some but it did cut down on the losses. A few years ago I decided to use a heat mat under my cuttings and it worked wonderfully well. I only lost 1. Now I do it all the time with great sucess. When new growth starts to show remove them from the heat mat...See Morestrawchicago z5
2 years agolast modified: 2 years agostrawchicago z5
2 years ago
ann beck 8a ruralish WA
2 years agolast modified: 2 years agostrawchicago z5 thanked ann beck 8a ruralish WAstrawchicago z5
2 years agostrawchicago z5
last yearstrawchicago z5
last yearstrawchicago z5
last yearlast modified: last yearstrawchicago z5
last year
Vaporvac Z6-OhioRiverValley
last yearlast modified: last yearstrawchicago z5 thanked Vaporvac Z6-OhioRiverValleystrawchicago z5
last yearlast modified: last yearstrawchicago z5
last yearstrawchicago z5
last yearstrawchicago z5
last yearlast modified: last yearstrawchicago z5
last yearlast modified: last yearstrawchicago z5
last yearlast modified: last yearstrawchicago z5
last yearlast modified: last yearstrawchicago z5
last yearlast modified: last yearstrawchicago z5
last yearlast modified: last yearstrawchicago z5
last yearlast modified: last yearstrawchicago z5
5 months agostrawchicago z5
27 days agostrawchicago z5
13 days agolast modified: 13 days ago


Related Stories
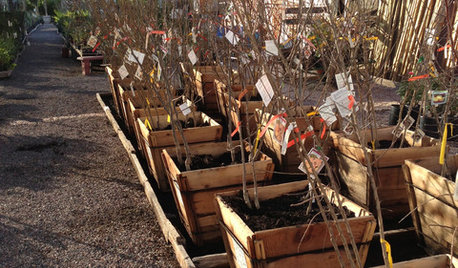
GARDENING GUIDESThe Beauty of Bare-Root Plants
Plant dormant trees and shrubs in fall using the easy, affordable bare-root method and enjoy beautiful results in spring
Full Story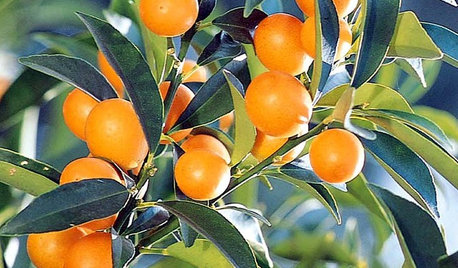
GARDENING GUIDES7 Fall Beauties for Mild-Climate Container Gardens
We're talking long-term relationship: These showy shrubs will bring color to your container garden autumn after autumn
Full Story
ARTThe Beauty of Bonsai — Living Art, Rooted in Harmony
Create your own emblem of nature's balance with an art form dating back 1,000 years
Full Story
MODERN ARCHITECTURERoots of Style: International Style Celebrates Pure Form
Using technology and materials of the time, International style is always current. See its expression in these 16 homes around the world
Full Story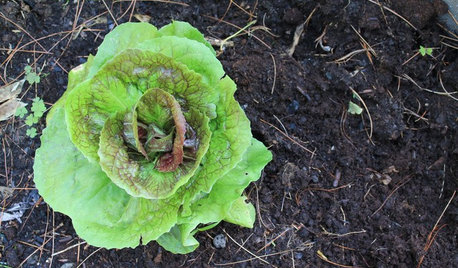
FARM YOUR YARDHow to Get Good Soil for Your Edible Garden
The nutrients in your soil feed the plants that feed you. Here are tips on getting it right — just in time for planting season
Full Story
GARDENING GUIDESHow to Stop Worrying and Start Loving Clay Soil
Clay has many more benefits than you might imagine
Full Story
GARDENING GUIDESGardening Solutions for Heavy Clay Soils
What’s a gardener to do with soil that’s easily compacted and has poor drainage? Find out here
Full Story
GREEN BUILDINGLiving Roofs Put Down Roots
No longer solely the domain of hippies — or hobbits — a green roof can be a hardworking partner in making your house sustainable
Full Story
GARDENING GUIDES7 Bulbs That Flourish in Mild Climates
Fall planting: For gardens that don't see harsh winters, different guidelines for choosing and planting spring-blooming bulbs apply
Full Story
WINTER GARDENINGHow to Plant Bare-Root Roses
Late winter or early spring is a great time to put new roses into the ground
Full Story


strawchicago z5Original Author