


Issue with bathroom floor tile one year after remodel
Renee Martin - IQ0JA
3 years ago
Featured Answer
Sort by:Oldest
Comments (8)

Renee Martin - IQ0JA
3 years agoRelated Discussions
Need help with bathroom remodeling grout issue..
Comments (11)What a mess. Sorry for your troubles, these things just shouldn't happen. Here's what I advise you to do: Write down the original problem, then each blunder that followed. Have it ready in an email. No emotion. Just the details. 1) This is what we ordered. 2) This is what was installed. 3) This was the problem with the installation. 4) This is what was done in an attempt to repair the problem (vinegar, stain, paint). 5) Is there a way to repair what has been done so we can have what we wanted in Step 1)? 6) If there isn't, what is the best course of repair so you can be made whole? (Full grout removal and replacement?) 7) Is their an alternative course of repair? (Mask it with Aquamix Grout Colorant?) Now one thing, you certainly don't want to use the AquaMix colorant if you don't like any of the offered colors. Call Custom's tech department. Ask the tech for his email address and while you are on the phone, fire off the email to him so he has the details in writing. I've even emailed photos to techies whole on the phone with them. Have your discussion, and have the tech reply to you in writing via an email. If the tech can't assure you that repairs can be made to the grout "as is", then have him write that the only way to get a proper installation is for the grout to be removed and replaced. The goal is to get specific answers back from him in writing. Some tech guys can suffer from the "I don't know" syndrome, and it's fine if they do...but they still have to recommend a final course of action. The point-of-view I use when dealing with tech support is that if they can't assure me that everything is okay, well, then it's not okay. And if it's not okay, the best course of action is usually full removal and replacement. With it being replaced, then you know it's okay. Your do have a few choices. One would be to have the grout removed and then new grout installed. That would "make you whole" in terms of you getting the installation that you originally wanted. One of the risks with that is when removing the grout, sometimes the tile edges can get nicked here and there. Any damage to the tile can just make this whole experience sink further into the abyss. Small nicks to the tile might not be a huge issue if the tile is a through-body color tile, ie, the color of the "inside" of the tile is similar in color to the surface color. An alternative repair, and it is a "repair" versus "making you whole", can be attacked on two levels, but the overall "repair" is using a grout colorant over the grout you have. Not a grout stain, but an epoxy-based grout colorant. I don't use colorants often, but when I do it's Aquamix Grout Colorant. AquaMix is a product from Custom, so it'd be right up the tech's alley in terms of a product that he could recommend. But again, you have to like one of their offered colors to want to use the product. One level of repair depends on the "paint added to the grout". I'd get an answer from Custom Tech on this. Is the grout okay? Will the paint prevent the epoxy colorant from adhering to the grout, etc? Will the stain used create adherence issues? If the messed up grout is a concern, would a proper repair be for then to remove the polluted grout from those sections. Install new cementitious grout. Then the grout colorant can go over the entire floor? It's difficult because your proper repair is removal of the grout and installing new grout. But the nature of that repair can cause damage to the tile...and sure, damaged tiles can be pulled and replaced. But does your C/H have the ability to carry out a repair like that without causing more problems? Your interaction now is pretty much between you and your contractor/handyman. Sure, your tile guy did the installation. But once your C/H jumped in with the paint and stain, he sort of absolved the original tile guy of all his installation sins. The fact that your C/H followed bogus advice from the tile store versus calling the grout manufacturer's tech department for repair advice, that's all on your C/H. He can certainly blame the sales guy at the tile store for giving him bogus advice. But that's not a concern to you. Let the C/H argue with the sales guy about that. Only your C/H is a concern to you, he's the one you hired, he's the one who really buggered up the installation. He should have done what you're going to do...and what it says on every bag of grout to do...if you have problems, call tech support. Sorry for the wordy reply. This is one of those cases where I was interrupted by several phone calls while typing, etc...ramblin' man...oh yes oh yes oh yes...oh nooooo.... Custom Customer Support 800-272-8786 Custom Technical Services 800-282-8786 Good luck....See MoreBathroom Reveal, Thanks to the Bathroom and Remodel Forums! (pic
Comments (56)This old thread got revisited. @dani_m08 to answer the question about extra probe, I believe I ordered an extra one when I bought the set up. The probe wire is just setting in the junction box I think but honestly I cant remember. When I laid out the underfloor heating and the probe, I just ran another probe near the first probe, and it was then sealed into the floor self leveling compound as per instructions. then the end was just threaded into the wall like the one that would be live, and not connected, but just laying there in the box. Regarding the tile layout. I just decided to run it this way, after getting instructions on the 90Degree way, IIRC. The herringbone that I love is from my childhood and the side walks in my neighborhood that all ran at 45Degree. so that to me is herringbone. I know you posted on @sochi thread about her amazing bathroom and a wall mounted faucet. I would totally do it if I had the right sink for it. In my case I had made my sink out of soapstone and an integrated backsplash. The pictures of this bathroom reveal are no longer available because of the use of photo bucket, when it was Gardenweb. I did not keep my account with photo bucket. I'll add some of the reveal pictures so you can see the sink and floor. Regarding the sink there is no ledge for water to drip from my hands when using the faucet. The water drips right into the sink. In my other bathroom with a deck mounted faucet I am always wiping up drips and it is a nuisance. I much prefer the setup for this sink. Below: I love the flush finish from the faucet to the bottom of the sink. nothing drips on a counter or edge of a sink. Below: looking in from the doorway. Below: Here I am finishing up the sink. the backsplash was epoxied on as a separate piece. The whole soapstone install in the room took next to nothing to buy as they were all small pieces that I epoxied together with a 3 part stone epoxy. Below: this is the counter at the tub, and is in 2 long pieces but I was able to epoxy them together at there edges to make a wide slab for the top. All the soapstone was finished with a 60 grit sandpaper to be rough and this lovely soft tone of blue/green/gray/white. I did not oil it so this color tone would remain light. Below: If I recall correctly @sochi helped me decide on this Hubberton Forge Mirror. I have 3 different metals in this room, but they are all a cool silver to black color. Below: the center of this tower shares space with the kitchen on the other side of the wall. there is also some extra space that houses some electrical wiring. this is an old simple house. this bathroom was an add on when it got move to the farm in the 30s IIRC. The plumbing was all rearrange and some of the details that were orignially there I kept but updated it, such as this tower feature. The old one went and the carpenter did a wonderful job with this one. Below: This feature was another thing I kept from the old bathroom but flipped it from the other end and had the carpenter put drawers in it. Before it was a hell hole. things got lost and the build was soooo old and creapy I didn't like using it for storage. Now it is perfect for storage....See Morebathroom remodel permit issues
Comments (1)here's a suggestion, but remember, it is never very wise to design by e-mail or on the telephone - I can't really see what's there, and you may misconstrue my words. If the bathroom is quite small, you might be able to double the floor joists above so they are 48"oc instead of 16"oc. This is like framing a stair opening. If you currently have 2x8 floor joists this would add 7" of ceiling height in the middle. Then you would have to make sure your floor above was strong enough to span the 48", which might mean new 2" decking - so there I've lost you another inch... You also might be able to take out the floor above and frame it again with 2x6's 12"oc, or 2x4's 6"oc if the span is short enough. Your town might ask for an engineer's stamp for that. If you have walls on the floor above the bathroom, you might be able to hang the first floor from the walls over the bathroom area, instead of bearing on the floor joists. Then you would have no joists and more height. If you have 2x10 floor joists, 16"oc, consider 2x8"s 12"oc....See MoreI’m remodeling two kids/ guest Bathrooms for resale in a few years.m
Comments (7)A realtor told me that a light bathroom update will give you a better return than a gut job. Buyers will see a fresh, clean and bright bathroom without thinking “we’ve got to update this.” We kept our vanities in all 3 bathroom projects because the boxes were strong and there was no reason to demolish them. But the doors were in bad shape. So we had a local cabinet builder make us new doors and drawer fronts. Each bathroom got new doors and drawer fronts, sink, faucet, countertop with simple back and side splashes of counter material, lights, tp holder and towel ring, towel hooks or bar, shower curtain, some cute decor, small storage cabinet over toilet for TP, and re-painted. One bathroom got a new mirror. At that time we left the floors, tubs and showers alone. Good luck!...See MoreRenee Martin - IQ0JA
3 years agoRenee Martin - IQ0JA
3 years agoRenee Martin - IQ0JA
3 years ago
Related Stories
BATHROOM DESIGNFloor Tile Options for a Stylish Bathroom
From the countless choices of bathroom tile available, we focus on some of the best looks for the floor
Full Story
TILEBathroom Floor Tile: Glass Mosaic for a Luxurious Look
It's gorgeous. It's expensive. It's slippery when wet. Learn the pros, cons and costs of glass mosaic tile here
Full Story
BATHROOM DESIGNFloor-to-Ceiling Tile Takes Bathrooms Above and Beyond
Generous tile in a bathroom can bounce light, give the illusion of more space and provide a cohesive look
Full Story
BATHROOM MAKEOVERSBefore and After: 4 Bathroom Remodels in 91 to 102 Square Feet
Browse bathrooms with styles inspired by Tudor homes, inns, five-star hotels and spas
Full Story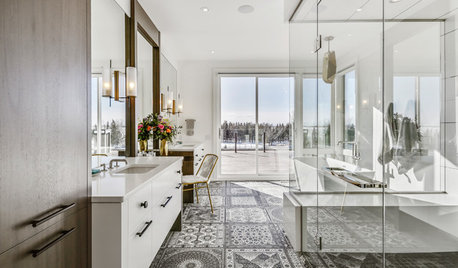
BATHROOM DESIGNNew This Week: 3 Bathrooms With Showstopping Floor Tile
Caution: These stunning tile collections might give you neck cramps from staring at the floor for too long
Full Story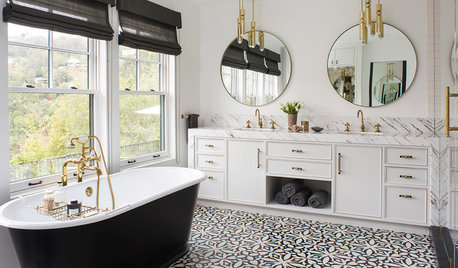
BATHROOM TILEDesigners Share Their Favorite Bathroom Floor Tiles
Wood-look porcelain, encaustic cement and hexagon tiles are making a splash in recent projects by these design pros
Full Story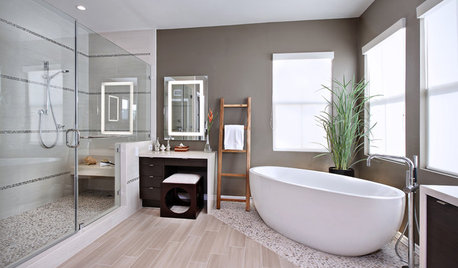
BATHROOM DESIGNGet Creative With Your Bathroom Floor Tile
Add movement, definition and interest to a humble bathroom floor by sidestepping uniform tile in favor of an unusual design
Full Story
KITCHEN MAKEOVERSBefore and After: 3 Remodeled Kitchens With a Vintage Vibe
A hand-painted hood, a brick fireplace and patterned porcelain tiles add classic charm to these renovated kitchens
Full Story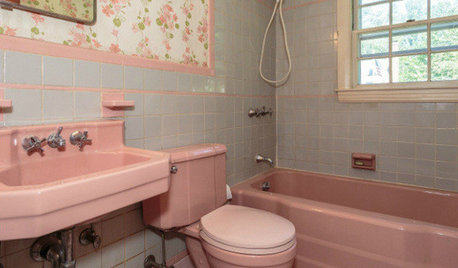
BATHROOM COLOR8 Ways to Spruce Up an Older Bathroom (Without Remodeling)
Mint tiles got you feeling blue? Don’t demolish — distract the eye by updating small details
Full Story
KITCHEN MAKEOVERSGreen Cabinets and Bold Tile for a Remodeled 1920 Kitchen
A designer blends classic details with bold elements to create a striking kitchen in a century-old Houston home
Full Story

Creative Tile Eastern CT