


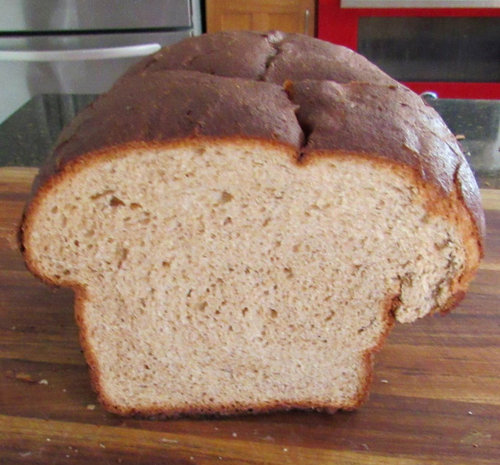
100% whole wheat bread
Lars
3 years ago
last modified: 3 years ago
Featured Answer
Sort by:Oldest
Comments (17)

Lars
3 years agoRelated Discussions
Grainlady, Your Whole Wheat Bread....
Comments (2)No trouble at all. I have to credit my dear friend Mildred with this recipe. I have a sponge setting as I type. -Grainlady 100% Whole Wheat Bread Bread Machine Recipe (changes for making it by-hand towards the end) Sponge: 3/4 c. lukewarm buttermilk (I use homemade kefir.) 3/4 c. lukewarm water 2-1/2 c. freshly-milled white whole wheat flour (Prairie Gold from Wheat Montana is my favorite wheat) 1/4 t. ascorbic acid* 2 t. SAF-Instant Yeast Mix these ingredients in the bread machine pan and set the machine to QUICK DOUGH. As soon as the mixture is well mixed, unplug the machine and allow to sit (with the lid closed) at least 2-1/2 hours or up to 12 hours (or something in-between - I usually use a 2-1/2 or 3-hour sponge, or overnight. You may want to extend this time if using hard red wheat flour to closer to 8-12 hours for a more mild flavor). After the sponge has set, with a soft spatula, mix these ingredients into the sponge: 2 T. melted coconut oil (or butter or veg. oil) 2 T. agave nectar (or honey) 1 egg (option: I also add 1/3-1/2 c. chia seed gel. **) Add to the top of the sponge mixture in the pan: 2-1/4 c. freshly-milled whole wheat flour 2 t. salt (on top the flour) Set the bread machine on regular DOUGH cycle and process. Check the dough to make sure it's formed into a nice soft ball and adjust the hydration as needed. Grainlady changes: I process the dough in the bread machine until the dough is mixed and kneaded. I don't let it raise in the machine. I place the dough in a dough rising bucket, place the lid on the top and allow the dough to rise ALMOST double. Whole wheat dough doesn't have the extensibility that white bread dough does, so try not to let it go more than double. Using a dough rising bucket helps you to accurately judge when dough has doubled. For this recipe a 2-quart container with a tight-fitting lid works perfectly. Back to original recipe: After the bread machine finishes the dough cycle (or has doubled in the dough rising bucket), dump the dough onto a Silpat. With oiled/greased hands, deflate the dough by pushing it in the middle with your fist then drawing all edges of the outside dough into the middle (turning the dough inside-out so to speak). Divide the dough into portions (I scale the dough for accuracy.) Round each portion (make it into a smooth ball) so that all the gluten strands are going into the same direction. Cover; allow to rest 10-15 minutes so the gluten relaxes. Form dough (with oiled hands), pan, cover with plastic wrap for the final proofing - etc.... Two loaves - 375F - for 20-25 minutes or until internal temperature of the loaves are between 190-200°F. I make this bread into 3 small loaves (7-1/2x3-1/2-inch pans - 350°F for 20-25 minutes ------------------------------------------------------ * ascorbic acid powder is available at most health food stores. It's a very important ingredient when you make bread that includes wheat germ, which is in whole wheat flour. There is a substance in wheat germ called Glutathione. This substance breaks down the gluten and can result in a short loaf. The bran in whole wheat bread can also cut the gluten strands which results in a short squatty loaf. The sponge helps to soften the bran. The addition of 1/8 t. ascorbic acid per loaf of bread will counteract the negative effects of Glutathione. It will help prevent the gluten bonds from breaking down and will also help repair gluten bonds that have been broken. The ascorbic acid also helps sustain the leavening of bread loaves during baking. Yeast grows longer and faster when there is also ascorbic acid. Do not add it to sourdough recipes because they are naturally an acidic atmosphere. ** Chia seed gel is a mixture of chia seeds and water (1 part chia seeds to 9 parts water or 1/3 c./2-oz. to 2-cups water). This mixture thickens as the seeds absorb the water and adds hydration to the crumb of the loaf and keeps the bread softer longer. It looks like poppy seeds in the bread after it's baked. Excellent nutritional boost and additional fiber. BY HAND, place sponge ingredients in a glass or plastic bowl and mix the sponge ingredients together with a Danish dough whisk (or a wooden spoon) and beat the ingredients about 100 strokes. Cover, and allow to sit at room temperature at least 2-1/2 hours. After the sponge is done: add the flour gradually to the sponge mixture using a Danish dough whisk (or wooden spoon) and carefully beat in each addition of flour before adding more. You may end up beating the dough 500-800 strokes, but do as much mixing as you have the strength to do. If you need to stop and rest, that's fine. The rest will allow the dough to hydrate. Towards the end of mixing, add the salt (DON'T FORGET!!!). The gluten will tighten up and make mixing harder after adding salt. The better job you do of mixing the dough and developing the gluten while it's in the bowl, the less time you'll need to knead it. When you knead the dough, avoid adding a lot of bench flour. If you have a problem adding too much flour during kneading, grease/oil your hands during kneading instead - especially during the last 2-3 minutes of kneading. Complete per recipe above... --------------------------------------------------------- The link below has a similar recipe: (scroll down the page to locate the recipe) Old-fashioned 100% Whole Wheat Bread (source: "The Bread Bible" by Beth Hensperger) -Grainlady...See MorePeter Reinhart Whole Wheat Bread (pics)
Comments (24)Lisa, bread baking is addictive although I don't do it as much anymore because we don't eat a ton of bread. Just wait until you decide you want to try a sourdough starter-I become completely obsessed and even asked my friend to "babysit" it when I went out of town. As far as baking it free form, I don't see any differences in instructions except scoring the loaf right before baking. There are instructions for hearth baking which include using a steam pan and baking stones/tiles. I don't have the patience for that so what I would probably do would be to place it on a baking stone covered with parchment and mist it lightly with water before baking. More experienced bakers will probably have better suggestions. Lisa, Instant yeast vs. regular yeast from the book: "instant yeast is recommended because it can be added directly to the dough. Active dry yeast will also work, but it must be hydrated in warm water before it is added." I believe instant yeast is the same thing as bread machine yeast. I buy my instant yeast in bulk packages from Sam's club. As for the water, I think the chlorine can be a factor so that's why they say to use spring or filtered water. Please let me know how yours turns out! It really was good bread-it's a little crumbly but not dry if that makes any sense and the flavor is awesome. No bitterness or heavy wheat taste. I don't know how much it affected the final flavor but I did use white wheat flour which is a lighter flour than traditional whole wheat. I really hope some of you guys try this and let us know how it turns out! Tracey...See Morewhole wheat bread
Comments (4)The crumb will be dense if you use a straight dough (aka direct dough) method for 100% whole wheat flour bread. This is the "modern" bread-making method designed for making bread quickly using processed bleached and unbleached flour, and is not a great choice for wholegrain breads. If this is your preferred method and you are making the bread by hand, make sure you do a good job mixing the flour into the liquid ingredients. I'd suggest a Danish Dough Whisk for this task, but a good wooden spoon will also work. Add the flour a little at a time and make sure it's mixed well before adding more flour. By mixing, I mean you beat it with the spoon 50 or more strokes before adding more flour. Add the flour until you don't have the strength to beat it anymore - you may have several hundred strokes invested in mixing. It's okay to take a rest during mixing. Letting the mixture sit will allow the dry ingredients to absorb moisture, so take a 5-minute rest if necessary. Taking care to mix the ingredients well will develop the gluten as well, and this is a step that is often rushed and done incorrectly. If you toss a shaggy mess of dough out to be kneaded, you haven't done a good job of mixing. You'll actually get better results with wholegrain flour if you use a sponge method. This is a method where the yeast, liquid and a portion of the flour are beaten together and allowed to sit anywhere from 30-minutes to overnight - experts say 2-1/2 hours is optimum. The bran has time to soften and soak up the liquid, and the gluten will also have time to develop without manipulation (kneading). Those sharp shards of bran will actually cut the gluten strands during kneading, resulting in short squatty loaves and dense crumb. There is also a substance in wheat germ called Glutathione that affects the gluten development. Adding an acid to the recipe (lemon juice, vinegar, ascorbic acid) will not only help prevent the gluten bonds from breaking down; but it will help repair gluten bonds. Soaking the flour in an acid medium (using whey, yogurt/kefir, buttermilk, vinegar or lemon juice) is another method. I suggest adding 1/8 t. ascorbic acid crystals per loaf of bread to the flour mixture (or half of a 250 mg vitamin C tablet crushed using two teaspoons, per 2-loaves). If you happen to have some Fruit Fresh on hand, you can use it as the acid ingredient. Only use an acid in bread made with baker's yeast, not naturally-leavened bread (those made with a starter - aka sourdough bread) because naturally-leavened breads are already acidic from fermentation. I've never found additional gluten necessary, even milling my own flour. The only time I added vital wheat gluten is if there was a very large percentage of low- or gluten-free flour in the recipe. I'd also suggest using a quality bread machine (and highly recommend a Zojirushi bread machine) for making dough. That's what they use in the King Arthur Test Kitchen for mixing and kneading bread dough, and they claim it's better than by-hand or with a stand mixer. Several years ago, King Arthur had pictures in their catalogue showing the difference between a 100% whole wheat recipe made in a stand mixer and the dough made in a Zojirushi Bread Machine and baked in a loaf pan. The one made in the Zo was about 1-inch taller than the same recipe made in a stand mixer. Stand mixers tend to aerate the dough, while the Zo does what it's designed to do, knead the dough. I'll include a link to Sue Greggs 2-Stage method, which includes more information. -Grainlady Here is a link that might be useful: Sue Gregg - 2-Stage Bread Method This post was edited by grainlady on Fri, Dec 6, 13 at 11:07...See MoreMy first whole wheat bread
Comments (17)This recipe was given to me by a dear friend, Mildred, from Arkansas. She got a similar recipe from Pleasant Hill Grain but wasn't happy with it, and together we "tweaked" it. This recipe is designed for a Zojirushi Bread Machine (make the dough only - not baked in the bread machine), but it will work if you want to make it by-hand. We call it "Mildred Bread" at our home, and there is a 3x5 recipe card with the ingredients safely taped to the bread machine. It's our everyday bread. I make loaves, dinner rolls, burger buns, hot dog buns, cinnamon rolls, etc. all from this same dough. Sometimes I'll make one 1-pound or 1-1/2-pound loaf and use the remaining amount of dough for rolls, cinnamon rolls, burger buns, etc.... This recipe is a bit wordy with explanations (that's the teacher in me from teaching so many bread classes ;-), but once you've made it, you'll be able to follow a 3x5 recipe card with the ingredients listed on it, like I do. CAUTION: Not all bread machines are capable of mixing 100% whole wheat bread dough, so check your user's manual. Enjoy, -Grainlady 100% WHOLE WHEAT BREAD Sponge: The night before, remove the bread machine pan and add the ingredients: 3/4 c. warm buttermilk (I use homemade kefir) 3/4 c. warm water 2\-1/2 c. freshly milled hard wheat (red or white) flour 1/4 t. ascorbic acid (if you don't have, or can't find, ascorbic acid, use Fruit Fresh \- but the acid is important!!!) 2 t. SAF\-Instant Yeast (I suggest SAF\-Instant Yeast and have never used anything else for this recipe) Place the pan into the bread machine and set on the Quick Dough setting and allow the ingredients to mix together well for a few minutes (you may need to scrape down any dry particles with a spatula), then turn the bread machine off (at the button, don't pull the plug or you risk damaging your bread machine computer). Shut the lid, and allow this mixture to set overnight. (If you are in a hurry, let the ingredients sponge for 1\-1/2 hours and then finish making the bread.) \*\*If making the recipe by hand, mix the ingredients well using a Danish Dough Whisk or a wooden spoon. Cover the bowl (using a shower cap, a Quick Cover, or a sheet of plastic wrap) and allow to sit on your counter at room temperature. If you have a dough\-rising bucket, use it for mixing the dough as well as for rising. After mixing in a dough\-rising bucket, snap on the lid and allow the sponge to sit on your counter. The next day (or anytime after 1\-1/2\-hours), remove the bread machine pan and add these ingredients to the sponge: 2 T. coconut oil (melted \- or use vegetable oil or melted butter) 2 T. honey or agave nectar 1 egg (I also add 1/3\-1/2 c. of chia seed gel, but that's optional.) On top of these ingredients in the bread machine pan add: 2\-1/4 c. freshly\-milled whole wheat flour 2 t. salt Place the pan back into the bread machine. Set bread machine to Quick Dough Cycle and start the machine. After it has been working for 5\-minutes, or so, be sure to check the hydration of the dough. You want a nice soft ball that is slightly sticky to\-the\-touch. It's better to err on the side of a wet dough than a stiff dry dough, so adjust the dough by adding more flour, or adding more water, if necessary. As soon as the dough has completed the kneading cycle (don't allow the dough to rise in the bread machine), turn the machine off. Remove the pan from the bread machine and dump the dough out onto a SILPAT (no flour necessary). With oiled hands so the dough doesn't stick, pat the dough into a dough\-rising bucket (I use a 2\-quart plastic food storage container that has graduated measurements on the side. I got the container at the local restaurant supply store, but you can find dough\-rising buckets at King Arthur Flour and elsewhere on\-line. I have them in three sizes for different amounts of dough.) Snap the lid on the dough\-rising bucket and allow it to rise until just under "double". (If the dough comes up to the 1\-quart line, it will be double when it reaches the 2\-quart line.) Check the rise after 20\-25\-minutes. It rises quickly if your kitchen is warm, and slower if your kitchen is cool. \*\*If making the dough by\-hand, add the 2 t. salt, 2 T. agave nectar (or honey) and egg to the sponge mixture, and then add enough of the 2\-1/4 c. of whole wheat flour to make a nice soft dough (add more flour than 2\-1/4 c., if necessary). Add the flour gradually \- a little at a time, and beat each addition of flour into the mixture before adding more. A Danish Dough Whisk is the perfect tool for this process (as well as stirring all batters and doughs), but a wooden spoon will also work well. If you do a good job of mixing, you won't need to spend as much time kneading. When making bread dough by\-hand, you need to spend a good deal of time beating the dough with the spoon or Danish Dough Whisk. You develop the gluten during the mixing, as well as during kneading. When you don't have the strength to mix it with a spoon anymore, place the dough on an oiled counter top and knead until the gluten has developed (6\-10 minutes). If you use an oiled counter top you won't have to add flour to the dough. By doing a good job of mixing, you will need only a little additional flour \- or none at all. If your dough is a shaggy sticky glob, you didn't do a good job of mixing. Oil your hands so they don't stick to the dough while handling it. Place dough in a dough\-rising bucket, snap on the lid, and allow the dough to rise until it's just below "double". Follow the remaining instructions... \-\-\-\-\-\-\-\-\-\-\-\- When the dough has doubled in bulk, you will need to take the lid off the dough\-rising bucket and punch it down. To do that, oil your hand and make a fist. GENTLY drive your fist through the center of the dough. Now grab the outer edge of the dough and pull it into the center hole. Do this all the way around. This moves the cooler outside dough to the inside (you have essentially turned the dough inside\-out.) This method degasses the dough and also redistributes the yeast throughout the dough. Place the dough out onto a SILPAT (a silicone mat). Handle the dough with oiled hands \- no flour necessary. If you are making more than one loaf from this dough, now is the time to scale it (weigh it on a kitchen scale), and divide the dough into equal portions. Round each portion. You round the dough by cupping both hands around the dough ball while it sits on the counter and gently pull the dough from the top to the bottom, moving it slightly each time you pull it down, until you have a nice, smooth ball of dough. A smooth ball of dough will get the gluten strands running in one direction and will hold in the gasses in. Cover the dough (I use a bowl or my dough rising bucket, or a sheet of plastic wrap) and allow it to rest for 10\-15\-minutes. This allows the gluten strands to relax. To form a loaf... With oiled hands, pat the dough out on the Silpat until it's about 1\-inch thick and the width of the pan you are going to use. Roll the dough up and pinch the seam closed. Tuck the ends under the bottom. Place the dough, seam side down, into a greased loaf pan/s and cover with plastic wrap. Allow it to double in bulk. Bake in a preheated 375 degrees F oven for about 25\-minutes, or until it's between 195\-200\-degrees F when you check it with an instant read thermometer....See MoreLars
3 years agoLars
3 years agoLars
3 years agolast modified: 3 years agoLars
3 years ago
Related Stories

KITCHEN DESIGNA Designer Shares Her Kitchen-Remodel Wish List
As part of a whole-house renovation, she’s making her dream list of kitchen amenities. What are your must-have features?
Full Story
KITCHEN DESIGNKitchen of the Week: A Sophisticated Take on 1920s Cottage Style
An Illinois designer embraces her 100-year-old home’s vintage look while incorporating modern features and finishes
Full Story
HOUZZ TVThis Light-Filled Tennessee Dream Home Was 40 Years in the Making
A retired couple used Houzz to find design professionals to help build a spacious home that can easily host 100
Full Story
KITCHEN DESIGNKitchen Accessory: The Breadbox
The breadbox — freestanding or built-in — still has a place in the modern kitchen
Full Story
LIFESimple Pleasures: The Joy of Baking
Fill your house with a heavenly scent and your heart with cheer by making time to bake
Full Story
FARMHOUSESWorld of Design: See How 9 Families Live and Farm on Their Land
Join us as we visit the homes and farms of passionate food producers and hear about rural life around the globe
Full Story
KITCHEN DESIGNHouzz Call: Tell Us About Your First Kitchen
Great or godforsaken? Ragtag or refined? We want to hear about your younger self’s cooking space
Full Story
HOUZZ TOURSHouzz TV: See a Modern Family Farmhouse That Can Pick Up and Move
In the latest episode of Houzz TV, watch California architect build a beautifully practical cabin to jumpstart his parents' new farm
Full Story
PETSHouzz Pets Survey: Who Rules the House — Dogs or Cats?
New data shows that pets make people happy, and pet owners love spending big to return the favor
Full Story
MOST POPULARDecorating 101: How Much Is This Going to Cost Me?
Learn what you might spend on DIY decorating, plus where it’s good to splurge or scrimp
Full Story
plllog