


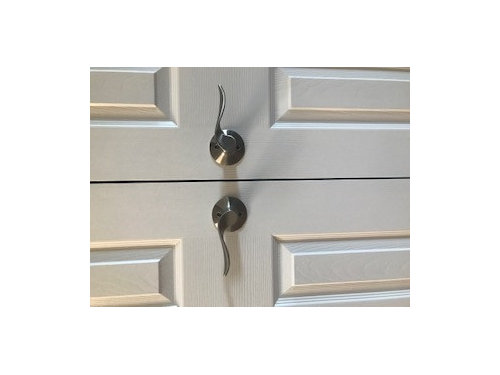
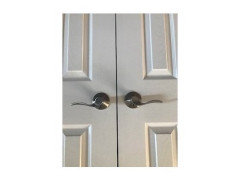
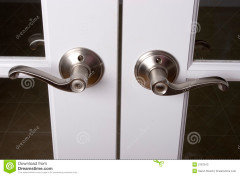
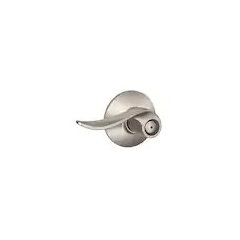
Door lever tips up or down
birdkkk
4 years ago
last modified: 4 years ago
Featured Answer
Sort by:Oldest
Comments (29)
Related Discussions
Marvin won't let me do a knob on 96' tall patio doors, only lever
Comments (13)With the multi-point locking systems, you have the bolt that extends out into the secondary door (or door frame if you only have 1 door) at the level of the handle, you have a smaller "bolt" that extends out of the top of the door into the upper door frame and one that extends out the bottom of the door into the sill. When the lock is engaged, all these bolts are sticking out. If someone engages the locks with the door open then tries to shut it, the bolts slam into the surrounding frame and damage it. Walk into just about any showroom with French doors on display and take a look at the frames (especially the upper frame). That was one of Pella's selling points was that their mechanism was made to push back into the door if the lock was engaged with the door open and you then tried to shut it. After it was shut, the locks slid back out of the door and into place within the frame & the door is locked with no damage to the surrounding frame, sill or adjacent door. If you're worried about not having a multi point system for security reasons, you can always do a regular deadbolt and slide bolts at the top & bottom. Typically the slide bolts will be much longer than the short little bolts on the integrated multi-point system for a higher level of security IMO. My thoughts on this is that its overkill--if an intruder wants in, he's going to find a way--odds are he will just break the glass and turn the locks whether multi-point or deadbolt. Plus deadbolts & slide bolts are easier to remember how to operate--there is usually a trick to engaging the multi-point lock system. I think with my Mom's doors you have to turn the lock a couple times then flip the lever up to engage the lock. Your secondary swing door of the French door set should bolt in place. That's the biggest part of how the primary swing door is secured when locked. Hope this helps!...See Moremany family pictures down narrow hallway--tips? suggestions?
Comments (26)Wow, Still lynski...you make a great point too! BTW-This is why I am awful on a jury. As the prosecution speaks, i am thinking "Fry the ba$tard!" Then the defense gets up and I think "OMG, this poor defendant has been framed!" If I hear good points and reasons, I can be easily swayed. Everyone here has made a GREAT point. I guess I have a lot to digest and think about. I love this forum because I have quickly learned my gut instinct/first choice is not always the correct way. Before the internet and forums like this I also learned my gut/first choice was wrong, but only through trial and error. This forum saves me from making the mistakes with my time and my money. anyway, Still lynski...you make a great suggestion about the groups, and also the "group in 3" rule. But I don't want it to look too contrived. Also, toward the end of the hall, I would need a runner (the 3rd/last runner) but there are a bunch of doors at the end of the hall...my master and guest bath on the right, and DD's room, guest room on the left. So, there would be no place to put pics down there. ahhh, so much to think about! lyban-WOW! see...I know that *I* love to look at family photos in someone's home. I can totally see why people would want to look at the walls of your hall! Ok, now tell me, and explain very slowly....how did you laminate on wood? I am not a crafty type of girl. Is this easy to do? Did you do it for any reason...as opposed to just framing? I am enjoying this thread and all the help. Thank you again...this is great fun for me!...See MoreYour lever style door knob ----
Comments (29)I have flair style ones. I bought them backwards, so they are all facing UP instead of down. I heard down was how they are supposed to go. There's a way to tell if you need a RH or LH one... stand within the door frame with your back to the hinge-side of the jamb, with the door open. If the door is open on your left, you have a left-handed door. If the door is open on your right, it is a right-handed door. Now if I'd of read that first.... but the guy told me the levers were okay no matter what (he lied apparently because it was an Ebay purchase). So now I have "up" facing levers unless I want to get all new ones. So far, nobody's noticed though? Does it really matter in the scheme of life? I'm letting this one slide! Oh and I have kwikset locks; you can push up or down on them. It doesn't matter. You will not need to think about it. You're brain will just do what is natural. An they are as comfortable as knobs. As for the person whose ripping pockets, I don't think anyone's had that problem here except for the robes on the back of the door. They will get caught on the levers. But the part about opening the doors easily with filled hands is true and the entire reason to get these types of knobs (other than aesthetics). This post was edited by dahoov2 on Tue, Dec 9, 14 at 1:40...See MoreFood Photo Tips: Part 9 - Setting Up a Tripod
Comments (0)Posted by canarybird (My Page) on Sat, Sep 5, 09 at 21:57 Food Photo Tips: Part 9 - How to set up a Tripod Hi again everyone. I'm back with another entry on how to use your digital camera for taking tabletop photos. Sorry my tutorial is a few days late this time. It's been a busy week over here. I wanted to give several camera tips today but once started on how to set up a tripod, I was carried away when creating the photos and diagrams, so it took longer than expected. As there are many photos, some may be small size, but all will expand with a mouse click. Setting up a tripod can be a little more confusing than one might first imagine. If you have tried it for the first time by turning all the knobs and flipping the locks, you may have ended up with legs that won't sit still and a top piece that hangs over and won't stay upright. Whatever you do, try these suggestions without a camera attached until you have got the hang of it. Here below is a typical entry level lightweight tripod, shown in its folded position. Total length is 14 inches, weight just under 2 pounds. Price around $75.00. Note that in this position the long handle, called the 'pan-handle' is bent downwards and the small crank handle is also folded down. First thing to do is lift up both to get them away from the legs (right). The next step is to flip up a leg locking lever (below left), and extend one leg fully, being sure all lower sections have snapped open: Close the leg lock lever and then do the same with the other two legs, being sure all sections are fully extended and the levers are locked: Only then should you open the three legs. Press the leg braces down and tighten the leg brace nut. Now the tripod is open, turn it so one leg is the leading leg in front of the camera and the other two legs are on either side of you, so you are standing in the space between them. Attaching the camera to the tripod: Two ways to attach the camera to the tripod are 1. by a screw on the tripod head which screws up into the base of the camera or 2. the quick-release plate, which comes in different forms, but is a fast way to put on and take off your camera from the tripod. The tripod I show here has a quick-release plate, which once screwed to the bottom of the camera, will enable the camera to be snapped into place on the quick-release platform of the tripod head by opening the lever. Here below is a camera, the quick-release plate with its screw and a small coin. The coin is used to turn the screw, attaching the plate to the camera. Here is the plate affixed to the bottom of the camera, and showing how to open the quick release lever: By holding open the quick-release lever with one hand, you can slip the camera with the attached plate into the platform, and then press the lever closed: By loosening the side tilt locking nut, you can then lift up the platform and your camera is ready to operate in a vertical position: When you were first setting up your tripod, after extending the legs, you may have found the head is pointing in the wrong direction. If the tripod head is pointing in the wrong direction, you need to loosen the panning lock nut and swivel the head until it is pointing forward and the pan-handle is at your left hand. The following examples are with the legs withdrawn so the tripod is shorter and can be used on a table: Panning or turning around the tripod head Here you see that with the panning lock nut loosened, you are able to swivel the tripod head around. You can also tilt the head down by turning the pan-handle a little as though it were a screwdriver which will release the tilt up/down of the head. When you have the right angle for your photo, turn the pan-handle in the opposite direction to tighten the head at the chosen position: Here are the names of the parts of this tripod, and the parts of the tripod head. Remember you can enlarge each photo with a mouse click: Tabletop Tripod Here is a small but sturdy tabletop tripod which I sometimes use. The legs will extend another 1 1/2 inches by twisting the black locks, and the central column may be raised by loosening the centre twist lock. This tripod has both pan and tilt functions and uses a screw head to fasten it to the bottom of the camera. Well I hope this will be a useful guide if you are using a tripod for the first time. It is always advisable to practise setting up the tripod a few times without your camera attached just in case you are unlucky enough to have it fall over. Set it up on a firm, level ground or floor and check that all levers are locked. If indoors be careful that small children or animals won't be tripping over the legs. I hope you understand all and if you have questions please ask here or PM me. So thanks for joining me. I'll be uploading the next installment soon. And please feel free to save the pages on your computer. Next time I'll show a little about photographing silverware, the flash menu and self-timer. Sharon (Canarybird) :-) (All text and photos copyrighted) Free for personal, non-commercial use Follow-Up Postings: o RE: Food Photo Tips: Part 9 - Setting Up a Tripod clip this post email this post what is this? see most clipped and recent clippings * Posted by publickman (My Page) on Mon, Nov 2, 09 at 2:38 Kevin has a tabletop tripod similar to the one you pictures, and he also has a unipod, which I have not used. We used the tabletop tripod for the Spanokopita demonstration, which you may recall. Lars o RE: Food Photo Tips: Part 9 - Setting Up a Tripod clip this post email this post what is this? see most clipped and recent clippings * Posted by canarybird (My Page) on Mon, Nov 2, 09 at 5:21 I love that little tabletop tripod although it's not been as useful to me as a floor length model. I've never had a unipod or monopod and I think they're best for crowded places where tripods are too bulky, such as sporting events where support is needed for heavy long lenses. The spanokopita demo was great but the camera seemed to be hand held. I think you were using the tabletop tripod in your demo of making little chocolates way back when. I've forgotten their exact name but they looked good. o RE: Food Photo Tips: Part 9 - Setting Up a Tripod clip this post email this post what is this? see most clipped and recent clippings * Posted by publickman (My Page) on Wed, Nov 4, 09 at 2:28 You're right - Gina was holding the camera for that video, as you can tell from her voice, which is the most prominent. I have a lot of raw video with other demonstrations that I have not had time to get around to editing yet. I don't even have my sewing room completely organized yet for video editing, although the computer I use for video editing is already set up there - along with two sewing machines, which have been getting a lot of use lately. When I finish making all the drapes, curtains, pillows, and cushions that I need, I will convert the room to a video editing room. Unfortunately, it is too small to be both simultaneously. I'm still in the process of settling in, and I guess it's going to take a full year. Lars o RE: Food Photo Tips: Part 9 - Setting Up a Tripod clip this post email this post what is this? see most clipped and recent clippings * Posted by canarybird (My Page) on Fri, Nov 6, 09 at 11:32 Making home videos is another field that interests me. But I have only an old two ton Sony video recorder that uses tapes. One day I hope to get a little HD digital video camera for using outdoors especially for recording birds, beach and nature. A dedicated room sounds like a great idea. SharonCb...See More
birdkkk
4 years agolast modified: 4 years ago
Brown Dog
4 years agorgrindrod
4 years ago
Ashley Nichols
4 years agoEphma
4 years agobirdkkk
4 years agobirdkkk
4 years ago
Bhouse
4 years agoUser
4 years ago PRO
PROBeth H. :
4 years agolast modified: 4 years agobirdkkk
4 years ago PRO
PROJAN MOYER
4 years agoUser
4 years ago
millworkman
4 years agobirdkkk
4 years agolast modified: 4 years agorgrindrod
4 years agoblmckenz
4 years agomarzo
3 years agolast modified: 3 years agogemgal33
2 years agorichandres1
last year
Micah Crump
7 months agoMicah Crump
7 months agoAnne Duke
7 months ago
acm
7 months ago

Related Stories

MOST POPULAR5 Ways to Pare Down Your Stuff — Before It Gets in the Door
Want to free up some room around the house? Rethink gift giving, give yourself a shopping mantra and just say, ‘No, thank you’ to freebies
Full Story
HEALTHY HOME10 Keep-the-Dust-Down Cleaning Tips for Allergy Sufferers
These cleaning and decorating tips will help keep everyone breathing easy at home
Full Story
LIFESlow Down and Ease Up: A Sanity-Saving Approach to Life
Why not take the pressure off and live a little more consciously in 2017? The challenging goals can wait
Full Story
KITCHEN DESIGNKitchen of the Week: Paring Down and Styling Up in a Pennsylvania Tudor
Nixing cabinetry, reducing counter space and limiting items gives a Bryn Mawr kitchen streamlined simplicity
Full Story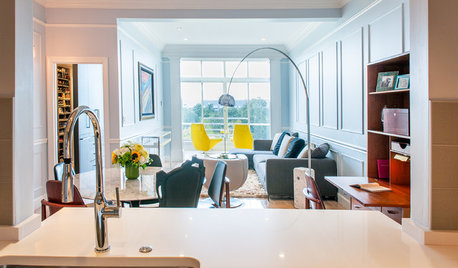
DECORATING GUIDESHouzz Tour: Couple Pares Down and Pumps Up the Style
A big transition from a large suburban house to a 1,200-square-foot urban condo is eased by good design
Full Story
LIFEMorning Nook Tips for Sleepyheads to Get-Up-and-Goers
Whether you whack the snooze button or spring out of bed, these ideas can help you create a refreshing space that helps you on your way
Full Story
HOUZZ TOURSHouzz Tour: Sliding Doors Open Up a Small Space in New York City
A wall teardown and custom treatments add more options for living and entertaining in a 450-square-foot apartment
Full Story
DECORATING GUIDESExpert Talk: Designers Open Up About Closet Doors
Closet doors are often an afterthought, but these pros show how they can enrich a home's interior design
Full Story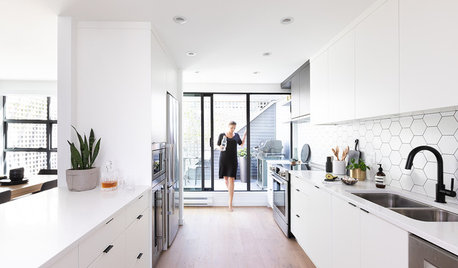
KITCHEN MAKEOVERSBefore and After: A Kitchen Opens Up and Brightens Up
Removing a wall in the kitchen and faux brick in the dining room makes way for improved style and a better layout
Full Story
ORGANIZING21 Tips for Organizing Your Stuff
Restore order at home with these ideas for tidying up cupboards, shelves, doors and more
Full Story

Lynne Om (9A, New Smyrna Beach,FL)