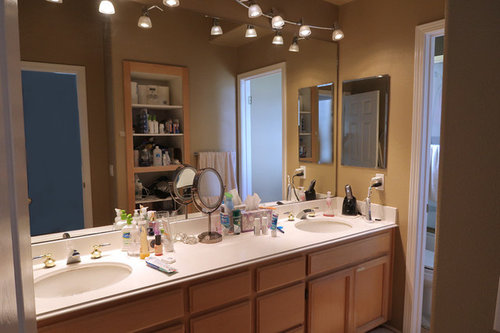
Bathroom and Cabinet Repaint with BM Advance and Regal Select
funwithpaint
7 years ago
Featured Answer
Sort by:Oldest
Comments (6)
paintguy22
7 years agofunwithpaint
7 years agoRelated Discussions
Bathroom Reveal, Thanks to the Bathroom and Remodel Forums! (pic
Comments (56)This old thread got revisited. @dani_m08 to answer the question about extra probe, I believe I ordered an extra one when I bought the set up. The probe wire is just setting in the junction box I think but honestly I cant remember. When I laid out the underfloor heating and the probe, I just ran another probe near the first probe, and it was then sealed into the floor self leveling compound as per instructions. then the end was just threaded into the wall like the one that would be live, and not connected, but just laying there in the box. Regarding the tile layout. I just decided to run it this way, after getting instructions on the 90Degree way, IIRC. The herringbone that I love is from my childhood and the side walks in my neighborhood that all ran at 45Degree. so that to me is herringbone. I know you posted on @sochi thread about her amazing bathroom and a wall mounted faucet. I would totally do it if I had the right sink for it. In my case I had made my sink out of soapstone and an integrated backsplash. The pictures of this bathroom reveal are no longer available because of the use of photo bucket, when it was Gardenweb. I did not keep my account with photo bucket. I'll add some of the reveal pictures so you can see the sink and floor. Regarding the sink there is no ledge for water to drip from my hands when using the faucet. The water drips right into the sink. In my other bathroom with a deck mounted faucet I am always wiping up drips and it is a nuisance. I much prefer the setup for this sink. Below: I love the flush finish from the faucet to the bottom of the sink. nothing drips on a counter or edge of a sink. Below: looking in from the doorway. Below: Here I am finishing up the sink. the backsplash was epoxied on as a separate piece. The whole soapstone install in the room took next to nothing to buy as they were all small pieces that I epoxied together with a 3 part stone epoxy. Below: this is the counter at the tub, and is in 2 long pieces but I was able to epoxy them together at there edges to make a wide slab for the top. All the soapstone was finished with a 60 grit sandpaper to be rough and this lovely soft tone of blue/green/gray/white. I did not oil it so this color tone would remain light. Below: If I recall correctly @sochi helped me decide on this Hubberton Forge Mirror. I have 3 different metals in this room, but they are all a cool silver to black color. Below: the center of this tower shares space with the kitchen on the other side of the wall. there is also some extra space that houses some electrical wiring. this is an old simple house. this bathroom was an add on when it got move to the farm in the 30s IIRC. The plumbing was all rearrange and some of the details that were orignially there I kept but updated it, such as this tower feature. The old one went and the carpenter did a wonderful job with this one. Below: This feature was another thing I kept from the old bathroom but flipped it from the other end and had the carpenter put drawers in it. Before it was a hell hole. things got lost and the build was soooo old and creapy I didn't like using it for storage. Now it is perfect for storage....See MoreBathroom Reveal, Thanks to the Bathroom and Remodel Forums!X-Post
Comments (6)Lovely! I like the classic white tile and porcelain and how you used furniture pieces in the bathroom. I love that the storage at the end of the tub has pull-outs that can be reached from the toilet. Your custom sink and backsplash and counter are unique and beautiful. Yours may be the first bathroom sink I have seen in which a small or medium dog could be washed! That is a good thing! I showed your pictures to my DH because I am thinking of classic tiled walls with a chair rail for when we redo our bath in a couple of years. He liked it! I was expecting him to say, "too old fashioned." He did not, he said it looked nice. From him, nice is a compliment. He even liked your rows of listello. I was just at the Tile Shop's site the other day looking at the Hampton tiles because someone was selling some on Craigslist. I am hoping to do as you did and get what I can cheaper there, and fill in the rest from the store. I can see that you worked very hard to secure all of your materials - and then cut the floor tiles to size and culled the Hampton tiles, too! You succeeded very well in getting the look you wanted while saving money along the way. Congratulations, and thank you for the pictures and great detail and supply list....See MoreKitchen Cabinet refinishing (pro not DIY)- Milesi, BM Advance?
Comments (51)I agree with Bry and most of the pros on here. Here’s my thoughts. BM Aura is NOT a cabinet-grade paint. This is just a fact. It’s a fully water-based, thin paint. It’s meant for drywall. Our company does over a mil a year, and I study the chemical science behind this stuff and study these products 24-7. I would suggest alternatives to a client, and if they insisted on BM Aura I’d literally walk away from the job rather than use this product because the danger of taking that job would be very high (the product won’t last, will scratch easily, and client will be unhappy). BM Advance is an ok product, but the long cure time and lack of durability compared to other similarly priced products makes it not worth it, IMO. TL/DR = There’s better options but this is still decent. Way better than BM Aura. The BEST “reasonably priced and readily available” product for cabinets is SW Emerald Urethane Enamel. It’s much better than the BM Advance in terms of A) durability and abrasion resistance, B) cure/dry time, C) chemical and mar resistance. Some prefer the look of either but they both look great but SW Emerald Urethane is way more durable long term and IMO at least I love the fact Emerald Urethane is brighter and dries harder. It looks a lot better to me. Advance looks/feels kinda soft and subdued. https://youtu.be/-TVrtJwLqgA Milesi, Fine Paints of Europe, and Renner have the “best overall” products but they’re way more expensive and harder to purchase. Milesi and Renner especially, often need to be shipped in. FPE is usually in our local stores. They’re all expensive though. Milesi also requires a 2-step process which is more complicated, so we need our project manager to oversee it. Milesi comes out super smooth and glassy, FPE Hollandlac comes out in a brilliant lacquer finish which some people want. My general thoughts, weighing all the pros and cons, is to either go with Emerald Urethane, OR, pick one of the very expensive European brands that meets your exact desire in a paint and go with them. But don’t do BM Aura on cabinets. Seriously. Don’t do that. That’s Magoo...See MoreBenjamin Moore Regal or BM Advance for Bathroom Vanity?
Comments (10)Best case they emboss an outline in the finish. Worst case they stick and peel off paint when you remove them. If you're never going to take them off, no big deal. Make sure they're not tight, just sit them on the paint film. Can always tighten them later. Because if you screw them in too tight the base of the pull pushes into the undercured paint film and you get a slight, mushy 'puddle' around the base of the pull. That puddle can create a weak spot for it to start chipping....See Morefunwithpaint
7 years ago
Related Stories
COLORSpeed-Dial Color Selection to Get the Best Result
You’ve belabored your color decisions and are still stuck. Here is how to evaluate your space and make choices that are right for you
Full Story
MOST POPULARFrom the Pros: How to Paint Kitchen Cabinets
Want a major new look for your kitchen or bathroom cabinets on a DIY budget? Don't pick up a paintbrush until you read this
Full Story
COLORBathed in Color: When to Use Red in the Bath
Rev up your space and flatter all skin tones with bold, beautiful red on bathroom walls, floors and fixtures
Full Story
Houzz Call: Show Us Your Paint Makeovers
Let your newly repainted house or room do the "How d'ya like me now?" strut right here — it might just be featured in an upcoming ideabook
Full Story
KITCHEN CABINETSKitchen Cabinet Color: Should You Paint or Stain?
Learn about durability, looks, cost and more for wooden cabinet finishes to make the right choice for your kitchen
Full Story
BATHROOM DESIGNBathroom Countertops 101: The Top Surface Materials
Explore the pros and cons of 7 popular bathroom countertop materials
Full Story
KITCHEN DESIGNKitchen of the Week: Elegant Farmhouse Style on the Water
Beautifully designed cabinets and more lend a timeless appeal to this kitchen overlooking a river in Canada
Full Story
KITCHEN DESIGNHouzz Quiz: What Kitchen Countertop Is Right For You?
The options for kitchen countertops can seem endless. Take our quiz to help you narrow down your selection
Full Story
COLORHow to Use Marsala, Pantone’s 2015 Color of the Year
Pantone digs deep and goes earthy with its selection. Here are ways to make it work in your home
Full Story
COLOR11 Terrific Paint Color Matches for Wood Details
Pair your wood trim and cabinets with the right shade of wall paint to bring out the beauty in both
Full Story






funwithpaintOriginal Author