My vision
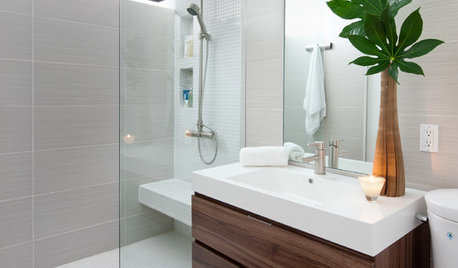
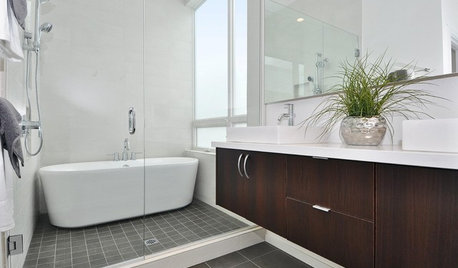
I wanted to blend this bathroom with the kitchen remodel that was done in the summer of 2011. I wanted a nice area for guest to use when visiting. Our other BR is at the other end of the house so not a great choice for guest. I wanted something soothing and “lovely”. I wanted some luxurious aspects to the room too. Overall, with the kitchen and with the BR, there was this theme I had in mind to keep the style of the original build. My Bathroom is a shed roof constructed addition, built on to the house in 1930 or so, when the house got moved from town to the farm. It’s a tiny house. The BR walls still had the original plaster embossed 4x4 tile look wainscot that the plasterer did. So I wanted to keep that style - but make it real tile. I realize having the bathroom off of the kitchen is not a desirable location and I could have closed the door and created a new one on the porch, but I chose to keep the original door location. My sister was surprised. I was originally going to take out the tub and put my W/D in there, but my DS was so sentimental about the room and taking baths there when a (dirty) little guy, that I kept the tub in the plans, scratching the W/D. I wanted to keep the BR looking somewhat similar in cabinet make and style as the kitchen, except painted cabinetry. I had in mind who I wanted to make my cabinets too. I saw some of his work and was impressed. And finally, I wanted to make more soapstone counters ☺ which ended up turning into a sink because I could be assured of a larger sink and still fit my constraint of 18” depth vanity.
So my vision didn't evolve in isolation. I took into account the history of the farm, house, family, function, friends, local craftspeople, and my design.
Function
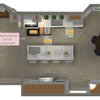
There were functional issues I wanted to improve upon, and some functional aspects I wanted to keep. I wanted to move the toilet out from behind the door so that the door didn’t bang into the rim each time it was opened. I was surprised that the toilet tolerated this treatment over the years. I wanted a somewhat accessible bathroom in case a wheel chair or walker was in the future. I planned the layout to meet ideal spacing for the most part. That was why I needed the 18” deep vanity and the round bowl toilet that I chose. I selected the tub to be low enough to get dogs and kids in and out of. Storage was a premium and I added roll out shelving and a pull out upper, in a small tower. These new cabinets replicate what was already there, but are new and with more style and function. I may not be able to cram as much junk into the cabinets with the roll outs, but what is there is accessible. I don’t need all that extra stuff anyway. I drew multiple floor plans, measuring everything to be sure the small space could work with my vision. Once I found my measurements I could start the selection of elements to fill the room.
The room was totally gutted down to the studs. All the electrical replaced and all the plumbing taken out and replaced. I kept the flooring and subflooring because the wood was in such good shape and it was probably old growth timber, nice tight grain. Can't beat that. We added 2x8 joist (DH did :) to strengthen the floor for stone tile. I prepped the floor for the self leveling compound to a T as instructed by Bill V.
To add the element of luxury, I put in radiant floor heating. I used a high-end tub filler with shower wand, and matching high-end wall mounted faucet. There is LED lighting under the vanity shelf and behind the mirror for night lighting. I used a marble listello to give some style to the wainscot. And of course my SS sink with the wonderfully lovely vanity base that Brett made for me. Oh, I can’t forget that I put in the slate floor in a herringbone pattern to add another style element. Remembering how Angie DIY cut all her tiles for her kitchen, I cut my 12x12 tiles down for herringbone. Thanks to Mongo for helping me on the layout and the tile cutting equation.
DIY
This was a DIY project except for the plumbing and the electrical. All of the heavy stuff got delegated to DH and DS, with me being the boss :) Of course if something needed problem solving, DH stepped up and helped me. Although, he did not help me with the grunting, I mean grouting. He just stayed in his office and periodically asked if I was ok. He has farmed all his life and in a previous life was an aerospace engineer out of college as well as a stint in the army. I used his smarts to help me along the way. I used the remodel forum a lot to figure out how work with the joist/flooring support to ready it for stone. Brickeyee, Renovator8, Worthy, sombreuil_mongrel (aka Casey) helped a lot with that one. Someone commented that it was one of the most over thought floors on the forum in a long time. Mongo and Bill V. helped with both the floor and the tiling. Mongo really explains things well, beyond tile. I went over Stacyneil’s thread about self leveling compound with a fine toothed comb. The JB forum was a lot of help too! I ran by my Ditra issues both here and on JB. Regarding the dry wall Brickeyee was very helpful. He coached me through it all. I had a big hole in my ceiling too that I fixed with the remodel forum’s help.
One benefit of taking a year, is that it gave me time to really think about things before committing to them. Since I have never done this before it was so helpful to have the time to learn. The down side with taking a year is that it gives you time to change your mind on finishes too many times, and end up with not only chrome, but polished nickel, polished stainless steel, worn pewter, and natural iron in the mix! Oh well, it will give it a layered look, right?
One last point, I messed with my Photobucket account last month and all of my old posts no longer have images attached to them !!! :( I will add a few from those old post to show some of the process and progress along the way.
Products
1. Fan, PANASONIC FAN FV-15VQ5
2. Lights, Norwell, Emily sconce 100watts each, chrome
3. Window, Windsor Windows
4. Tub Filler & Hand Shower, wall mounted, chrome, Hansgrohe Axor Montreux with handheld shower
5. Faucet, Hansgrohe Axor Montreux wall mount chrome with cross handles
6. Tub, Kohler Bellwether 837, white cast iron
7. Tub drain, Kohler K-T37397-CP PureFlo™ Victorian Push Button bath drain trim
8. Floor, special order black slate from Home Depot in 12x12 gauged.
9. Floor heating system, 240 volt Warmly Yours wire system with thermostat and 2 temp probes (one not hooked up but in the electoral box in case the other fails)
10. Tile underlayment, Ditra over the ply that Bill Vincent specifies in his FAQ site.
11. Thin set, Ditra-Set un-modified, for the floor; Hydroment Single-Flex for the walls, modified.
12. Wall tiles:
a. 4x4 white ceramic tiles that I got off of Craigslist
b.listello is “Hampton” marble mosaic from The Tile Shop (I cut it apart because the spacing was not good and some of the tiles where different sizes so where culled)
c. Crown, Johnson Tile that I got off of Craigs List. When I ran out was able to locate them at Best Tile in Syracuse, NY.
d. Base board tile from The Tile Shop.
13. Grout and caulk, Laticrete caulk to match the grout. Spectralock epoxy grout in Silver Shadow for the walls. Platinum and Silver Shadow 3:1 ratio for the floor.
14. Moisture barrier for tub walls, HydroBan
15. Paint, all Benjamin Moore, except lacquer, which was colored to BM colors
a. Bath and Spa for the walls in Bunny Gray
b. Vanity is ML Campbell lacquer, colored to BM “Thundercloud Gray", #2124-40
c. Cabinets, ML Campbell lacquer colored to "Distant Gray" #2124-70
d. Casement around door and window, BM Super White
e. Painted Pine standing cupboard, BM misty gray 2124-60
16. Built-in Cabinets and Vanity, Brett Arganbright, proprietor of River Valley Woodcraft.
17. Sink, Soapstone remnant that I got from Bertini’s Tile and Marble.
18. Counters, Soapstone remnant that I got from Bertini’s Tile and Marble.
19. Toilet, Toto Promenade, round front, ADA height.
20. Toilet seat, Inax Advanced Toilet Seat L-series (round) CW-W130-LU
21. Grab bars, Kohler (?model) 24” and 18” at tub in polished stainless steel. 24” is used as towel bar.
22. Hardware
a. Amerock knobs on vanity and tub cabinet in worn nickel (pewter color)
b. Emtec door hinges (black) and lever handle (Napoli in silver patina on bathroom side and black on kitchen side)
c. Rockler hinges for painted pine cupboard, 3/8'' Inset Partial Wrap Hinges - Oil Rubbed Bronze, 3 pair
d. HD Martha Stewart knobs (black?) x 2, on painted pine cupboard
e. Towel bar on vanity, Baldwin in chrome that I cut down to 13 or 14 inchs.
CLICK on the image and it will take you to Photobucket where the images are shown in a "story board" format that Photobucket has created. I will try this technique and if things don't work out, I will post a few pictures.
Here is a link that might be useful: my photobucket album
This post was edited by enduring on Fri, Apr 5, 13 at 19:55


schoolhouse_gw
Nancy in Mich
Related Discussions
Small Bathroom Help 6'6'' x 5'. Convert Bedroom to Bathroom?
Q
Bathroom Remodel Reveal
Q
Bathroom Reveal, Thanks to the Bathroom and Remodel Forums! (pic
Q
Electrical panel in bathroom - X post from Bathrooms
Q
enduringOriginal Author
Suzi AKA DesertDance So CA Zone 9b
enduringOriginal Author
Suzi AKA DesertDance So CA Zone 9b