


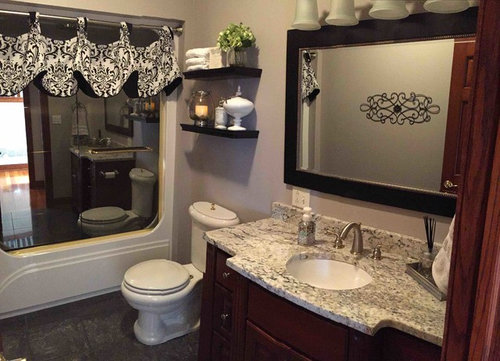
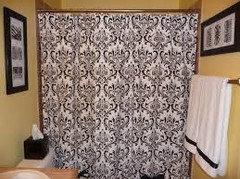
B&W Updated Bathroom Reveal
gigib_08
8 years ago

Featured Answer
Sort by:Oldest
Comments (28)
Related Discussions
Bathroom Reveal, Thanks to the Bathroom and Remodel Forums! (pic
Comments (56)This old thread got revisited. @dani_m08 to answer the question about extra probe, I believe I ordered an extra one when I bought the set up. The probe wire is just setting in the junction box I think but honestly I cant remember. When I laid out the underfloor heating and the probe, I just ran another probe near the first probe, and it was then sealed into the floor self leveling compound as per instructions. then the end was just threaded into the wall like the one that would be live, and not connected, but just laying there in the box. Regarding the tile layout. I just decided to run it this way, after getting instructions on the 90Degree way, IIRC. The herringbone that I love is from my childhood and the side walks in my neighborhood that all ran at 45Degree. so that to me is herringbone. I know you posted on @sochi thread about her amazing bathroom and a wall mounted faucet. I would totally do it if I had the right sink for it. In my case I had made my sink out of soapstone and an integrated backsplash. The pictures of this bathroom reveal are no longer available because of the use of photo bucket, when it was Gardenweb. I did not keep my account with photo bucket. I'll add some of the reveal pictures so you can see the sink and floor. Regarding the sink there is no ledge for water to drip from my hands when using the faucet. The water drips right into the sink. In my other bathroom with a deck mounted faucet I am always wiping up drips and it is a nuisance. I much prefer the setup for this sink. Below: I love the flush finish from the faucet to the bottom of the sink. nothing drips on a counter or edge of a sink. Below: looking in from the doorway. Below: Here I am finishing up the sink. the backsplash was epoxied on as a separate piece. The whole soapstone install in the room took next to nothing to buy as they were all small pieces that I epoxied together with a 3 part stone epoxy. Below: this is the counter at the tub, and is in 2 long pieces but I was able to epoxy them together at there edges to make a wide slab for the top. All the soapstone was finished with a 60 grit sandpaper to be rough and this lovely soft tone of blue/green/gray/white. I did not oil it so this color tone would remain light. Below: If I recall correctly @sochi helped me decide on this Hubberton Forge Mirror. I have 3 different metals in this room, but they are all a cool silver to black color. Below: the center of this tower shares space with the kitchen on the other side of the wall. there is also some extra space that houses some electrical wiring. this is an old simple house. this bathroom was an add on when it got move to the farm in the 30s IIRC. The plumbing was all rearrange and some of the details that were orignially there I kept but updated it, such as this tower feature. The old one went and the carpenter did a wonderful job with this one. Below: This feature was another thing I kept from the old bathroom but flipped it from the other end and had the carpenter put drawers in it. Before it was a hell hole. things got lost and the build was soooo old and creapy I didn't like using it for storage. Now it is perfect for storage....See MoreUpdate - bathroom is finished
Comments (62)Hiya sheesh, can't believe I missed this posting! It looks really nice, great job. I've been working on our upstairs hall bath and I am just doing a couple of tweeks before the "reveal". Have you looked for pretty soaps at TJMaxx? I am now totally hooked on them. They even organize them by color! I've been buying them to put in glass jars in the bathrooms. They are wrapped in gorgeous papers, and as long as you have some sort of common color, they all look great mixed together. You could also consider a bowl with some natural sea sponges, that would look pretty too. Glass jar filled with cotton balls looks kind of fun too. Great job! -bee...See MoreBudget bathroom makeover reveal
Comments (24)Regarding the mirrors, I purchased some adhesive meant for mirrors (and marble etc) I unscrewed the clips at the top of the mirror and squirted adhesive all down the back, then pushed the mirror back against the wall and re-fastened the clips. I waited 2 days for it to cure, then carefully took off the clips and checked that the mirrors were secure. I used the same adhesive to stick the frame wood to the mirror. The wood was cut at Home Depot to my measurements - the top and bottom 1x4 is 1" longer than the width of the mirror so that it overlaps the edge by 1/2" each side to hide the glass edges. The side boards are the height of the mirror plus 1" then minus 7" for the width of the top and bottom boards (1x4's are actually 3.5" wide). First I glued the crown molding to the top board with carpenter's glue and taped it in place overnight to set. I wanted to make "returns" out of crown but even though I am good at math I was unable to cut those angles with my hand saw and miter box! Turns out you would only be able to see it on the toilet side of the guest bath anyway and it looks OK without. Then I used the mirror adhesive to stick the bottom board in place, taped it, then the side boards on top of that, taped them, then the top board with the crown. I left the blue tape overnight for the adhesive to cure it was solid by morning. I used primed pine boards and crown, so I didn't even have to paint the backs since I was using white - they were already white primer (you can see along the edge in the mirror)....See MoreTeeny tiny full bathroom reveal. Some said it couldn't be done!
Comments (23)Monica, that floor is gorgeous in her inspiration photo!! The tile showrooms (at least here in the Northeast) are all showing dozens of wood/tile varieties. I'm sure she could find several wide pine options like her Photo. I would do real wood anywhere except a bathroom. I was afraid of the moisture on it. Have her post updates here! Farmhouse coastal is a gorgeous look. I redid my kitchen 3 years ago with New England coastal theme and still love it as much as I did on day 1! Last night, I took my first bath in the new bathroom and love the tub and how deep it is. Haven't tried the handheld yet......See More
gigib_08
8 years agogigib_08
8 years agogigib_08
8 years agogigib_08
8 years ago
ingrid_vc so. CA zone 9
8 years agolast modified: 8 years agogigib_08 thanked ingrid_vc so. CA zone 9gigib_08
8 years ago
Errant_gw
8 years agogigib_08
8 years ago
Olychick
8 years agoingrid_vc so. CA zone 9
8 years ago


Related Stories

INSIDE HOUZZA New Houzz Survey Reveals What You Really Want in Your Kitchen
Discover what Houzzers are planning for their new kitchens and which features are falling off the design radar
Full Story
BEFORE AND AFTERS8 Bathroom Updates Have Ideas for Every Style
All white, classic vintage and brightly eclectic are just some of the new looks sported by the transformed bathrooms you'll find here
Full Story
BUDGET DECORATINGBudget Decorator: 15 Ways to Update Your Kitchen on a Dime
Give your kitchen a dashing revamp without putting a big hole in your wallet
Full Story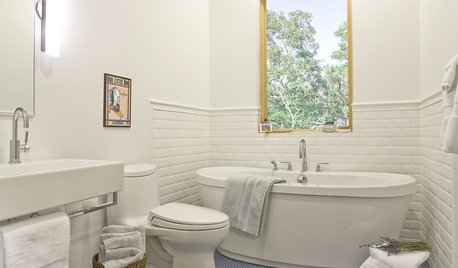
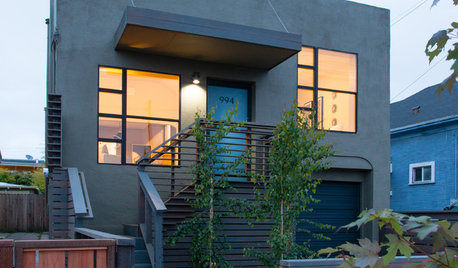
HOUZZ TOURSHouzz Tour: Visit a Modern Update in Oakland
See how a "hacked together" home became an urban neighborhood jewel
Full Story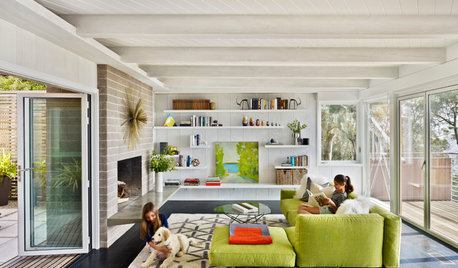
REMODELING GUIDESHouzz Tour: Updating a Midcentury Aerie in the Berkeley Hills
The setting was splendid; the house, not so much. Now the two are right in line, with high quality to spare
Full Story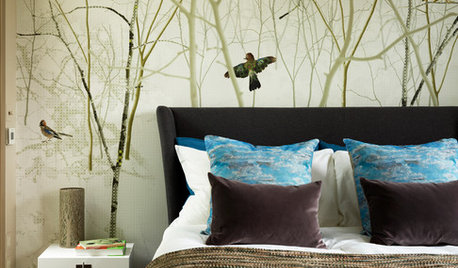
BEDROOMSInside Houzz: A Guide to Updating Your Master Bedroom
Using data from a new Houzz survey, we share how you can better navigate the task of tackling a bedroom project
Full Story
HOUZZ TOURSMy Houzz: Bright and Airy Updates in a California Fixer-Upper
An Australian family tackles an unloved Cape Cod–style house, turning it into an inviting home that reflects their history and travels
Full Story
DECORATING GUIDES10 Ways to Update a Victorian Living Room
Bring your period living room sensitively into the 21st century with these simple yet effective design tricks
Full Story
REMODELING GUIDESHow People Upgrade Their Main Bathrooms, and How Much They Spend
The latest Houzz Bathroom Trends Study reveals the most common budgets, features and trends in master baths. Now about that tub …
Full Story


tibbrix