


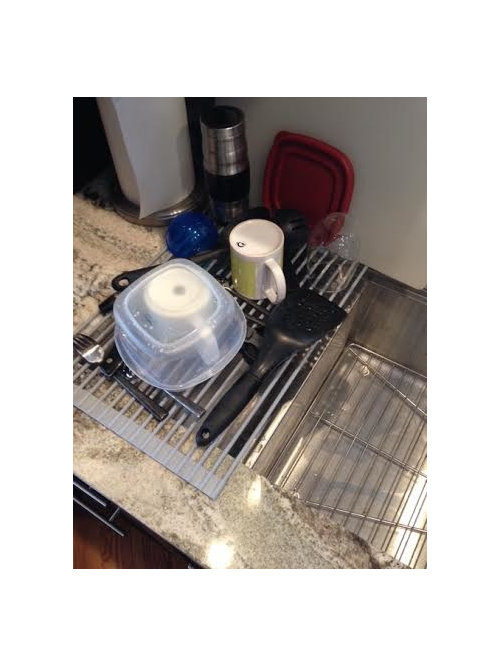
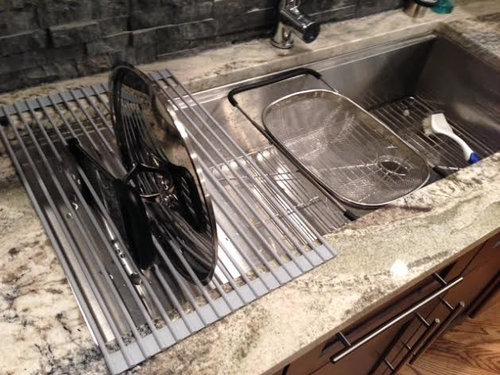
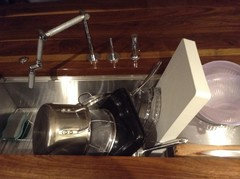
Best $25 kitchen purchase I've ever made: PICS
Stephanie Cone
9 years ago
Featured Answer
Sort by:Oldest
Comments (16)

sjhockeyfan325
9 years agoRelated Discussions
Probably the best buy I ever made.
Comments (11)Not to worry Gandle because alot of us missed the other sewing machine thread. I could also talk sewing machines (and knitting needles - metal vs. bamboo) all day long. My mother sewed lots of clothes for us when we were kids, like you said including coats!! Sewing holds so many memories. My mom and I took the train down to Chicago to shop Marshall Fields fabric department for just the right material for my prom dress. I didn't have to be worried that I'd see anyone else walking around the prom in the same dress. I never had home ec. in high school so as a young married woman I begged mom to teach me how to sew and I was off to the races. For awhile when the kids were little my sewing machine was a revenue generator, the dolls, clothes and Christmas decorations created on that machine allowed me to be a stay-at-home mom. In the mid-70's I invested in a very pricey electronic Singer. But as electronics have the habit of doing, it fried out sometimes in the 1990's. I've been sewing (sometimes daily for years) on a little Brother machine I picked up at Gag-Mart. The older machines such as Leona's are far superior because all the internal parts are metal. You could literally drive over them with a Mack truck and they'd keep on going. I'm holding my breath on the Brother because many of the internal parts are plastic. It's funny you posted this today, because as soon as I'm off the computer here I'm into my sewing room to construct an evening jacket for the cruise we're taking at the end of the month. It's a Vogue pattern by designer Guy Laroche. I love the process of clothing construction, it's actually quite interesting. I'll try and take a picture when I'm finished. Thanks Gandle. Maybe I'll look for one of those older Singer's on EBay. Awwww...the shipping would kill me though....See MoreBest turkey I've ever had...a new secret weapon
Comments (27)There ARE definitely a few things to think about when it comes to safety. However, if you think about it, most of it is just plain common sense and it is truly not that difficult at all! Unfortunately, though, some folks have not been thinking and have made some really stupid mistakes when they've attempted this and have now given the whole thing sort of a bad rap. Our family has done it many, many times and it is very, very easy and safe as long as you follow the directions on your fryer and you think a little bit about what you are doing! Here are a few tips: * Absolutely, positively, DO NOT fry a turkey inside or even close to your home - like on a deck/patio or in the garage. We always fry ours in the driveway. * Make sure the turkey is COMPLETELY thawed and patted dry before putting it into the fryer! This is the biggest mistake people make! Putting a partially frozen/wet turkey in oil that is 350 degrees can cause a fire or even an explosion. * Do not overfill the fryer. This can cause significant burns. * NEVER leave a frying turkey unattended. Even after you are finished frying, the oil remains hot a very long time. Be very careful with kids and pets around it. * EVERYONE should have an All-Purpose fire extinguisher for their kitchen! This will come in handy when you are frying a turkey. As most of you probably know, absolutely NEVER, EVER put water on a grease fire! It only causes the fire to spread faster. If the fire is manageable, you may try to use fire extinguisher. If not, call 911! * Make sure no one who will be at the dinner, and especially eating the turkey, is allergic to peanuts! Here is a link that might be useful: Safely Deep Frying A Turkey...See MoreBest ever Inspiration Pic--help me 'mitigate the marble'
Comments (11)Thanks for the kind words! :) Yes, I imagine given what you've said, that you can approximate what I see in the picture. Sometimes what people are looking for is more of a feeling. What you've also implied is that you really want the look of the best ever inspiration picture. If you're doing a version of that island, I think you really need light, but you can approximate it with granite or quartzite if you're looking more for edgy guy rather than a real break-your-heart bad boy. You could definitely go darker on the perimeter. Regarding soapstone, you might look for one of the harder varieties. Try scratching it with something pointy like a screw or nail. If it's hard to make a mark, you should be able to live with it, even if you're not big into patina. I think unoiled soapstone would give you the kind of color you're looking for, it looks great with light marbles, and is very functional. If you get oil spots on unoiled soapstone you can use a grease cutting detergent like Dawn dish liquid. It's really not that much maintenance. If you go with soapstone, however, do get installers who really know soapstone. It's different from granite or marble, and has different requirements (though simpler tools). As to patterns of stones, it really depends on the exact slabs you choose, but you should be fine doing veins with veins or spots with spots but not veins with spots. Similarly, it's nice if one has more and one has fewer veins, but you want the veins to be not too dissimilar in size. A little difference is contrast. A big difference is just busy. This works best when the stones can be read as inverses of each other, so a white marble with gray veins might work with a brown granite with white or gray veins, but not so much with a brown granite with black or red veins. These are just generalities, however. It really depends on the exact slabs and how you template them and fit them together. Taking away that whole question, could make your life a lot easier. Have you considered quartz for the perimeter? One of the ones that reads solid?...See MoreKitchen confessional ... I've never made ...
Comments (50)I have been working on my pie crusts for years now and I think I'm finally starting to get fairly consistent good results. I went through a phase, a few years ago, where my crusts were embarrassingly tough. Fortunately, I seem to have worked my way out of that phase and my crusts are now usually tender and flaky. I use the Crisco recipe. I measure out the flour and Crisco (and the bit of salt) into a bowl and then put that in the freezer for 30 min before cutting in the Crisco with a device that I believe is called a pastry blender (but which has always been called a "pie crust maker" in my family). Then, I gently mix in ice water, a tbsp at a time, with a fork. When it looks like there's enough water that things will hold together (probably less wet than you'd expect...just wet enough to hold things together), I gently form a ball (minimal handling), just gathering most of the bits together into my hands and pressing gently together. Then, I wrap the ball tightly with saran wrap, gently squishing it into disc shape during the wrapping process. I put my crusts into the refrigerator to rest, usually overnight. I've come to believe that resting them in the refrigerator is absolutely crucial. After they've rested, I gently roll them out, lightly flouring things as needed to prevent sticking. Most of my pie crusts are turning out fairly well now. Before I started resting the crusts in the refrigerator before rolling them out, some of my crusts were very tough. I have never tried pre-baking the bottom crust for a cooked pie. I usually do bake my pies for longer than the recipe calls for, though, to avoid undercooked bottom crusts. I do cover the edges, to prevent them from getting overdone. I keep a close eye on pies during baking and I usually also end up putting a loose sheet of foil over the entire pie at some point, to prevent overbrowning of the top crust. Cherry pie is my favorite! :-) The next time I make one, I am going to try those TJ cherries. Edited for swypos. :-)...See MoreNothing Left to Say
9 years ago
Stephanie Cone
9 years agoStephanie Cone
9 years ago
bbtrix
9 years agoStephanie Cone
9 years agobbtrix
9 years agobeachem
9 years ago
Maine Susan
9 years ago
Jancy
9 years agolast modified: 9 years agoNothing Left to Say
9 years agoMaine Susan
9 years ago
gyr_falcon
9 years agomrspete
9 years agoMaine Susan
9 years ago

Related Stories

DECORATING GUIDESThe Dumbest Decorating Decisions I’ve Ever Made
Caution: Do not try these at home
Full Story
FEEL-GOOD HOME12 Very Useful Things I've Learned From Designers
These simple ideas can make life at home more efficient and enjoyable
Full Story
Call for DIY Projects: Show Us What You've Got!
Share a Pic of Your Handiwork with the Houzz Community
Full Story
SALVAGEBike-Chain Chandeliers You've Got to See
Take a video ride with us to see how an artist creates amazing lighting fixtures solely from bike parts
Full Story
DECORATING GUIDES7 Home Purchases Worth the Splurge
Make buyer's remorse over furniture, textiles and more a thing of the past with this wise purchasing advice
Full Story
HOUZZ TVHouzz TV: See a Funky Beach Home Made From Old Streetcars
A bold color palette zaps life into a Santa Cruz, California, home built out of two streetcars from the early 1920s
Full Story
FIREPLACESRumford Fireplaces Are Hotter Than Ever
Higher efficiency and good looks are leading homeowners back to this 18th-century fireplace design
Full Story
ARCHITECTUREIt Takes a Village: 2 Homes Made of Multiple Structures
Separate buildings join in style and intention in these home bases, showing that sometimes more is just right
Full Story

KITCHEN DESIGN15 Farmhouse Kitchens That Made Us Swoon This Month
Raw wood, natural light, shiplap siding — we just couldn’t get enough of these farmhouse-style kitchens uploaded to Houzz in January
Full Story

mrspete