


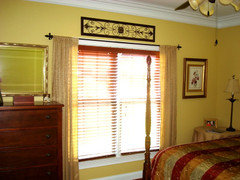
Curtain height ?- I need fast advice (pics of window)
nhb22
15 years ago


Featured Answer
Sort by:Oldest
Comments (47)

2ajsmama
15 years ago
susanlynn2012
15 years agoRelated Discussions
Privacy needed, at least 8ft and grows fast.. pics
Comments (11)I would like to suggest that you quickly fire or otherwise cancel the guy who is going to remove the wall. Then STOP, as Mad Gallica suggests! Then there are just a couple of things to do while you wait for spring. First is to measure your lot and draw up a plot plan that you can use for testing designs. This isn't hard to do, if you have a measuring tape, a straight edged ruler, and some graph paper (use 4 squares to the inch, it works best). Basically you'd want to include all the existing trees and structures, the location of the driveway & walks, utilities and the septic system components. Make copies of the base plan and then get some colored pencils and try different arrangements for "blocking" masses of plants. This will really help you to figure out where you really need borders, how wide you want them to be, and how tall the plants should be. Selecting the plants should come much later in the process. At the same time, go get a copy of one or more of Gordon Hayward's books; The Welcoming Garden is a good one. It describes how to get from square one (where you are) to having a house in a garden. It's got lots of useful techniques for deciding things like placement and depth of borders, selecting a style you'll be happy with, and how to make your design complement the locale. These little "passtimes" might get you interested in gardening to an extent you can't even imagine at this point. If that happens, we'll be here - egging you on. And by the way, welcome to the forum! Nice to see someone who has a blank slate - so many possibilities ahead of you....See MoreHelp!! I need drapery/curtain advice!!
Comments (8)So much of this is personal taste. I like fabric covered cornices over windows, but tend to dislike many of the valances I see. I'm not a fan of a drapery panel on one side of a window because you end up with a lot of exposed rod, but it is commonly done. I was going to suggest pulling the bed away from the wall about 4 inches, and put simple panels on each side of the window, but with the high posts on the bed, it may look cluttered. The roman shade idea is great, and it looks like you easily have enough space for inside mount. If you plan to keep that bedspread, you could pull your colors from that. Or a neutral sand color would work long after the bedspread is changed out....See MoreI want to make a top treatment for a window , need advice
Comments (3)Here is a clipping I saved on how to make valances. Hope it is kosher to re-post someone elses' post, but these instructions were just too good to not share. posted by: my3dogs on 07.17.2008 at 08:01 pm in Home Decorating Forum Hi everyone! Here are the directions for the valances that you saw in the post linked below. They ARE EASY - but the directions are long, because I am trying to give you enough detail, even if you are a beginner. Read them all the way through so you understand them, and ask any questions you may have. If you are a real novice, you may want to make a sample using just muslin, or other inexpensive fabric, til you get the hang of it. This is a no-pattern valance that I started making last summer. It requires just straight stitching. My windows are generally about 50" (more or less)in height. If your windows are very short or very tall, you may want to vary the length of the fabric you use. I would say to err on the 'buy more' side though, so they don't look skimpy. The fullness adds richness. I generally use 1 1/4 yards of 54" wide home dec fabric to make the valance. You will need an equal amount of lining fabric. If you choose to put trim on the bottom (it adds a lot to the treatment, IMO) buy 1 1/2 yards of trim to make sure you have enough to go across the length of your 54" wide fabric. If your fabric is wider than 54", buy enough trim to cover its width. Cut your valance fabric and lining to equal lengths. I always measure the side edges of my fabric and mark the length before cutting. It may have not been cut straight at the store, and you want to be sure that your left side is the same length as your right side. Pin the two rectangles of fabric together on all sides, with the RIGHT (front) sides of the fabrics inside, facing each other. Before putting the fabrics together, I mark lightly on the back which is the TOP of the print (if using a print) and which is the bottom, so your print will end up right side up! Depending on the type of rod you plan to use for the valance, you need to leave openings on each side that will become your rod pocket. Continental rods (the flat wide plain ones) need a 4" rod pocket. If you use a decorative rod, with finals on the end that screw off, I would recommend making your rod pocket 2" wide. For a small tension rod, I'd make the rod pocket 1.5" wide. You don't want to force your fabric onto the rod - allow room to make it easy for you. Measure down from the TOP of your pinned together fabric, and make a light mark with pencil on each side, the size of your chosen rod pocket, plus 1/2". That 1/2" is going to be the width of your top seam. You'll be making a mark on the left and right sides 4 1/2" down from the top if you use a Continental rod, for example. Stitch from these marks down each side to the bottom, using a 1/2" seam. You'll need to leave an opening in the top or bottom to turn your valance inside out when you're done stitching. I'd suggest a 4" - 6" opening for turning. If your rod pocket openings are 4", you don't need to leave another opening, you can use them to turn it inside out. Mark the opening you need to leave, then stitch across the top and bottom edges, using a 1/2" seam, leaving your opening...well...OPEN! Clip your fabric corners off OUTSIDE of your stitching. This is just a small triangle of fabric from each corner. This will allow you to get nice sharp edges on your corners when your turn the valance right side out, as it reduces the bulk of fabric there. Turn your valance right side out, pulling it through the opening you left. I use a wooden chop stick to push the fabric gently at the corners to make them nice and square, once I have turned mine right side out. Don't push too hard, or you may poke a hole through your valance! At this point, you should have a lined rectangle of fabric, with rod pocket openings near the top of each side. Close the opening you left for turning, either by folding and pressing the edges in and hand stitching it closed, or use 'stitch witchery' type of fusing tape to do it. You can also sew it closed with your sewing machine, but you want to do it right at the edge. You want to make this closure as 'invisible' as possible, so I always use fusible tape. Carefully iron your valance. Use your fingers to work the edges, so that you have your seam right in the middle of each edge, so you don't see the front fabric on the backside, and you don't see the lining from the front. Now, to stitch the rod pocket. You will be making one row of stitching across the front of your fabric from side to side. Measure down from the top edge, so you have the same length opening on each side. The size of the opening you left on each side was determined above by the type of rod you're using. You can lightly pencil on the line that you need to stitch across, or do what I do - Place the fabric on the sewing machine, and put the needle down on the place where you'll start stitching. Take a 4" (approx) length of masking tape, and lay it against the upper edge of the fabric, to the right of the needle, and stick it to the sewing machine base. You can use this tape edge as a guide to hold the top edge of your fabric against as you stitch across. It helps you make a straight, even rod pocket. My sewing machine has tape on it for all different widths of rod pockets! If you chose to put trim on the bottom of your valance, do it now. I use 'Aleen's OK To Wash-It' fabric glue that you can get at WalMart or a fabric store. If you use glue, just follow the directions on the bottle to glue your trim evenly to the front bottom of your valance. I lay my valance on my kitchen island, and let it set overnight, while the glue dries. You can also stitch your trim on, either by hand or by machine. I prefer the glue, because you see no stitching on the back side. (I'm anal.) Now to make the ties. You can simply buy ribbon (such as grosgrain) or use purchased cord (see my dining room silk ones in the link) or make them out of fabric. Use either the same fabric or a coordinating one. Here, you first need to decide if you are going to tie your valance up with bows, or do knots. Bows take longer ties. Allow yourself a MINIMUM of 36" long ties. You can always cut them shorter if necessary, but you can't make them longer. I suggest hanging your valance up and using string to tie them up temporarily to see how long you need to make your ties. (It's longer than you think!) Cut your strips of fabric approx 4" wide and the length you have decided on above for your ties. Fold and pin the strips in half the the short way, so you have a long strip of fabric that is 2" wide. Make sure the right sides are together, (inside) because you are going to turn them inside out after stitching. Stitch along the pinned edge of each strip, about 1/4" from the edge. Now the fun part - turn those narrow strips inside out. My chop stick comes in handy for this, but use whatever method you choose to accomplish this. Press the ties just as you did the valance rectangle, making sure your seam is even on the edge. I fold in the raw ends and use my fusible tape to close them, but you can machine stitch them closed or do it by hand - Your choice. Your valance is done! Put it on your rod, using the rod pocket. Hang it in your window. Now, take the ties, and simply drape them over the rod on each side, having half of the tie fabric strip hanging in front, and the other half of the tie hanging behind the valance. Now, gather up one side of the valance in your hands, and reach behind it it grab the dangling tie in back. Tie up the valance, by tying the front and back pieces of the tie together, either in a knot or a bow. Do the same with the other side, making sure your ties on each side are tied up at the same length. Now stand back and make sure your valance looks even at the bottom on each side. Use your hand to 'finger fold' and drape your fabric until the look is what you want. You'll be surprised at what a difference it can make in the look by spacing your ties closer together, or moving them further apart on the rod. Also by tying the ties higher or lower... This is where you need to play around until you get the look you want. On the HGTV message board, a woman made these and kept posting pics asking for advice - Higher? Lower? Move the ties apart or closer...It's really all up to you. Hers looked GREAT when she was done, and she was so pleased to have made her own custom valance. I hope you all feel the same way, if you try them! Here is a link that might be useful: pictures of theses wonderful valances...See MoreNeed fast advice re height of BS & outlets - about to meet GC
Comments (5)Yes, the splashlette is 2cm thick. My counters are 4cm so they had to fabricate the spashlette from a different slab. The whole installation was unplanned anyway due to their error in cutting. In re-reading your OP, I noticed that a 6" splash will come up to the bottom of the window sill. Is that right? If you go that route, at least you'll be lining the stone strip up with an existing element in the room so it wouldn't look so out of place. With a window 6" above counter, a little 2" strip of stone would leave abbot 4" of drywall. Would you like a little strip of painted drywall showing like that? I'm not much help. Just pointing out some issues on which to ponder. :)...See Morestinky-gardener
15 years agodebb
15 years agobudge1
15 years ago2ajsmama
15 years agorich69b
15 years ago
nhb22
15 years ago2ajsmama
15 years agoValerie Noronha
15 years agostinky-gardener
15 years agonhb22
15 years ago2ajsmama
15 years agostinky-gardener
15 years agodebb
15 years agosanborn5
15 years agolacombe
15 years ago2ajsmama
15 years agomimi_2006
15 years agowork_in_progress_08
15 years agoacountryfarm
15 years agodeborahnj
15 years agoleibrook
15 years agonhb22
15 years agolacombe
15 years agosusan209
15 years agoles917
15 years agok9arlene
15 years agoUser
15 years agogk5040
15 years agoUser
15 years agonhb22
15 years agojerseygirl_1
15 years agomary_lu_gw
15 years agoHappyladi
15 years agoUser
15 years agonhb22
15 years agolovinlifesc
15 years agoUser
15 years ago2ajsmama
15 years agonhb22
15 years agogk5040
15 years agogk5040
15 years agolovinlifesc
15 years agonhb22
15 years agogk5040
15 years ago
Related Stories

BATHROOM DESIGNDreaming of a Spa Tub at Home? Read This Pro Advice First
Before you float away on visions of jets and bubbles and the steamiest water around, consider these very real spa tub issues
Full Story
TASTEMAKERSBook to Know: Design Advice in Greg Natale’s ‘The Tailored Interior’
The interior designer shares the 9 steps he uses to create cohesive, pleasing rooms
Full Story
DECORATING GUIDES10 Design Tips Learned From the Worst Advice Ever
If these Houzzers’ tales don’t bolster the courage of your design convictions, nothing will
Full Story
KITCHEN DESIGNSmart Investments in Kitchen Cabinetry — a Realtor's Advice
Get expert info on what cabinet features are worth the money, for both you and potential buyers of your home
Full Story
DECORATING GUIDESStage Your Home and Sell it Fast
11 ways to prep your house for more offers and a quicker sale
Full Story
SELLING YOUR HOUSESell Your Home Fast: 21 Staging Tips
Successful staging is key to selling your home quickly and at the best price. From cleaning to styling, these tips can help
Full Story
DECORATING GUIDESDark Curtains See the Light
For a cozy feel or a visual trick for ceilings and windows, dark, moody curtains and drapery treatments have a bright outlook
Full Story
DECORATING GUIDESEasy Reference: Standard Heights for 10 Household Details
How high are typical counters, tables, shelves, lights and more? Find out at a glance here
Full Story
WINDOW TREATMENTSThe Key to Designer-Look Window Treatments
Learn the one thing that will make your curtains suffer if you get it wrong — and how to get it right
Full Story
WINDOW TREATMENTSGreat Ways to Dress a Bay Window
If you’re hemming and hawing over curtains and shutters — or nothing at all — these bay window treatment ideas can help
Full Story


2ajsmama