


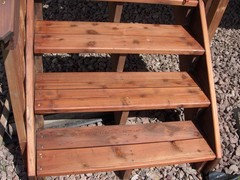
deck stain? low voc questions
blubird
9 years ago
Featured Answer
Sort by:Oldest
Comments (13)

tibbrix
9 years ago
blubird
9 years agoRelated Discussions
Low odor stains and finishes
Comments (35)We have color! I am in LOVE with the Pallmann's Magic Oil finish we put down. Because I was trying to avoid a strong odor during the refinishing since we would be staying in the house during the process (sleeping downstairs), I decided to go with a colored Pallmann's Magic Oil rather than staining using Minwax or DuraSeal first then using the clear Pallmann's. To find a color I liked, I ordered several samples of Pallmann's from the distributor that is closest to me, in Dallas, and the samples are called "pucks." I got black, dark brown, and red brown. Straight out of the can, the colors weren't what I was looking for, but when I started mixing them, I found a great combo. I just took a plastic solo cup and a plastic teaspoon and mixed in various ratios until I got what I wanted. First was 3 spoonfuls of dark-brown and 1 of black, but that was too dark, so I added 2 more spoonfuls of dark brown (for a 5:1 ratio) and that was perfect. I was also mindful of how much total finish I needed to buy (6 liters for my project) so tried to mix in ratios that would minimize waste, and 5:1 was perfect for that. We mixed all six of the Part A containers (colored oil) in a 5 gallon bucket and stirred thoroughly, then used a small measuring container (from the paint section of HD) to measure out a small amount of the colored oil to mix with the Part B (accelerant) which is what makes it harden to a very durable finish. I think the colored Pallmann's has a different ratio of Part A to Part B than the clear, but just follow the directions on the box. Ours was 4:1, I think, so I would fill the container up 16 ounces with color, then top off to 20 ounces with the accelerant, stir with a stir stick, then trowel apply per the directions and video UFloor (the distributor/mfr.) has on YouTube. To prep, we screened the entire floor upstairs at 100 screen (we'd sanded it previously with a sanding sequence of 60, 80, 120 but had a week's worth of foot traffic and moving the last bits of furniture out so wanted to make sure the wood fibers were all the same to accept the stain evenly. Perhaps overcautious, I don't know). Screening is MUCH harder than using the vibrating square buff sander - it took lots of muscle to figure out how to control the buffer. There were a few times initially where I didn't think we were going to be able to do it - mostly when the buffer was going airborne like an ice skater doing a triple Lutz. Eventually got it under control, but managed to leave lots of marks on our freshly painted walls from the buffer handle pushing us around. Got some touch up to do. It looks so easy on YouTube but it was HARD! Then, we swept up tons of sawdust. Then, we shopvacced all the dust we could, carefully carrying around our shop vac canister so it wouldn't leave wheel marks on the floor's fibers. (Again, overcautious much?) We tacked the floor with old towels misted with paint thinner. This was stinky but my husband did it while I was at Home Depot exchanging our buffer for a new one - the first one's wheel was messed up and it was really annoying to work with. All the prep work takes forever, but I figured it was better to do it now than spend two months installing the floors and messing them up in the final stretch. Before sanding and screening, we also had taped over all the light switches, electrical outlets, covered vents and air returns - and turned off the heat - taped plastic over the ceiling fans and lights, removed all the blinds, etc, and then removed all that stuff so that when we were doing the clean up, all the sawdust would be on the floor so we could get it up before we applied the finish. OK, still with me? We are back to applying the finish. We started with the side rooms so that if we had to stop, we could end along a doorway with a full plank of wood. The first room we trowel applied - I used the trowel (which was a 10" stainless steel drywall trowel that I just took a piece of sandpaper and rounded the edges on) for the majority of the floor and my husband took a piece of the buffer pad and did the edges - like cutting in when you are painting a room. We got about 1/3 through the room and needed to stop and buff (there is a time limit on how long the product is workable, we set our phone's alarm and stopped to buff whenever it was time). The first bit was frantic as I was really worried about hurrying and the time and everything, but I calmed down soon enough and figured out this is a marathon, not a sprint. We followed the buffing sequence the instructions specified and didn't have much problem, The first buff is really "grippy" and you need to use some muscle to control the buffer or it will throw you around. The final buffs with the white pads were pretty easy, and I did those to give my husband a break. Per the tip from the Pallmann rep, we applied two coats back-to-back before moving on to the next room. Trowel application: The second room, we thought we'd try the other application method, the buffer method instead of hand-troweling. Big mistake! Maybe if we were more experienced with the buffer we could have done better, but as it was, that buffer through us both around like a rodeo bull. Grabbing the liquid oil made it really careen around, no matter how carefully or lightly we dipped into the oil pool. I had the honor of putting the first hole in the drywall - at which point DH thought he'd better take over. He was doing better than me at first, but then the buffer got the best of him and he put two more holes in the drywall in the same room! We decided to finish that room using the buffer method but to go back to troweling after that. There is no real difference in how the finished product looks, and it really wasn't faster to do the buffer with the way it was flinging us around. The only thing was my wrist was practically crippled by the end of the project, as we did almost 1500 sf in a 10 or 12 hour marathon. I was switching from left to right hand, and DH even had to take a turn troweling, but I've had to wear my wrist brace all week to give my poor arm a chance to rest. This is reaching the length of a novel, so I will just post some more pictures of the final product. We still need to do the stairs (at 2:30am we called it quits because we needed to get up for work in four hours) and baseboards and shoe molding, so these aren't the final final product, but we are getting close. It's been an adventure! We did have a few problem areas that we need to address, I will come back and post about that soon. Buffer application: Back to troweling:...See MoreDeck stain
Comments (44)I had a deck built two years ago. It is about 2-3 feet off the ground and has skirting but skirting that allows a good deal of air flow. About two month after it was built, I put on Thompsons water Seal...yah, I know. I like the natural wood color and thought that would be all I need. I have since realized it offers little to no UV protection and after 1.5 summers and now two Wisconsin winters, the moisture resistance is mostly gone. I am looking to put on some regular stain this summer. I am NOT going to be sanding it. I have a bad back and just the staining will be about all I can handle. Any suggestions and stain recommendations? I will probably be doing it in May or early June. Thanks, Bruce...See MoreI have had it with deck stain
Comments (154)I use TWP 100 Pecan 120 on a 14x25' deck. initially I applied 2 coats & right after the 2nd application it rained. I covered it with 2 large water proof tarps with no adverse effects. Looked better than I could have ever imagined. 3 years later I, contrary to my wife's input, & washed it with a triphosphate/bleach/hot water mixture (followed the Triphosphate box instructions) with a dark red cleaning pad 6" x 9". I cleaned 4 boards at a time going with the grain & going the 14' direction. I dipped the pads (cut one in 1/2 to cover the entire bottom of the applicator with 5 rubber bands holding the pad to the application. No rubber bands broke either & cheap ones at that. No sanding whatsoever! It happened to be hot & sunny the entire time, but you take what you can get. After cleaning each 4 board section, I rinsed the sections off going away from the uncleaned boards. I had to give a 2nd coat to a couple heavily greened areas, I waited only one day, even as it rained the very minute I finished the job. I waited only one day to stain. Steamy & sunny. Looks wonderful. Used an old car washing glove for the balusters, dipping in the stain & wringing it out. One can cover the entire baluster in one swipe!...See MoreGarapa Deck Install Questions
Comments (7)I'm still working out some of my issues, but here is my take: 2. I do not want to pre-seal all 4 (6) sides. Top only, after install. Yes, but the sides will be important for aesthetics if there is any gap between boards. Use lots of stain or spray it in the gaps. 3. SS Trimhead #7 2 1/4 screws are planned- wouldn't mind Headcoat if I could figure on a color. The difference between Ipe and Garapa is significant, but I plan on using a darker stain on the wood (116 perhaps?). Love liquid nails so I will do the 4?? adhesive just because. Yes on the #7 2 1/4" and adhesive. Adhesive will give you a quieter deck. 4. TWP or Woodzotic? I know there has been a lot of info flying around, but the concreteness of the data still has me wondering. Yearly maintenance is ok, but to a lesser degree would be preferential. I can't say, I recently stripped the TWP on my ipe, but it was 501 (CA VOC compliant) - it didn't work. Today I put down the Woodzotic, but that's not enough time to tell. 5. Rails will be Mangaris, would like to use same stain but accentuate the difference in color between the two different woods. Information here would be quite helpful. I think it's a good idea to use the same stain, and stain them at the same time. Hopefully the woods will show the difference. But, masking or cutting stain along edges is much harder than paint - it's hard to show clean lines. 6. Countersink vs. no countersink. The Garapa is a bit softer than Ipe, so I like the 5/32 pilot with no countersink idea. I am a bit OC so I will definitely chalk lines and use a jig to ensure screws are straight. 3/4 from edges and ends sounds about right, but I would like to be sure. Anchor Seal is a given, but should the skirt cover the ends or be flush with the joists? I think 3/4" from edges is max, shoot for 1/2-5/8." If you are truly OC, you will countersink. I would countersink pine if it was my deck. 7. Gapping. I am clueless. 1/8, 3/16, flush? Much help here if possible. Kiln dried may expand, air dried will shrink. Be sure you know what you have. I used air dried ipe, with 0-1/16" gap. All of my boards now have a 1/8-3/16" gap and I would not want any more (I used 1X4). 8. Deck is ~1 ft above ground on low end and 20" on high end with ventilation on three sides. Is this sufficient? 9. Sanding? I am reaaaallly confused on this topic. I sanded the whole deck, but I think you can sand the problem spots, if any, and then RAD the whole thing to clean and prep it. good luck....See Moretibbrix
9 years agoblubird
9 years ago
cold_weather_is_evil
9 years agotibbrix
9 years ago
Faron79
9 years agoblubird
9 years agoacatalfamo47
8 years agoblubird
8 years ago
P G
3 years agoblubird
3 years ago
Related Stories

GREEN BUILDINGConsidering Concrete Floors? 3 Green-Minded Questions to Ask
Learn what’s in your concrete and about sustainability to make a healthy choice for your home and the earth
Full Story
KITCHEN COUNTERTOPS7 Low-Maintenance Countertops for Your Dream Kitchen
Fingerprints, stains, resealing requirements ... who needs ’em? These countertop materials look great with little effort
Full Story
KITCHEN DESIGN9 Questions to Ask When Planning a Kitchen Pantry
Avoid blunders and get the storage space and layout you need by asking these questions before you begin
Full Story
MOST POPULAR8 Questions to Ask Yourself Before Meeting With Your Designer
Thinking in advance about how you use your space will get your first design consultation off to its best start
Full Story
EXTERIORSCurb Appeal Feeling a Little Off? Some Questions to Consider
Color, scale, proportion, trim ... 14 things to think about if your exterior is bugging you
Full Story
DIY PROJECTSCool Tip: Mimic Stain With a DIY Color Wash
Get the look of an oil-based stain without all the bother, using this easy wash made with paint
Full Story
WOODTry DIY Plywood Flooring for High Gloss, Low Cost
Yup, you heard right. Laid down and shined up, plywood can run with the big flooring boys at an affordable price
Full Story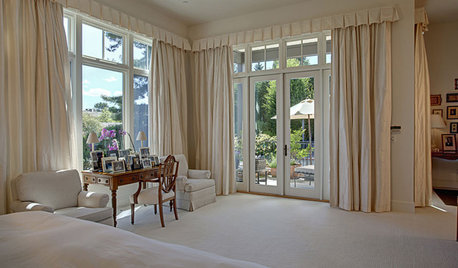
WINDOW TREATMENTSHow Low Should Your Drapes Go?
Hover, brush the floor or pool like Scarlett O'Hara's tears — we give you the lowdown on curtain length options
Full Story
SELLING YOUR HOUSE10 Low-Cost Tweaks to Help Your Home Sell
Put these inexpensive but invaluable fixes on your to-do list before you put your home on the market
Full Story
KITCHEN CABINETSKitchen Cabinet Color: Should You Paint or Stain?
Learn about durability, looks, cost and more for wooden cabinet finishes to make the right choice for your kitchen
Full Story


Faron79