


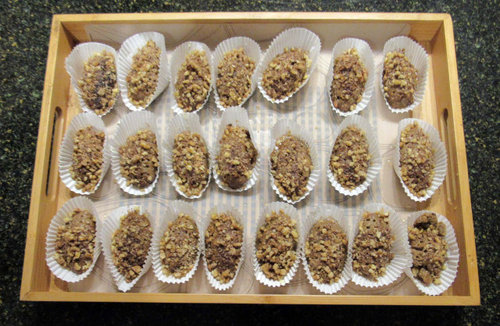
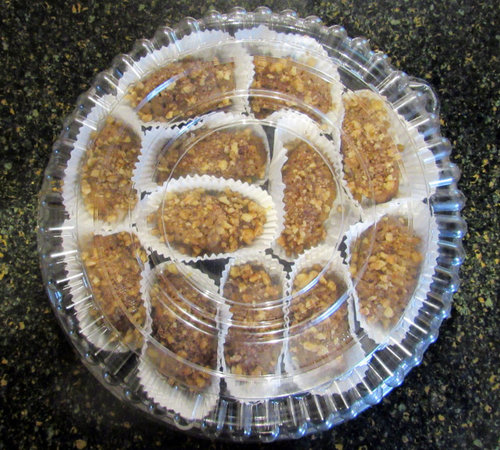
Revised Melomakarona cookie recipe
Lars
last month
last modified: 29 days ago
Featured Answer
Sort by:Oldest
Comments (8)

Lars
last monthRelated Discussions
favorite back of the bag/box recipes thread
Comments (29)I made the recipe from the back of the Hershey's Cocoa box and it was pretty good. It's a chocolate cake recipe with chocolate frosting. I love a recipe where the only ingredient for choclate is cocoa, because I keep that on hand. I usually have a square or two of baker's choclate, but never enought to make a whole recipe with. I buy it on a per project basis. It wasn't quite done on time, so I left it in the oven a little longer and the edges got a little overdone. A glass of milk helps with that. It's a very dark and moist cake. The order in which you add ingredients seemed a little weird for me. Maybe because I'm used to making cookies. You start with the flour, sugar, salt, soda, powder, and cocoa. Then add the eggs and vanilla. Then some milk and a cup of boiling water. Strange order it seems. I'm sure it would have been even better had I not baked it in silicone baking pans. I really dislike those things!...See MoreCookalong Extra! ****Holiday Cookies****
Comments (102)I have never read or posted in this section of GW, but the link for Holiday Cookie Recipes appeared at the top of a page I do frequent, and the idea was just too tempting to bypass. Let me preface by saying that I am not the cook in our family. That distinction belongs to my husband, who missed his calling in life... he could have been a famous and well loved chef. So, he generally cooks, and I generally get clean-up duty. :-) Due to health issues we cook almost exclusively from scratch, pouring over product labels to ensure only pure, organic, natural, unprocessed and healthy ingredients are used. If we must, we order products and have them shipped. For example, if a recipe calls for vegetable oil, we would use cold pressed coconut oil instead. Sugars are kept to a minimum, are organic when used, or we substitute raw organic honey. Flour is unbleached and organic. I want to thank you all for sharing your recipes, several of which I've copied and plan to try this season. They all sound and/or look amazing, but my expertise extends as far as simple drop cookies, so that's where I usually concentrate my efforts. Decades ago, my Mother gifted me with a set of recipes from Mary Masters - My Great Recipes. Perhaps some of you have heard of them. My all-time favorite drop cookie recipes from the set are: Haymarket Chocolate Chip Cookies These are thin and crispy chocolate chip cookies that are often found in cookie shops. The edges are browned and crisp but the centers remain pale. * ½ cup soft butter or margarine (must be room temperature) * ½ cup sugar * 1 egg * 1 tsp vanilla extract * ½ cup sifted all-purpose flour * ¼ tsp salt * 1/3 cup chocolate chips * 1/3 cup chopped pecans or walnuts Cream butter and sugar until light. Add egg and beat until creamy. Stir in vanilla, flour and salt until a smooth batter forms. Stir in chocolate chips and nuts. Line cookie sheets with foil and grease lightly. Drop batter with a teaspoon, well apart on the baking sheets (they will spread out while baking) Bake at 350F for 7-10 minutes until edges are golden and centers are set. They will be soft when hot so remove immediately from baking sheet and cool on racks. They will become crispy as they cool. Makes 24-30 cookies. (Rack placement depends on how your oven cooks... I place mine centered to avoid uneven browning on bottom or top, and I turn the cookie sheets halfway through to obtain even cooking.) Oatmeal Lace Cookies 1/2 cup butter, melted and cooled 1/2 cup sugar 1/2 cup brown sugar 1 large egg 1/2 tsp vanilla extract 1 1/2 cups quick cooking or rolled oats (not instant) 1 tbsp all purpose flour 1/4 tsp salt Preheat oven to 325F. Line a baking sheet with parchment paper. In a small bowl, melt the butter and allow to cool slightly, for 2-3 minutes. In a large bowl, whisk together sugars, egg and vanilla extract. Pour in the cooled, melted butter and whisk to combine. Add in oats, flour and salt, and stir with a wooden spoon or spatula until well combined. Allow batter to stand for 5 minutes. Scoop 1 teaspoon sized balls of dough and place onto prepared baking sheet, leaving about 3 inches between cookies to allow room to spread. Bake for 14-16 minutes, or until crisp and golden. Allow cookies to cool for 4-5 minutes on the baking sheet to give them time to firm up, then transfer them to a wire rack to cool completely. (I usually put both types of cookies in a container the moment they are cool to help retain a little chewiness in the centers, though the edges will be deliciously crispy. And again, ensure your oven racks are placed for even baking.) Tips: Not only do I allow the butter to come to room temperature before using, I also take the eggs out of the fridge at the same time. All ovens differ, so oven rack placement and turning the cookie sheets halfway through the bake help ensure an evenly baked cookie without burnt bottoms, or a partial sheet darker than the others. Enjoy!...See MoreFound a Waffle Baker & Revised the Recipe
Comments (22)Bobbie : If you can take a picture, it would help. Top and bottom. Or check the Model # I'll take a look at mine, to see if it comes apart easily. If it is the same as mine ( Toastmaster Model 252A ), Don't throw it away. Mine looks like it should go in the trash, but it bakes better that any other I had before. You might be able to use an angle bracket and put a screw into the rivet hole , But not too far in, to where you would hit any wires. Cut the metal bracket leg off to the same height, as the other legs and put a rubber boot on the bottom. You could also use a piece of 3/4 IN. copper tubing. Flatten one end and bend it 90 deg. Drill a hole to put a screw thru,into the bottom of the waffle iron. Cut the copper to the same height as the other legs. Put a rubber boot on it, or stuff a cork in it, so it won't scratch. It should only take 5 minutes to make the leg. Let me know how it turns out. Maryanne: Good thing I didn't see the one in Hazelton first. Why didn't you put a plug on the old one ? You woman like to throw things away. Your Dog likes Waffles ???????????????? No Kidding !!! Now I know why you threw the other Waffle Iron away. Wheeee eeooooooooooooo !!! LOU...See MoreRECIPE: I've finally mastered pizza, and am sharing my recipe
Comments (46)Annie, I can't speak to the perforated pan, since my method is to use parchment paper. If you use my crust, it's easy to make the thinnest crust pizza just using your hands. It's only technique, but for myself, I like the parchment paper on the stone and liken using a stone as a quick sear method to help set the crust. If the pizza is thin enough, and you don't overload it with ingredients, the middle won't be soggy. At the high heat, it also comes out with the browned crust you expect from a pizza parlor. I always make the outer edge of the crust a little thicker, with the middle as thin as I can make it. Try using half the amount of ingredients you normally would and see if it makes a difference. (I know, it goes against my basic nature to use restraint, but it really makes a difference!) One recipe of my crust will cover the bottom of a half sheet pan (on parchment), which lets you know how much the dough should stretch. I've tried Ann's method of using an peel and sadly I am obviously not coordinated enough to manage it. It seemed that in order to get them to move, my crusts always had too much flour, and the cornmeal always burned and smoked in my oven. I'd really like to watch her do it, so I figure out a new technique! My pizza crust also has an olive oil coating (top and bottom), which helps create a crispy exterior and flavor that I like. It's impossible to move anywhere after you oil the dough, spread it out and load it, which is why I like making it on the parchment. This is only a theory on my part, but I think when you make your crust in a pan, the tendency is to overload the toppings since you have a pan to support the crust. The pan will take time to heat up with the pizza in it, which is why the top burns before the bottom gets done. There are many ways to make pizza, however I know this is the only way I can make mine turn out! Since I'm also a fan of thin and crispy (St. Louis style) pizza, that's the style I wanted to learn to make. I am dismal failure with anything else......See MoreLars
29 days agolast modified: 29 days agoLars
27 days ago
Related Stories
KITCHEN OF THE WEEKKitchen of the Week: Storage Galore in a 1920s Colonial
Pullouts, slots, special drawers and more — this customized kitchen packs in plenty of organizing solutions
Full Story
DECORATING GUIDES10 Popular Home Design Trends — Timely or Timeless?
Weigh in on whether these of-the-moment decorating elements will have staying power or become a memory of these times
Full Story
LANDSCAPE DESIGN5 Reasons to Consider a Landscape Design-Build Firm for Your Project
Hiring one company to do both design and construction can simplify the process. Here are pros and cons for deciding if it's right for you
Full Story
MOST POPULARThree Magic Words for a Clean Home and a Better Life
Not a natural tidying and organizing whiz? Take hope in one short phrase that can change your life forever
Full Story
REMODELING GUIDES5 Trade-Offs to Consider When Remodeling Your Kitchen
A kitchen designer asks big-picture questions to help you decide where to invest and where to compromise in your remodel
Full Story
FEEL-GOOD HOMESimple Pleasures: 10 Ideas for a Buy-Less Month
Save money without feeling pinched by taking advantage of free resources and your own ingenuity
Full Story
colleenoz