


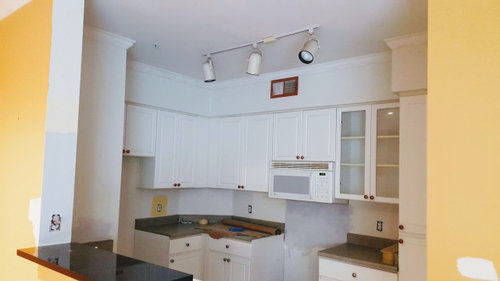
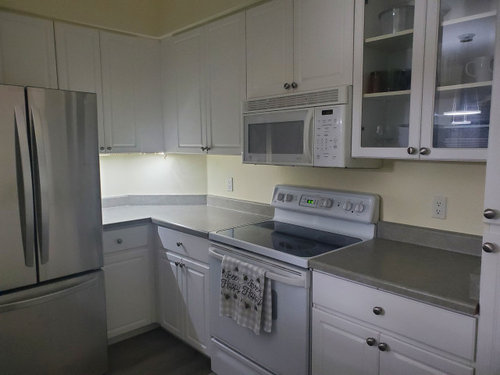
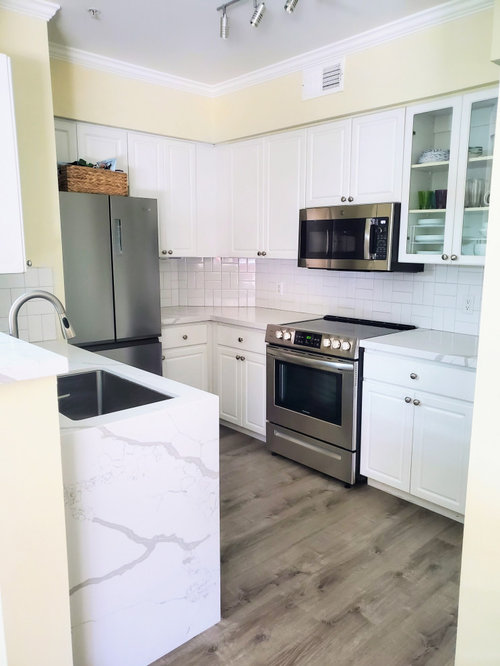
Kitchen Remodel Before and After Photos
last year
last modified: last year


Featured Answer
Sort by:Oldest
Comments (11)
Related Discussions
Painted 1980's veneer kitchen cabs... before & after photos
Comments (26)WE painted our cherry veneer 20 year old cabinets in our old house. We also replaced appliances, counter, backsplash, fixtures and found the old floor. I think you are on the right track removing the overhang, but also removing the soffit will make a huge differnce. Do it if there is nothing in it that is too difficult to relocate. If you do not replace doors, definitely fill in the groove and sand flat. You also be able to add glass to a few uppers to really make an impact. The fun thing about painting old cabinets is that you are not destroying anything and making an improvement. You could try different colors. We pained ours about every 3 years, first white, blue, then yellow. I wanted to try gray but we sold the house. We also cut out some of the uppers for glass, but ended up cheaping out and using wire. We also used Soapstone remnants, since we did not want to tear out anything too great because we wanted to eventually replace cabinets (moved first). We were able to them for $2500. Before: First remodel in progress (no finished photos): Yellow:...See MoreKitchen Remodel Finally Complete....Before and After
Comments (55)Quick update... I ended up ordering a spoon and fork from Target.com. Here's a pic of it installed on the back wall. Also finished up installing my DIY under cabinet lighting... these lights are bright!!!! So glad I used a dimmer switch...this is the dimming level I tend to keep it at. Also forgot to mention that one of the pantries is a broom closet. After living in my new kitchen for almost of month now, I feel like I got everything right and did the best I could with the space I have. Trash cabinet, baking tray cabinet, broom closet, sink drop down tray, spice rack, plus all of the additional cabinet space makes me one happy camper. :) My only regret is not putting in pull outs for my pots/pans and lids. It's a bit of a pain having to bend down and look back into the cabinet to find what I'm looking for. Maybe at a later time... since it's still possible. Another thing I'm finding an issue with is our fridge. We bought a counter depth so we could have additional room, but it's been tough living with the limited space. Luckily, we still have our old fridge, so we're thinking of keeping it now to store larger items....See MoreBefore and After Kitchen Photos
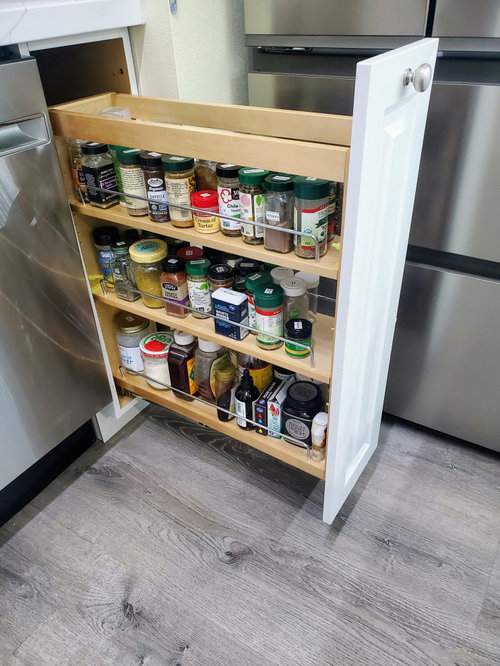
Comments (14)Thanks! OK, here are a few details. The cabinets were made here locally in San Diego by a company that works in conjunction with our contractor. They are a white paint on the top and a dark espresso stain on the bottom and are made from alder. Some details we are enjoying are the pull-out for trash and recycling, two spice pull-outs by the stove, and dividers up above the fridge for cutting boards and cookie sheets (I highly recommend the dividers)! The countertop is One Quartz made by Daltile and the pattern is called White Sand. It looks solid white from afar but has a lot of texture up close. The cooktop is a 36 inch 5-burner model from GE (not induction) and the downdraft is from GE and vented under the floor and across to the exterior wall. The other appliances are all Kenmore. There is a smallish microwave inside the pantry area. The backsplash is glass tile, also from Daltile, called Color Wave in color Whisper Green. I completely changed my mind about what I wanted to do with the backsplash, but I think it worked out. The sink is made by Blanco and it's my favorite part! The right side is just as big as the side of a 50/50 sink, so I can use a dish rack in it, but the left side is 6 inches wider and fits large pots and pans. Perfect! The faucet is Kaden by Moen and is great. The hardware was a great, inexpensive find! It's made by Bayport House. I thought it was kind of unique and blended a modern and traditional look. It is good quality for the price. The pendant lights are called Bolla and made by Hinkley Lighting. There's a matching chandelier in the adjacent room. It's a seeded glass shade and we've been trying different types of vintage-looking bulbs. We raised the ceilings and got rid of a soffet, so we gained 13 inches of cabinet on one side and 6 inches across the rest of the kitchen. That, along with the new layout, gave us an incredible amount of new storage. We also took out a built-in TV cabinet in the other room and used the space to enlarge the storage closet under the stairs. Did I forget anything? :)...See MoreBEFORE pics of my Kitchen remodel... Need ideas for my AFTER update!
Comments (24)Chris, I did to my custom cabs exactly what you want to do. They were solid wood, great shape, but after 15 years I couldn't stand the overall dark feel. I had them refaced and everything painted. new countertops, vent hood, splash, window, everything. The company I hired to paint also deals w/refacing. for an additional 2K, I got all new doors, drawer fronts. (I prob have twice the cabs you do, including a 4X7 island) The new doors are all solid maple w/center panels made from MDF. when painting, MDF is a better choice for the panels than solid wood. To answer your questions about getting new doors that aren't painted, yes, they would then have to use a veneer material to skin your base cabinets so that they would match. something else you should change over is the lower doors to drawers. a good refinishing company can also do this for you. I had them make two large drawers in my island where open shelving used to be. so much better for storing large pans have you had any estimates? If going the painting route, make sure you get all of the steps they take in priming. if getting them refaced, those should come raw, so all they have to do is prime and paint. you can also get soft closing hinges. You're prob looking at well over 6-7K for just painting, and then whatever extra they charge for refacing. as for the gap to the ceiling, there are diff ways to tackle that. since your current cabs have a large wood edge (the part above your doors) , it might be difficult to add on boxes to that. you see how the doors immediately transition into the added boxes? You have that 3-4" of wood above your doors. what you might be able to do is get taller doors to cover that, remove the crown, and then build the boxes above that. or, you could add on a decorative molding or large crown This one might work for you. another poster on here had these, but notice how her doors almost touched her crown molding. They removed that Built boxes and then added doors. I believe she told me this cost her 2K to have that gap closed like this these are mine, before. I'm sure people thought I was crazy for changing it. I didn't care. I lived w/it for 15 years, the finish was wearing and I was tired of dark. notice my drawer/door design. see how the top drawers are slab and the others shaker style? This is why I refaced so they would all match. all of the fluted / rope trim and corbels were removed. micro was moved. vent hood made. drawers in island made. doors added to desk area. We did the window ourselves. new marble/quartz, lighting, flooring, appliances. I did Wrought Iron on my island, bright white on the others. there's a double pantry to the left you can't see. You say you don't want white, which is fine, there are plenty of other colors. Revere Pewter edgecomb gray Navy Kendall Charcoal This just gives you an idea. what is your budget? If you say 10K, that may get you countertops and new tile backsplash....See More last year
Related Stories

KITCHEN MAKEOVERSBefore and After: 3 Remodeled Kitchens With a Vintage Vibe
A hand-painted hood, a brick fireplace and patterned porcelain tiles add classic charm to these renovated kitchens
Full StoryKITCHEN MAKEOVERSBefore and After: 3 Kitchen Remodels in 185 Square Feet or Less
Refaced cabinets, clever storage and better layouts make these kitchens feel bigger, brighter and more functional
Full Story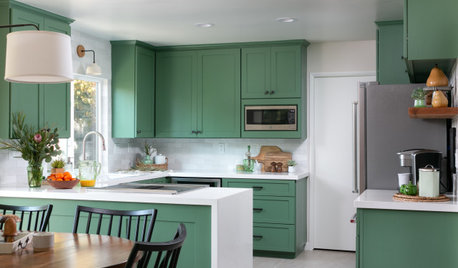
COLORFUL KITCHENSBefore and After: 3 Kitchen Remodels That Go for the Green
See how vibrant shades of green on cabinets and islands bring energy to these kitchen makeovers
Full Story
KITCHEN MAKEOVERSBefore and After: 5 Kitchen Remodels Under 160 Square Feet
New layouts and lighter palettes help these smaller-than-average kitchens feel more open and bright
Full Story
KITCHEN MAKEOVERSBefore and After: 3 Kitchen Remodels in About 285 Square Feet
See the materials and layout changes designers used to transform these nearly same-size kitchens
Full Story
KITCHEN STORAGEBefore and After: 4 Kitchen Remodels With Smart Storage Solutions
Pullouts, inserts and careful planning ensure that these newly renovated kitchens pack it all in and stay organized too
Full Story
KITCHEN MAKEOVERSBefore and After: 3 Kitchen Remodels That Kept the Same Footprint
See how pros transformed these kitchens without changing their sizes or layouts
Full Story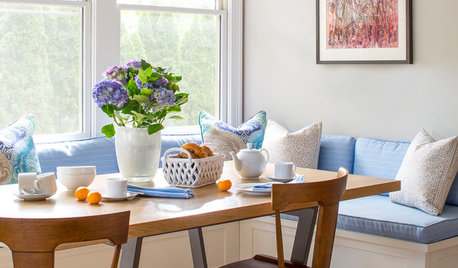
KITCHEN MAKEOVERSBefore and After: 3 Kitchen Remodels With Stylish Breakfast Nooks
See how designers added breakfast nooks to these kitchen makeovers to provide more seating and storage
Full Story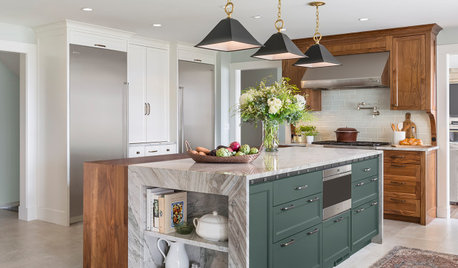
KITCHEN MAKEOVERSBefore and After: 3 Kitchen Remodels That Added a Large Island
Home pros, including one found on Houzz, create stylish family hubs with storage, shelving and microwave drawers
Full StoryBEFORE AND AFTERSBefore and After: See a Complete Kitchen Remodel for $35,000
An expanded layout, new maple cabinets and granite countertops breathe new life into this family gathering space
Full Story
blfenton