


Plumbing connections in concrete? Tile bathroom before or after tub?
Peke
3 years ago
last modified: 3 years ago

Featured Answer
Sort by:Oldest
Comments (17)

Peke
3 years agoRelated Discussions
Is a tub in master bathroom Important?
Comments (24)Cindaintx - thanks. We are so excited about the topo map vanity! :-) We are building a log house in the foothills of the Cascade Mountains of Washington State. We decided to put a log vanity in each of the bathrooms - some of the log furniture companies sell them. They're well made, and are decently priced. If you choose to get their wood slab top, they will cover it with a liquid glass coating, which is durable, waterproof, good for a bathroom environment. Dh and I love the outdoors, and tying the outdoors to the inside makes sense for a log house. So - we decided to get a topo map of our area, with the mountain we live near featured prominently on the map. Mytopo.com has topos of many outdoor areas, and you can choose sizes, etc. Our log vanity supplier, JHE Log Furniture Store, has agreed to put our topo map (from My Topo) under the liquid glass - like decopauge (sp?). Of course, the sink and faucet will take up some of the space, but since it's a 48 inch vanity, there will still be a fair amount of map showing on the wood vanity top. I thought of this myself, so I am eager to see how it turns out! Since DH and I both hike, this is going to be a fun feature of that bathroom. Of course, the same thing - embedded topo - could also be done on a tabletop, etc...Do you hike? We have been brainstorming about other ways to bring the trails, the wildlife, etc. into our home. We're having fun with this!...See MoreExterior uninsulated bathroom wall and tub drain question:
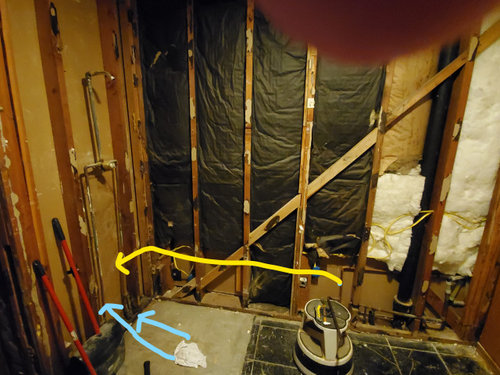
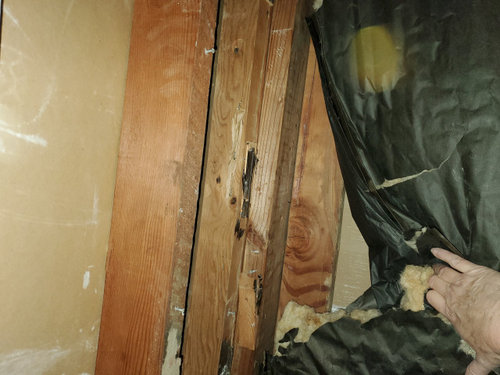
Comments (6)Bill, thanks for the reply.. Attached is a photo of the exterior wall. The tub lip will be near the top edge of the lower piece of blue insulation. With the window, the additional furring around it, and the cross furring there is not that much rigid insulation. The plywood on the exterior wall was to take the place of furring strips to move the durarock out to fully overhang the tub. This would also give me more to screw the durarock to. As a byproduct, I hoped to gain a bit more insulation. Is the concern more the plywood (as opposed to furring strips which would allow more air movement), or is it the rigid insulation trapping moisture, or the combination? Would plywood be ok if there was no rigid insulation? From other posts, it was recommended that if using fiberglass with kraft facing, to cut the kraft paper face every foot. This would allow moisture to escape. Since the rigid insulation is not wider than a foot I thought it would allow sufficient moisture migration. As an alternative, I could just peel 1 inch of unfaced fiberglass insulation and place it on the exterior wall instead of the rigid insulation. I did this in the paneled basement that has a similar exterior wall (and it helped). Or if the concern is more the plywood, I could put furring strips in. Yes the existing furring strips were not very level. I replaced 2 (both sides of window), and added another just above the tub lip (for screws). Then with the plywood, shims and screws planned to make the surface more level for the durarock. From your post, I interpret that you may also be suggesting durarock directly on the existing furring strips (with vapor barrier). Thus no plywood or additional furring strips to move the durarock out farther and fully over the tub lip. Floating the wall might be easier, but I have my experience with thinset and tile so hoped to stick with that. For the 1.5 2 inches on the ends, I was going to again use plywood to furr the wall out. I planned to split the difference and make up some of the gap on each end. However, based on your suggestion I now plan to sister the 2x4 on the back wall and put most of the 1.5-2 inches there. Attached is a photo of the floor for completeness. I added another joist (2nd out from wall) between a steel I-beam and a wall that sits on a concrete floor below. The new joist was cross braced to the existing joist along the exterior wall. It was placed to sit under the left set of feet on the tub. The position of the tub feet are marked with white paper in the photo. I then used joist hangers to support the joist to be cut (3rd out from wall). I placed the cross support to sit almost under the right front tub foot. I then cross braced to support the tub left back foot. So all the tub feet will sit directly over a structural member. The tub feet are referenced from someone sitting in the tub facing the drain....See MoreVote? What to do with small bathroom... tub or shower?
Comments (42)I love an old tub!!! And by the looks of yours, it is not a new model! If I'm a buyer looking at your house, I'm thinking "great! That tub is original and probably comfortable!" Our tubs in this house (built in '94) are steel and they are definitely not comfortable to recline in. They also don't hold the heat like an older (quality) cast iron tub will. You have a little treasure that just needs some TLC! I'd suggest checking out tub/tile re-finishers in your area. I know what you are talking about with an older tub---the kind momma scoured with Comet every week until the glaze was gone! They can also cover up those sailboats too. Do you plan on keeping the slate floor? It looks nice to me. The only other suggestion (aside from swapping the door and vanity) would be to put up some bead board on the lower section of the wall. Why? Well, the way the tub tile butts into the window looks awkward. If you have white bead board next to the tile (under the window and beyond) then there won't be any contrast in color and the lack of space between the tile and window won't show up at all. Above the bead board, I'd nix the yellow and go with a light sandy, golden tan. I could see this bath looking very Pottery Barn/beachy. She does not like the sink? Those crazy sailboats? The grody tub? Well, you've obviously done something right, LOL!!! The kid has good taste--what more can you ask for? :)...See MoreDIY bathroom reno finally complete! Before and after pics
Comments (43)Just one side note, it was mostly DIY- all of the plumbing and tub installation was done by a plumber. And the plaster walls were resurfaced by a professional. They were pretty bad after removing the tile. And my husband wanted plaster not Sheetrock....See MorePeke
3 years agoPeke
3 years agolast modified: 3 years agoPeke
3 years agoPeke
3 years agoPeke
3 years agoPeke
3 years agoPeke
3 years agolast modified: 3 years agoPeke
3 years agolast modified: 3 years agoPeke
3 years ago


Related Stories
BEFORE AND AFTERSBefore and After: 6 Bathrooms That Said Goodbye to the Tub
Sleek showers replaced tub-shower combos in these bathroom remodels. Could this be an option for you?
Full Story
BATHTUBSBefore and After: 6 Dream Bathrooms That Free the Tub
Freestanding tubs replace bulky built-ins in these beautiful bathroom remodels
Full Story
BATHROOM DESIGNBefore and After: 4 Bathrooms That Ditched the Tub
See how designers removed bathtubs in favor of sleek walk-in showers in these bathroom remodels
Full Story
BATHROOM MAKEOVERSBefore and After: Tub-Shower Combo Gets a Major Update
A mother-daughter bathroom in Toronto now has function and style, thanks to clean design and custom storage
Full Story
BATHROOM MAKEOVERSBefore and After: 7 Bathroom Makeovers That Keep the Same Layout
See how designers transform bathrooms without the expense of relocating the plumbing
Full Story
BEFORE AND AFTERSBefore and After: 4 Spa-Like Bathroom Makeovers
See how designers use soaking tubs, spacious showers and luxe materials to make these rooms feel like a day at the spa
Full Story
BATHROOM DESIGNBefore and After: Room for a Tub and Shower in 84 Square Feet
A Canadian couple replace the shower-tub combo in their bathroom with a walk-in shower and a built-in tub
Full StoryBATHTUBSBefore and After: Tubs That Say Hello to Glass
Clear glass enclosures give these 5 tub-shower combos a sleek new look. Could this be an option for you?
Full Story
BEFORE AND AFTERSBefore and After: Stylish and Streamlined Small Bathroom
A design firm helps a New York couple update a 45-square-foot bath and avoid surprises by limiting material choices
Full Story
BEFORE AND AFTERSBefore and After: 19 Dramatic Bathroom Makeovers
See what's possible with these examples of bathroom remodels that wow
Full Story

formulaross20