


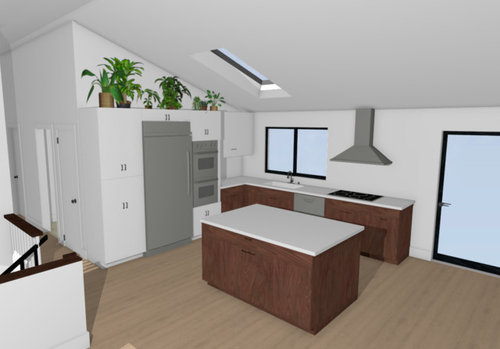
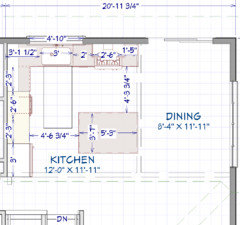
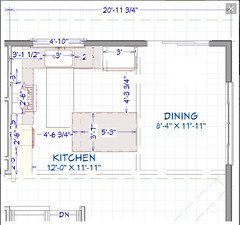
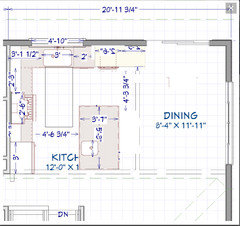
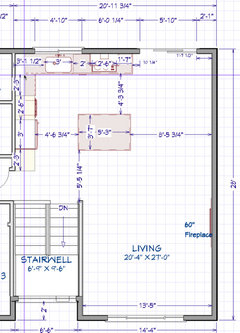
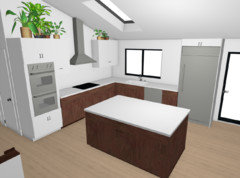
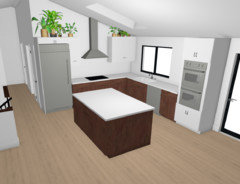
Would love input on our kitchen design before I start finalizing
4 years ago

Featured Answer
Sort by:Oldest
Comments (32)
Related Discussions
My 2014 Seed Order (almost final - would love input!)
Comments (6)Shelley, Viva Italia is pretty compact--reaching maybe 3 or 3.5' in height. It doesn't spread out a whole lot, so you can plant them closer together than you'd plant an indeterminate. I prefer indeterminates because tomato plants that are 6 to 8' tall generally give me a larger harvest than those that are 3' tall. It makes sense as there is twice as much plant there with the taller varieties. Heat tolerance, like beauty, is in the eye of the beholder. What a person considers heat tolerant can hinge, largely, on what level of heat their area has. A hot summer in Pennsylvania, for example, is not the same thing as a hot summer in southern Oklahoma. I have not noticed that Viva Italia is any more or less heat-tolerant than any other paste tomato. For me, paste tomatoes set fruit in hotter weather in the summer than slicers do, and since they do that, I tend to think of all pastes, as a group, as being better heat-setters than slicers and beefsteaks. I don't necessarily notice a huge difference between paste varieties in terms of which one is still setting fruit when my daytime high is 95 versus 98 versus 102, but it is clear to me that they continue setting fruit in July long after the heat and humidity have shut down most slicing types. The spacing of tomatoes is a hugely complicated subject. I vary my spacing from year to year, depending on the variety I'm planting as well as what sort of weather I am expecting. I space them farther apart if it is going to be a wet year because they will get a lot bigger, and space them more closely if I expect a drier year. I space them farther apart if I know from experience that the variety I'm planting grows into big monster plants. I space them more closely if experience has shown me that they tolerate closer spacing. I might space them more closely in a bed that's been super-enriched that year with the addition of tons of compost, and might space them farther apart if that bed didn't get much compost lately. So, I cannot tell you how closely I space tomato plants because I vary the spacing from year to year, and even from one raised bed to another in one year. In general, three foot spacing is fine, and four feet is better for the largest indeterminates. You can space some determinates 2' apart although 3' apart is better. Some years I want to grow too much of everything and cram plants in much more close to one another than I should. What works for one variety doesn't work for another. You just have to experiment with different spacing in different situations until you learn what works for you in your soil and with your temperature and with your moisture levels. With Tess' Land Race Currant, I don't like to plant anything within 4 or 5' on any side of it because it is a monster plant. It would be smarter to just plant it out in the middle of the yard where there's nothing within 8' of it. So, you have to know your plants and how they grow in your soil in the average year in order to determine what spacing works best for you. Closer spacing often gives you fewer fruit per plant, but if it enables you to plant more plants in the square footage you have available to you, you still might get a larger harvest overall. I always plant 4 times as many tomato plants as I need (though never as many as I'd truly love to plant) and I plant them twice as close together as I know I should. Virtually every year I get all the tomatoes we can eat fresh, all the tomatoes I wish to can, dehydrate or freeze, and still have plenty to give away, so I won't change planting that closely....but I wouldn't necessarily recommend such close spacing to someone else because I don't know what their soil, their moisture levels, and their weather will allow. Make sense? In a perfect world, I'd plant my indeterminate tomato plants 4' apart in rows 6' apart, but in the real world, they are lucky if I plant them in 3' apart in rows 2' apart. I'll have a two-foot pathway, then a 4 or 5-foot wide raised bed that has two rows of tomato plants, then another 2' wide path, then another raised bed. I don't even measure how far apart they are. I just eyeball it, though I've done it long enough that I can eyeball it pretty well. What works for me with the soil I have and the fertility level it has reached after 15 years of improvement might not work for someone else with different soil. So, spacing is something you have to master for yourself in your own conditions. Because the heat tends to shut down production at some point in June or July, I try to get all my canning done in June and the first part of July, and then I can just yank out the paste tomato plants and focus on other parts of the garden. Usually by mid-July, I've 'had it up to here" (lol) with canning tomatoes and am ready to move on to making pickles or canning peppers or whatever. Some people in some parts of the country that cannot put their plants into the ground until late May or early June haven't even starting canning tomatoes yet, and there I am already done....and glad to be done. Canning in August when the high temps are 105 to 110 or even higher is not my favorite activity. I'd rather be done with all the canning before we get that hot. Finally, the single factor that plays the greatest role in what sort of fruit set I get in any given year is simply how early I can get the tomato plants into the ground. My average last frost date is March 28 but we usually have a freezing night about once a week through the first week in May. If I waited until May to put transplants into the ground, it likely would get too hot for fruitset before they even had time to flower and set fruit, so I'd have to wait until autumn to harvest tomatoes. Instead, I plant as early as I possibly can, cover up the plants with floating row cover when cold weather threatens, and do whatever I can to get those plants flowering and setting fruit before the heat sets in. This involves lots of guess work and lots of hand-wringing when April brings an Easter snow storm a month after I put tomato plants in the ground. Heat tolerance will carry you and your tomatoes only so far, but you can win the war by planting early, early, early. Gordon Graham liked to put his tomato plants in the ground two months prior to his last frost date in Edmond, and he often had to stack two WOWs on top of one another to protect his tomato plants from late freezes or frosts or snow or sleet. I have a sloping garden so WOWs don't work for me....they just topple over and roll downhill when I fill them with water. I use floating row cover instead, and in some years when early warm weather was followed by snow around Easter, I have built low tunnels of PVC pipe and 6 mm greenhouse plastic and kept the tomato plants covered by the low tunnels for almost 3 weeks. Since our weather seldom cooperates with us, we just have to work around it in order to achieve the garden harvest we want when we want it. My best tomato year in ages was in 2012 when I was able to start putting tomato plants in the ground around March 10th. We still got really hot in June and were really dry in July and August, but the plants had set huge loads of fruit in April and May, so that I was able to just keep harvesting them pretty deeply into summer. A year with an early last freeze like that is pretty rare---maybe once a decade or, in a really good decade, maybe twice. I correctly concluded, based on the January and February weather, that I could plant in March that year and it all worked out. However, you're really just guessing when you take that sort of risk and it can just as easily not work out. If my soil temperatures and air temperatures are in the right range for the tomato plants, I'll plant early more often than not. It is the air temps and the soil temps that either allow the tomato plants to grow or not, not a specific date on a calendar, so I tend to plant when my brain tells me to, not when a calendar says it should be safe. As erratic as our weather is, I almost never do things the same way two years in a row. That is part of what makes gardening fascinating.....it is like playing chess with the weather and you have to use whatever strategy it takes to help you win the game. Tracy, I was sort of assuming that TLC would have BI seeds, but didn't want to guess. Thanks for confirming that. Carol, Thanks for linking the recipe. Dawn...See MoreThoughts on my Kitchen Design? Would love input
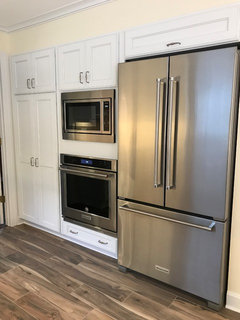
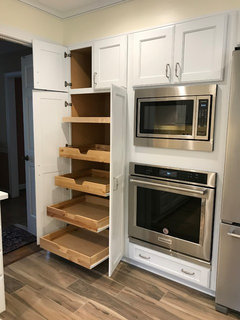
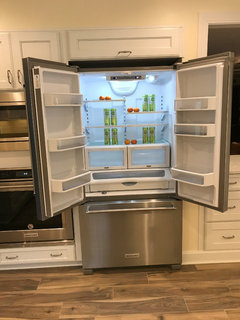
Comments (22)Thanks for the responses! Interesting... Okay, to answer a few questions -- yes, there is a pantry. It is thru the mud room entry, and is virtually right behind where you see the wall ovens. It is in a different room technically, but close by. It's the only place we could make one fit. We had this huge kind of fridge in our last house and we got spoiled with it... BUT, I don't want it to be the elephant in the room! As far as where the microwave is located, instead of going with double ovens, I'm doing the stack with micro/convection oven on top, and oven below it. I'd be willing to nix the desk, I guess. My husband will not agree, but I'm the one that spends the most time in this room! I definitely want it to function well! Thanks for your input. Keep it coming...!...See MoreFinalizing Kitchen Design and Layout - would love input!
Comments (25)When trying to fit an island in a kitchen, keep in mind the following...... (It's kind of generic, so there's probably stuff in it that you don't care about, but I wanted to be thorough!) First, the NKBA recommends minimum aisle widths of 42" for a one-worker kitchen and 48" for a multiple worker kitchen. However, many here swear a minimum of 36" will work in some cases*. So, here are minimum kitchen widths with an island: Island w/cabinets and/or appliances on one side and no seating: Minimum aisles* and no traffic: 25.5" + 36" + 27" + 36" = 124.5" (10'4.5") [basis of next numbers] For one aisle of 42" with Traffic b/w island & one run of cabinets (on larger aisle side): + 6" = 130.5" (10'10.5") For two aisles of 42" with Traffic b/w island & one or two runs of cabinets: + 6" + 6" = 136.5" (11'4.5") For one aisle of 42" and one of 48" (for frequent/heavy traffic): + 6" + 12" = 142.5" (11'10.5") For ideal aisles of 48" (w/multi-worker kitchen or frequent/heavy traffic): + 12" + 12" = 148.5" (12"4.5") Island w/cabinets and/or appliances on both sides and no seating: Minimum aisles* and no traffic: 25.5" + 36" + 27" + 36" + 25.5" = 150" (12'6") [basis of next numbers] For one aisle of 42" with Traffic b/w island & one run of cabinets (on larger aisle side): + 6" = 156" (13') For two aisles of 42" with Traffic b/w island & one or two runs of cabinets: + 6" + 6" = 162" (13'6") For one aisle of 42" and one of 48" (for frequent/heavy traffic): + 6" + 12" = 168" (14') For ideal aisles of 48" (w/multi-worker kitchen or frequent/heavy traffic): + 12" + 12" = 176" (14"6") Island w/cabinets and/or appliances on one side and an island with seating** (i.e., empty wall behind seating): With run of cabinets behind the seats and no traffic or counter behind seats: 25.5" + 36" + 40.5" + 48" + 25.5" = 175.5" (14'7.5") [basis of next numbers] With run of cabinets behind the seats and either traffic or counter behind the seats (but not both): 25.5" + 36" + 40.5" + 54" + 25.5" = 181.5" (15'1.5") With run of cabinet behind the seats and traffic and counter behind the seats: 25.5" + 36" + 40.5" + 60" + 25.5" = 187.5" (15'7.5") With ideal aisles: 25.5" + 42" + 40.5" + 60" + 25.5" = 193.5" (16'1.5") Island w/cabinets and/or appliances on both sides and an island with seating** b/w them: With run of cabinets behind the seats and no traffic or counter behind seats: 25.5" + 36" + 40.5" + 48" + 25.5" = 175.5" (14'7.5") [basis of next numbers] With run of cabinets behind the seats and either traffic or counter behind the seats (but not both): 25.5" + 36" + 40.5" + 54" + 25.5" = 181.5" (15'1.5") With run of cabinet behind the seats and traffic and counter behind the seats: 25.5" + 36" + 40.5" + 60" + 25.5" = 187.5" (15'7.5") With ideal aisles: 25.5" + 42" + 40.5" + 60" + 25.5" = 193.5" (16'1.5") Notes: * The "minimum" aisle width of 36" only works if the kitchen will always be a one-person kitchen and there is no through traffic in the aisle (i.e., no more than one person working in the kitchen at a time (this includes prepping, cooking, cleaning up, getting a snack, etc. and there will be no traffic going through the kitchen to get to another part of the kitchen/house). Some people have varying aisle widths. They'll have the minimum recommened 42" in most places, but 36" at one place (like b/w an island and range) where there will only be one person in that particular space at a time and no traffic going through the area. ** Assumes counter-height seating with 15" overhang, the minimum recommended by the NKBA. Please do not skimp on this overhang. It doesn't really help. People still take up the same amount of room when sitting at the island as they would if you provided the minimum overhang. People can be "squeezed in" just so much...the stool & their bodies will still stick out into the aisle just as much as if there was a 15" overhang. All you do when you skimp on overhang is make it uncomfortable for people to sit at it for more than a few minutes. To adjust to the reduced overhang, people have to sit sideways, "straddle" the cabinets, or sit further back and have to lean forward farther to get to the counter...none of which are comfortable after a few minutes. (If you expect people to sit sideways, then provide 36" of linear space per person rather than 24".) The NKBA guidelines were developed for a reason, not b/c the NKBA was trying to give us all a hard time. They also were not "grabbed out of thin air"...they researched this and other items in the guidelines. One more thing, if you think the shallower overhang will be OK b/c you only expect your young children to use the seating, then remember that children grow very quickly (ask any parent!). Before you know it, your children will be adult-sized teens and still trying to sit at the counter (and probably w/friends). So, don't be shortsighted when planning, look into the future as well. [The NKBA recommends an 19" overhang for table-height seating (30" off floor, note new overhang recommendation), 15" for counter-height seating (36" off floor), and 12" for bar-height seating (42" off floor). They also recommend planning for 24" of linear space per person for counter-height & bar-height seating; 30" for table-height (again, note new guideline).] One thing to note: Bar-height and, to some extent, Counter-height seating are not very comfortable for very young children, for older adults, and for those with certain mobility issues. They also are not the safest seating for young children (clambering in/out of the seat and even just sitting at the counter at a fair distance from the floor). So if you can, try to provide table-height seating fairly close as well....See MoreJust got our kitchen design back for home build.. Input on "extras"?
Comments (33)My personal reaction is that those little cabinets way up high are useless. Decorative only, and once something like a pitcher is up there, it will never come back down again. I'm personally not willing to pay for that. I also like the 42"-high cabinets I have. I can put boxes of seldom-used stuff on the upper shelves, bcs they're behind doors. I'm short, so I would never go with those little shelves that raise the bottom of the cabinet up. Never. I can barely reach the second shelves of my cabinets anyway! And I'd totally lay down parchment, waxed paper, or newspapers (but probably not newspapers; they make me worry they'd draw more bugs) on the tops (I did get grease and dust mixed together up there; that's why I went against the modern trend and installed a soffit). If I were more worried about roaches, I wouldn't. I like lots of drawers, but not necessarily *all* drawers. I'd pay more for drawers, gladly. Regarding drawer slides: I want full extension; I'll pay tons extra to get it. I don't think dovetail is necessary, but often it's part of the package. The soft-close is nice, so I'd pay a little more to get it. Hope that helps!...See More 4 years ago
- 4 years ago
- 4 years ago
- 4 years ago
- 4 years ago
- 4 years ago


Related Stories
KITCHEN DESIGNKitchen of the Week: A Designer’s Dream Kitchen Becomes Reality
See what 10 years of professional design planning creates. Hint: smart storage, lots of light and beautiful materials
Full Story
BEFORE AND AFTERSFresh Makeover for a Designer’s Own Kitchen and Master Bath
Donna McMahon creates inviting spaces with contemporary style and smart storage
Full Story
KITCHEN DESIGNFresh White Palette Brings Joy to Designer’s Kitchen and Bedroom
In Florida, Krista Watterworth Alterman ditches dark faux-Mediterranean style for bright, glossy whites
Full StoryHOUZZ TV LIVEFresh Makeover for a Designer’s Own Kitchen and Master Bath
Donna McMahon creates inviting spaces with contemporary style and smart storage
Full Story
KITCHEN DESIGNA Designer’s Picks for Kitchen Trends Worth Considering
Fewer upper cabs, cozy seating, ‘smart’ appliances and more — are some of these ideas already on your wish list?
Full Story
KITCHEN DESIGN11 Must-Haves in a Designer’s Dream Kitchen
Custom cabinets, a slab backsplash, drawer dishwashers — what’s on your wish list?
Full Story
KITCHEN OF THE WEEKKitchen of the Week: A Designer Navigates Her Own Kitchen Remodel
Plans quickly changed during demolition, but the Florida designer loves the result. Here's what she did
Full Story
KITCHEN MAKEOVERSBefore and After: Glass-Front Cabinets Set This Kitchen’s Style
Beautiful cabinetry, mullioned windows and richly refinished floors refresh the kitchen in an 1879 Pennsylvania home
Full Story
KITCHEN MAKEOVERSA Designer’s New Kitchen Embraces Soothing Sea-Blue Colors
Ocean-inspired fish-scale tile and brass hardware on crisp white cabinets create a tranquil space
Full Story
BEFORE AND AFTERSKitchen of the Week: Bungalow Kitchen’s Historic Charm Preserved
A new design adds function and modern conveniences and fits right in with the home’s period style
Full Story
Buehl