

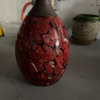
Is there anyone who can take a background out of a photo?
7 years ago
Featured Answer
Sort by:Oldest
Comments (33)
 7 years ago
 7 years ago
Related Discussions
desperate! anyone in dc area who can take monarch cats?
Comments (1)i wished i lived in the area! =) i just cant seem to get monarch's here! good luck!...See MoreTaking Photos tips and viewing photos
Comments (16)Ok I will do some before after shots. I remind you , I love to push photography . It is another obsession I have besides gardening. I will work the details. But I am still learning my camera also. I hate to RTFM. TRoth garden taken in failing light at sunset After I addressed darkness, lightened the shadows, and burned the highlights, and the addressed the overall blue tones by adding yellow. A cactus group shot that had a beautiful beam of light. I like light and I am always photographing it and it is always making me tear my hair out. This one I found flat compared to what I saw. After punching lighter the exposure all over and darkening the exposure values , I elevated the definition to accentuate the contrast in the textures. de blued it and de-greened it I think. I did take liberties with this next picture of the Kalanchoe Luciae be cause I wanted the viewer to be surrounded and swallowed by the plant. I am not always driven by reality. Usually I am, but sometimes I gotta do a "Georgia". I felt that this one was washed out from how I felt it was. This one I did go a little overboard on it. So Sue me. Here is another one from the K. luciae series. The differences are sometimes not that starling, but subtle , but the overall will be worth it. Notice the highlights have an indistinct texture and I just want to make things better even though the picture is fairly alright. I just like to fiddle. Things just seem a little fuzzy. I feel air and I don't like it. I popped the exposure lighter then darkened the exposure value, burned the highlights. I want that rich sense of space amongst the leaves and the red to pop and show the light coming through them. I wanted the texture on the leaves. I am a little distressed with the out of focus on the back highlighted leaf. The highlight is still reading as blown.. I should have gotten my tripod out so I could cut the F stop down but then the sun would have been gone. I got the fuzzy out of there . the air is clear. I can breathe now . OH god, now you know I am obsessed. You know what is weird. I can do this for peoples portfolios and I do for some artist around all over. They send me full sized files and I see if I can work them....See More?? for those of you like Sharoncb & annt who take GR8 photos
Comments (12)Thank you for the compliment loves2cook. I have 3 digital cameras, one of which is a Canon EOS SLR the other two are Olympus, one tiny and one middle-sized point & shoots. I use one or the other according to where I am. (The smallest pocket one is for dining out in restaurants.) I don't use fully automatic settings, but rather make my own combination of manual and "scene" settings. Natural light is all I use and since our meals are in the early afternoon I never need an electric light, unless sitting at a dark restaurant table, where the overhead lamp is sufficient. Never use flash for food photos. I'd be happy to write some tutorials starting this weekend over on the Conversations side to share any tips and knowledge I have. But don't forget there's a whole blog of free help at Digital Photography School I have Photoshop but never use it. I prefer simpler editing programs with minimal adjustments of light, contrast etc. Okay now it's Ann's turn and anyone else who can elaborate on how they do it. I will go over to Conversations before Monday and write something that could hopefully be of help. SharonCb...See MoreFood Photo Tips: Part 4 - Seamless Backgrounds
Comments (0)Posted by canarybird (My Page) on Wed, Jul 29, 09 at 19:02 Food Photo Tips: Part 4 - Seamless Backgrounds Hi again everyone. I'm back with another entry on how to use your digital camera for taking tabletop photos. Today's tutorial is a short and easy one about setting up a paper sweep for a seamless background behind your subject. ( I see Garden Web has problems today and all posting is being stopped for a few hours, so this may come as a Thursday post, rather than on a Wednesday.) You may have wondered how to eliminate the horizon line between the tabletop and the background. Although you won't want to do this for all your photos, it's useful to know a simple and inexpensive way to give your picture a smooth, even background when you want your dish or other object to stand out on its own. The answer is called a SWEEP and you've probably seen large backdrops in photo studios where a roll of paper is pulled down from the ceiling and stretched out on the floor towards the camera so the model can stand on the paper and there is no line where floor meets wall. You can buy white plastic or synthetic material sweeps in small tabletop and larger sizes in photo supply shops and online but as we're trying to keep our experiments down to something you can make at home as economically as possible we're going to make one out of a sheet of white poster paper measuring approx. 20 x 26 inches (50 x 66 cm) bought in a craft or office supply shop. You just have to be careful not to spill gravy too often on the paper! It helps to wipe carefully the bottom of the dish and put a folded tissue or napkin under before placing it on the paper. I just happen to have a plexiglass recipe book holder..Fig. 31....bought years ago, which not only keeps the pages of a recipe book from being spotted with sauces, but also makes a good support for our poster paper, using two clothes pegs to clip the paper to the holder. Fig. 32. (I hope you still have a few clothes pegs around.) Another useful item you could use as a support for your sweep is the back part of an old picture frame, Fig. 33 & 33a ...the kind that's made to stand on a table, either vertically or horizontally by its back leg. I removed the glass and frame from an old photo and taped the cardboard backing closed so it holds together. It will also do a good job to support your paper and has the advantage of folding flat and being lightweight. It can also serve as a holder for a piece of white printer paper ....clipped again with a clothespeg....to be used as a reflector to bounce back the main light onto the dark side of your subject...(when not using it as a support for the sweep paper.) If youre really stuck for something to put behind to support your paper sweep, a 5-lb bag of dry cat (or dog) food and two large clothes pegs also does a wonderful job! Fig. 34 shows how the sweep looks in place behind the teapot, and the following three illustrate the setup with the camera on a tripod. For this teapot photo I set the SCENE to PORTRAIT, the White Balance (WB) to cloudy, did not raise the Exposure Value (EV), and used the optical zoom on the camera to bring the scene closer. Fig. 38 shows a piece of white foam packing cut for use as a reflector on the dark side of the teapot. Try to find pieces of fine foam, which come as packing in just about every large item nowadays. The one I show here is the wrong kind, as it leaves bits like popcorn strewn all over the carpet. But I did find some better pieces after I took these photos. Fig. 39 shows the reflector in place, held by a metal bookend. Here is the simple metal bookend that can be purchased very reasonably in an office supply shop. And finally, here you see the difference made by that piece of foam used as a reflector in these two photos. Fig. 41 is without reflector, and Fig. 42 is with. Of course all shadows aren't bad, because we need shadow to define shapes and show texture and form. But if you are aiming for an all round brightness in a small object, the reflector bounces back some of the main light. In some cases you would also use a softly diffused light from a lamp over on the dark side to give some added highlights. Here are a few more sample photos which I took using a white or cream coloured paper sweep: In all cases above the photos were taken in daylight. Next time we'll have a look at artificial lighting and how to take food photos after dark, without flash. I also want to show you how to make a DIY light box, so you can take closeup photos of food surrounded by pure white light. Following that, we should get into MACRO mode...it's really easy and it's made for taking closeups just as we're doing here. I hope you've been experimenting with the White Balance WB and the Exposure Compensation EV buttons. We'll go over that again and how to put it all together as Step 1, Step 2....follow me ...and see if we can even get some questions going. Thanks for your responses too. I appreciate knowing if this is of help to you. Until then, thanks for joining me. I'll be uploading the next installment soon. And please feel free to save the pages on your computer. Sharon (Canarybird) (All text and photos copyrighted) Free for personal, non-commercial use Follow-Up Postings: o RE: Food Photo Tips: Part 4 - Seamless Backgrounds clip this post email this post what is this? see most clipped and recent clippings * Posted by loves2cook4six (My Page) on Wed, Jul 29, 09 at 19:21 Sharon, You are AMAZING. You should collate all these posts and publish a book: All you ever wanted to know about taking outstanding photographs of food I'm sure others will have an even better idea for a title but I wanted to be the first to put it out there :) These threads are invaluable. Thank you for all your time and effort. o RE: Food Photo Tips: Part 4 - Seamless Backgrounds clip this post email this post what is this? see most clipped and recent clippings * Posted by canarybird (My Page) on Wed, Jul 29, 09 at 19:37 Oh thank you loves2cook. It's good to hear that these little postings can be of help. There are some wonderful books and blogs on food photography, some more technical than others, and certainly better than what I write here. I'm trying to keep it simple for now, and haven't mentioned words like aperture, shutter speed, ISO, so as not to frighten anyone LOL....at least not yet! SharonCb o RE: Food Photo Tips: Part 4 - Seamless Backgrounds clip this post email this post what is this? see most clipped and recent clippings * Posted by foodonastump (My Page) on Fri, Jul 31, 09 at 12:01 Hi Sharon - I just want to add my thanks for these practical tutorials. You've definitely explained/resolved a few frustrations I've had in my feeble attempts at this type of photography. Thank you! o RE: Food Photo Tips: Part 4 - Seamless Backgrounds clip this post email this post what is this? see most clipped and recent clippings * Posted by canarybird (My Page) on Fri, Jul 31, 09 at 14:12 You're welcome foodonastump, I hope you will continue to find useful hints in the coming postings! And thanks for the feedback. SharonCb o RE: Food Photo Tips: Part 4 - Seamless Backgrounds clip this post email this post what is this? see most clipped and recent clippings * Posted by antiquesilver (My Page) on Sat, Aug 1, 09 at 5:12 I anxiously await each of your posts - your tips are priceless! o RE: Food Photo Tips: Part 4 - Seamless Backgrounds clip this post email this post what is this? see most clipped and recent clippings * Posted by happygram (My Page) on Sun, Aug 2, 09 at 3:07 You are absolutely amazing. I was away for a couple of weeks w/o a computer, and coming back to find these hints of yours was a real gift Thanks you so very much. You're not only a superb cook and great photographer and teacher but are so very kind to take your time to help like this. Mary o RE: Food Photo Tips: Part 4 - Seamless Backgrounds clip this post email this post what is this? see most clipped and recent clippings * Posted by canarybird (My Page) on Sun, Aug 2, 09 at 6:19 Thanks to you both antique silver and happygram for your comments. I'm sure not a superb cook though, but if anything tastes good at my house, I probably got the recipe from the Cooking Forum and the good cooks we have here! SharonCb o RE: Food Photo Tips: Part 4 - Seamless Backgrounds clip this post email this post what is this? see most clipped and recent clippings * Posted by kcsunshine_2006 (My Page) on Mon, Aug 3, 09 at 17:27 Sharon, thank you, from a lurker! This is really a spectacular gift. KC...See More 7 years ago
 7 years agolast modified: 7 years ago
- 7 years ago
 7 years ago
 7 years ago
 7 years ago
- 7 years ago
 7 years ago
- 7 years ago
- 7 years ago
 7 years ago
- 7 years ago
- 7 years agolast modified: 7 years ago
- 7 years agolast modified: 7 years ago
- 7 years ago
- 7 years ago
- 7 years ago
 7 years ago
- 7 years ago
 7 years ago
- 7 years ago
- 7 years ago
- 7 years ago
- 7 years ago
- 7 years ago
 7 years ago
- 7 years ago
- 7 years ago
 7 years ago
- 7 years ago







Related Stories
HOW TO PHOTOGRAPH YOUR HOUSETake Great Home Photos the Easy Way — 5 Tips From a Pro
Improve your for-sale ad or just make beautiful memories with these simple strategies anyone can use
Full Story
KITCHEN DESIGNThe Cure for Houzz Envy: Kitchen Touches Anyone Can Do
Take your kitchen up a notch even if it will never reach top-of-the-line, with these cheap and easy decorating ideas
Full Story
BATHROOM DESIGNThe Cure for Houzz Envy: Bathroom Touches Anyone Can Do
Take your bath from blah to ‘ahhhh’ with just a few easy and inexpensive moves
Full Story
DECORATING GUIDES10 Ways Photos Can Make a Room
Keep your favorite views forever with a fresh take on a photo wall
Full Story
LAUNDRY ROOMSThe Cure for Houzz Envy: Laundry Room Touches Anyone Can Do
Make fluffing and folding more enjoyable by borrowing these ideas from beautifully designed laundry rooms
Full Story
BUDGET DECORATINGThe Cure for Houzz Envy: Living Room Touches Anyone Can Do
Spiff up your living room with very little effort or expense, using ideas borrowed from covetable ones
Full Story
DECORATING GUIDESHow to Take Beautiful Home Photos
4 professional photographers share tips for making home interiors shine
Full Story
MUDROOMSThe Cure for Houzz Envy: Mudroom Touches Anyone Can Do
Make a utilitarian mudroom snazzier and better organized with these cheap and easy ideas
Full Story
HOW TO PHOTOGRAPH YOUR HOUSEHow to Take Home Design Photos
Quality images preserve memories, create great design portfolios and help you sell a home. See how to show your place at its best
Full Story
BEDROOMSThe Cure for Houzz Envy: Master Bedroom Touches Anyone Can Do
Make your bedroom a serene dream with easy moves that won’t give your bank account nightmares
Full Story
carabubble