


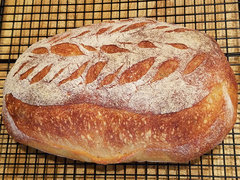
Ann T bread help
chase_gw
6 years ago
Featured Answer
Sort by:Oldest
Comments (22)

ann_t
6 years agolast modified: 6 years ago
User
6 years agolast modified: 6 years agoRelated Discussions
Ann T---- Bread questions
Comments (5)Lisa, this is my favourite starter. It is a pure starter, made from just rye flour and water. Nothing else. Once you get it going and it is easy to keep. YOu just have to feed it occasionally. Once you get your starter active, you use it to make a biga or a levain and that is what you add to the French baguette recipe rather than yeast. For the Biga, I just add 2 ounces of starter to 1 1/2 cups of flour and a cup of water and let it develop overnight. Home Cookin Chapter: Recipes From Thibeault's Table Sourdough starter - Amy's bread =============================== copied from: http://countrylife.net/pages/recipes/672.html Amy Scherber's Sourdough Starter RYE STARTER From AMY'S BREAD, copyrighted. Amy's bread This starter is begun with rye flour because rye just LOVES to ferment and is an easier starter to get going than a wheat starter. When I first made it, it had a bubble or two within a couple hours. The procedure is to start it with rye flour, then transform it by changing what you feed it. The original rye will dilute to nothing over time and you'll end up with a white flour (or whatever other grain you choose, it could be whole wheat or pumpermickel, or you could leave it as a rye starter) and water based starter, but it had the advantage of beginning it's life from highly fermentable rye flour. Start it with organic rye flour and spring water. Once you have it going well you can switch to all-purpose white (or other) flour as you choose. The use of spring water is recommended for maintenance, however, as tap water may contain elements (such as chlorine) which may be detrimental to the health of your starter. I also recommend that you use a container that you can mark the volume levels of starter each time, so that you will know when it has doubled. Use a marking pen or tape or any other means to indicate on the container the starter levels each time you feed. Phase 1 - Combine 2 oz organic rye flour (room temp) with 4 oz spring water in a clear container. The batter should be about the consistency of very thick pancake batter, add more water or flour if necessary. Cover & let it sit for 36 - 48 hours at 75 - 77 degrees (a little cooler is okay but over 80 you will incubate the wrong kind of bacteria and your culture will have an unpleasant bitter taste). You should start to see tiny bubbles forming after about 24 hours. By the time it has doubled, there will be a noticeable network of small bubbles throughout the batter & it will be foaming & bubbling on top. (If the batter has not doubled within 48 hours, feed with 2 oz water & 2 oz flour (add more of either if necessary for the consistency) and let it sit another 24 hours or until you see some definite activity.) Phase 2 - Stir the culture down, notice how soupy it's become. The batter should have a noticeable sour smell & a mildly tangy taste at this point. Add 2 oz water & 2 oz flour and stir vigorously until well-combined. Let it sit for 12 hours. It should be showing a fair amount of activity at this point. You should see lots of foaming & bubbling through the sides as well as on the top. Don't be concerned if the culture deflates & loses volume. This means the yeast has exhausted its food supply, but it will continue to increase in acidity. Don't worry if your culture isn't dramatically active yet. As long as there is some noticeable activity going on and the mixture smells & tastes sour, you're on the right track. Phase 3 - The culture should now have a pronounced, sour, fruity taste and smell, it should not taste musty or bitter (if it does, discard and start again, paying close attention to the temp of the culture at all times). Now you can start "transforming" it into a white (or other) flour based starter. Use 6 oz of the starter, add 3 oz water & 3 oz flour, stir vigorously. Let it sit for 12 hrs at 75 - 77 degrees F. Refresh it again, setting up a maintenance level of 12 oz of starter. This will be your "mother" starter that you use to build the sourdough starters/sponges needed in individual recipes. Each time you take part of the mother out to build a starter, you must refresh it with equal weights of flour and water to bring it back up to its maintenance level. To maintain - Use 6 oz of the mother culture (discard the rest), add 3 oz water & 3 oz flour, stir vigorously, let it sit at room temp until doubled in volume. A strong mother will double in 8-12 hours. If yours doesn't do that, let it continue to sit out until it has a nice tangy taste and smell; discard all but 6 oz and repeat this procedure. Repeat this procedure as many times as necessary until the mother doubles within 8-12 hrs. It may take several days. Don't get discouraged, it's worth the effort. To use for recipes - Combine 1/2 c (5 oz) Mother from the refrigerator, add 3 oz flour and 2.5 oz warm water (85 - 90 degrees). The mixture will be stiffer than the mother. Let it sit, covered, until doubled in volume (if it doesn't do so go back to maintenance procedure). When the starter has doubled, it is ready to use in a recipe. Measure the amount needed and discard any that remains....See MoreHelp! Ann T!!!!
Comments (9)Linda, I'm sorry I wasn't around to help you, I was working today. It looks like you were well taken care of though. You can't go wrong at 350°F but for future reference James Beard's recipe calls for baking at 375°F. Sharon, normally you would be right. Not something I make often but I make it occasionally because Moe likes it. It is one of James Beard's recipes. Home Cookin Chapter: Recipes From Thibeault's Table Oatmeal Bread with Cooked Oatmeal ================================= Oatmeal Bread with Cooked Oatmeal James Beard - Beard on Bread There are two or three favorite recipes for oatmeal bread in this coun- try. I first encountered this one in Nevada, in a restaurant that was made famous by Lucius Beebe, and it was so good that I extracted the recipe from the owner and have been using it for many years. It is an interesting, loosely textured bread with an unusual light-brown color and a rich, full flavour. It is delicious with sweet butter, and it keeps well. [2 small loavesj 1 cup coarse rolled oats 1 cup boiling Water 2 packages active dry yeast 1 teaspoon granulated sugar 1/2 cup warm water (100° to 115°, approximately) 1 cup warm milk 1 tablespoon salt 1/4 cup dark brown sugar 4 to 5 cups all-purpose flour approximately Cook the oats in the boiling water until thickened, about 3 minutes. Pour into a large mixing bowl and allow to cool to lukewarm, Mean- while stir the yeast and teaspoon of sugar into the warm water until dis- solved, and allow to proof. Add the warm milk, salt, brown sugar, and yeast mixture to the oats and stir well, then Stir in 4 cups of flour, 1 cup at a time. Turn out on a floured board, Knead into a smooth, pliable, elastic dough, if necessary using as much as 1/2 to 1 cup, or more, of additional flour to get it to the right feel. (This will take about 10 minutes,) Shape the dough into a ball, put into a well-buttered bowl, and turn to coat on all sides. Cover and let rise in a warm, draft-free place until doubled in bulk, 1 to 1 1/2 hours. Punch the dough down. Knead for 2 or 3 minutes and shape into two loaves. Thoroughly butter two 8 x 4 x 2-inch tins. Place the dough in the tins, cover, and let rise in a warm place until about even with the top of the tins, or amost doubled in bulk. Bake in a 375°F oven for about 50 minutes....See MoreWith help from Ann_T, am slowly getting better at the french loaf
Comments (4)Thanks. It looks better, and this time the crust isnt so thick and tough. It still looks denser than Ann_t's, but it was still good. Her's looks like they came right out of an expensive bakery. Tammy...See MoreBread Question for Ann T. Please
Comments (7)Trudy, I would use the recipe that Linda linked to. You can make the baguettes, long or short, or make short fat loaves if that will work better for you. I often do double or triple batches of the dough and bake loaves of different sizes and shapes. French Baguette Julia Child 1 package dry active yeast (2 1/2 teaspoons) 3 1/2 cups unbleached flour (bread flour) 2 1/4 tsp salt 1 1/3 cups cold water plus 1/3 or so additional water Using Food Processor Place the flour, yeast and salt in the bowl of the food process. Pulse to mix. Add 1 1/3 cups of water and process until the dough comes together. If the dough doesn't form a ball, add a little of the extra water. Process for about 60 seconds, turn off machine and let dough rest for 5 minutes. Turn on the machine again and rotate the dough about 30 times under the cover, and then remove it to a lightly floured work surface. it should be fairly smooth and quite firm. Let the dough rest for 2 minutes and then knead roughly and vigorously. The final dough should not stick to your hands as you knead (although it will stick if you pinch and hold a piece); it should be smooth and elastic and, when you hold it up between your hands and stretch it down, it should hold together smoothly. Preliminary rise - 40 to 60 minutes at around 75�F. Place the dough into a clean dry bowl, (do not grease the bowl), cover with plastic wrap, and set in a warm place free from drafts. (note the French do not grease the bowl because they believe the dough needs a seat to push up from). This first rise is sufficient when the dough has definitely started to rise and is about 1 1/2 times its original volume. Deflating: Turn the dough onto your lightly floured work surface roughly and firmly pat and push it out into a 14 inch rectangle. Fold one of the long sides over toward the middle, and the other long side over to cover it, making a 3 layer cushion. Repeat the operation. This important step redistributes the yeast throughout the dough, for a strong second rise. Return the dough smooth side up the bowl; cover with plastic wrap and again set to rise. Final rise in the bowl - about 1 to 1 1/2 hours or longer. The bread should be 2 1/2 to 3 times its original bulk. It is the amount of rise that is important here, not the timing. To Shape, Cut the dough in half. Set one piece aside and cover with a towel. On a lightly floured work surface pat the dough into a 14 inch rectangle, squaring it u p as evenly as you can. Fold the rectangle of dough in half lengthwise and using the heel of your hand, firmly press the edges together whether they meet. Seat well. Pound the dough flat. Now repeat - patting the dough out again and folding it over and sealing the edges. Pinch the edges well and Rotate the dough so that the sealed edge in on the bottom. Repeat with second piece of dough. Cover with plastic wrap or loosely with a towel and let rise to more than double again at about 75�f. Place stone in oven and Preheat oven to 450�F. Slash three long cuts into the loaves and place on the hot stone. Immediately toss a number of ice cubes on to the bottom on the oven to create steam. Bake until bread is golden and has an interior temp of 200�F. Takes about 30 minutes. Making Dough in a Mixer or by Hand When you are making dough in an electric mixer with a dough hook, proceed in the same general way with the rests indicated, and finish by hand. or mix the dough by hand in a bowl, turn out on a work surface, and start the kneading by lifting it up with a scraper and slapping it down roughly for several minutes until it has body. Let it rest several minutes and then proceed to knead. MY NOTES: I use a Magic Mill to do most of the kneading. The Magic Mill can handle over 20 cups of flour at one time. I use 4 cups for a single batch and 8 cups for a double batch Plus the addition of a Biga. I prefer a wet dough so I add more water. I usually start this bread with a Biga (Italian)/Poolish (French) a pre-fermentation. Made the night before. Contributes to a more complex flavour and a better texture. 1 1/2 cups flour 1/2 teaspoon yeast 1 cup of water. Mix well. Cover and set aside. Other changes: I mix the Biga, Flour, Yeast and water together,without the salt, and let sit for 20 to 30 minutes to allow the flour to absorb some of the water. I add the salt after this rest, and then finish by kneading. This dough makes for a wonderful pizza crust. Place dough in fridge and leave it for two to four, even five days. Take it out early (three hours) to give it time to come to room temperature. Allowing the dough to have a long cold fermentation really develops the flavour and the texture of the bread....See More
sherri1058
6 years ago
agmss15
6 years agochase_gw
6 years ago
jerzeegirl (FL zone 9B)
6 years agolast modified: 6 years agoann_t
6 years agolindac92
6 years agolast modified: 6 years ago
2ManyDiversions
6 years agolast modified: 6 years ago2ManyDiversions
6 years agoann_t
6 years agolast modified: 6 years agoUser
6 years agolast modified: 6 years agolindac92
6 years agochase_gw
6 years agolast modified: 6 years agolindac92
6 years ago2ManyDiversions
6 years ago
javiwa
6 years agolast modified: 6 years agolindac92
6 years agocathyinpa
6 years agoann_t
6 years agojaviwa
6 years ago


Related Stories
DESIGN POPBakers’ Home Storage Tips for Sliced Bread’s 90th Birthday
In honor of the bread slicer’s debut in 1928, we offer the best bread storage tips since, well ... you get it
Full Story
SELLING YOUR HOUSE10 Low-Cost Tweaks to Help Your Home Sell
Put these inexpensive but invaluable fixes on your to-do list before you put your home on the market
Full Story
HOUZZ TOURSHouzz Tour: Lovingly Resurrecting a Historic Queen Anne
Dedication and a keen eye turn a neglected eyesore into the jewel of its Atlanta neighborhood
Full Story
HOUZZ TOURSMy Houzz: DIY Love Reforms a Dated Cape Ann Home
Handmade touches and classic neutrals transform a dark Massachusetts house into a beautiful home fit for a family
Full Story
HOUZZ TOURSMy Houzz: Honoring the Past in an 1891 Queen Anne
Antiques and respectful renovations give a home in Oregon old-world charm and modern-day comforts
Full Story
DISASTER PREP & RECOVERYHurricane Harvey: How You Can Help
Want to donate or volunteer to aid victims of the storm? Here are groups assisting with disaster relief and recovery
Full Story
SELLING YOUR HOUSEThe Real Scents That Will Help Sell Your House
Ditch the potpourri and baked cookies. Follow these guidelines on scents to use and avoid to help sell your home
Full Story
REMODELING GUIDESMajor Remodel: Restoring a Queen Anne to Glory
Misguided 1970s changes marred this Victorian-era home in Portland, until a dedicated family moved in
Full Story
MOST POPULAR9 Real Ways You Can Help After a House Fire
Suggestions from someone who lost her home to fire — and experienced the staggering generosity of community
Full Story
SELLING YOUR HOUSEHelp for Selling Your Home Faster — and Maybe for More
Prep your home properly before you put it on the market. Learn what tasks are worth the money and the best pros for the jobs
Full Story

2ManyDiversions