SHOP PRODUCTS
Houzz Logo Print
revwoods_sw

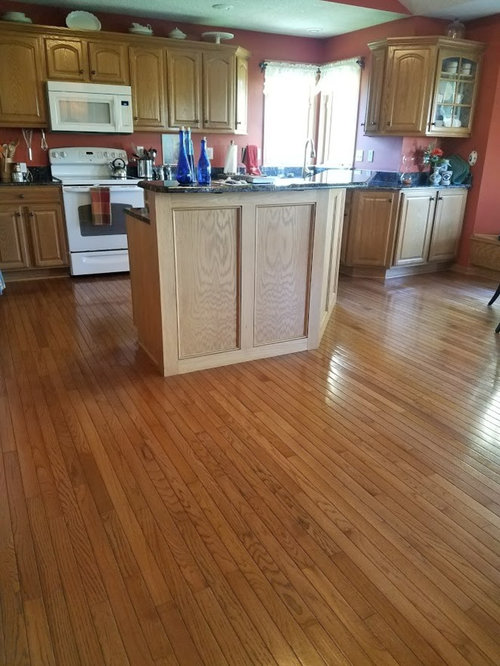
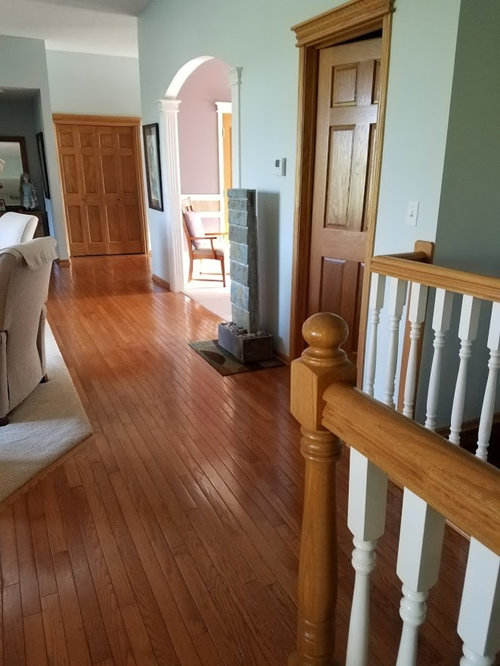
Hardwood flooring stain help

revwoods_sw
6 years ago

House was built in the 1990s. Time to re-do the wood floors. Current stain has reddish tint. My style is traditional with touches of americana. Wanting to lighten up the kitchen. I can restain the same color... more of a brown tint... or natural wood. Thoughts?


Comments (20)

  • PRO
    Uptown Floors
    6 years ago

    rev:

    The floor looks almost looks like a standard prefinished Bruce 2 1/4" strip eased edge from my chair.

    Back in the 90's there weren't as many names and colors as there are today. Any pro can work with whatever you desire. May take some serious sanding to get the bevels out, because you really can't keep them. Explained in the video.


  • PRO
    Beth H. :
    6 years ago

    it's reddish because it's red oak. you will have to do a non-red, med brown stain like a walnut. nothing with red undertones.

    is it a solid or engineered? If the latter, you will need to get a flooring expert out there to see if they will sand down well enough for you to redo.

  • Related Discussions

    Help picking a floor stain color for red oak hardwoods!?
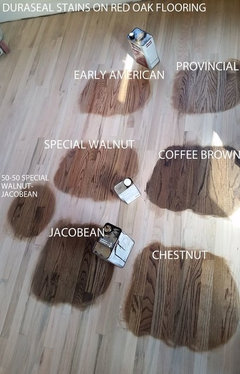
    Q

    Comments (4)
    Hi John, do you have any photos of the space you could post? That might be helpful. In general, it's trickier to make wood floors work with wood stained cabinets, but I've done it. Since you don't want reddish floors, I'd aim for a cooler brown - more towards a walnut. I would NOT do ebony floors; those super-dark floors are impossible to keep looking clean. They show dust, lint, grass, etc. Also, what stain product is your contractor using? Most come in pre-mixed colors. That may determine the palette you have to choose from. Other stains can be tinted or adjusted if needed. Adding green to a stain color, for example, will help cut the red of the oak floors. You have to go easy though, you don't want to end up with a noticeable green tone. You're welcome to email me directly if you want more info - I don't check messages on here very often. Thanks Info@PaintColorHelp.com
    ...See More

    PLEASE HELP ME PICK OUT A STAIN FOR REDOAK HARDWOOD FLOORING

    Q

    Comments (1)
    These are the pictures of the flooring
    ...See More

    Hardwood floors - Stain color help!

    Q

    Comments (7)
    You don't want to pick the floor color in isolation. It has to work with the elements you are not going to change. Are you keeping the wood beams? Are you keeping the exposed brick? Are you planning on painting? Do you already own furniture that you will be using long term or will you be buying new in the next few years? I suggest using some online or phone apps where you can upload the picture of the room and change flooring materials - test different looks in your room and decide what color you are aiming for. I think that the wood beams and red brick make your space unique and wonderful, so I would use that to plan the rest of the space (flooring stain, paint colors, furnishings), but you need to decide what you love and how to make it work in your home.
    ...See More

    Hickory hardwood flooring stain options… please help!

    Q

    Comments (1)
    Get more than one opinion . Hickory is very easy to work with once you know how. And after a good sanding, hickory takes stain really well. But that's the key. You need to sand it really well. To open up the pores, start sanding with heavy grit sandpaper - we suggest starting with 100- grit.
    ...See More
  • revwoods_sw
    Original Author
    6 years ago

    It's solid hardwood. we will lose some of the bevel but not much, according to our contractor. so are you saying not to go with natural color?


  • suzyq53
    6 years ago

    Natural will be pinkish.

    revwoods_sw thanked suzyq53
  • PRO
    Beth H. :
    6 years ago

    suzy is correct. natural red oak has a pink undertone. the only way not to see this is to do a med dark, non red stain.

    revwoods_sw thanked Beth H. :
  • PRO
    User
    6 years ago

    Please understand that if you wish to stain these floors, the bevels absolutely need to be sanded out. Right now, being pre-finished flooring, the bevels have the same factory finish on them, that the tops (the face) of the boards do. Stain will not penetrate into the bevels, leaving you with literally stripes on your floor. To properly stain any floor, the sanding needs to be done to 100% of the surface, including the beveled edges. As far as colors go... if you want to brighten up the kitchen, I'd suggest some contrast. Are you going to keep the neutral cabinets the way they are? A newer trend I've been seeing lately is darker cabinets, lighter walls, and a medium-toned floor. Or, if you're going to keep the cabinets the same, try a darker floor and lighten up the walls; Red Oak has some beautiful graining, and does really well with darker stains.


    The Flooring Blog

  • acm
    6 years ago

    I'd go a little bit darker than natural to get some contrast with your cabinetry, which is currently almost the same color. If you want to lighten the room, your biggest bang for the buck will be to replace the dark wall color!

    revwoods_sw thanked acm
  • revwoods_sw
    Original Author
    6 years ago

    Yes, I want to replace wall color for sure. tx


  • PRO
    Quality Granted
    4 years ago

    Hi there, hoping for a little feedback

    I've clear coated several floors in the past year but my current project is my first dark stain on a large floor.

    1st attempt i failed in getting a even stain..took it back to bare wood for my second attempt.. I didnt get too far before realizing switching to oil based and very meticulously sanding to 220 still left invisible sanding anomalies. I also had some places where water had splashed/ been wiped off and sanded but it left very visible dark spots and droplets after stain...

    Now I've taken this newly stained portion back to 60G with a buffer to try and remove the stain but it penetrated quite deep in these problem spots..

    If I was to raise the grain now during sanding (just with damp lambswool) could this help me to remove the discolored wood I'm sanding now? The area is almost to bare wood but has got faint blotches that seem to run too deep to remove with the buffer ..

    My strategy would be to then get the newly sanded portion back up to 100G. Then to sand the rest of the floor back down to 100G (perhaps again open the grain first to make sanding more productive by passing with a damp lambswool because the grain is closed up)

    Then return the whole floor to 220G and water pop carefully before staining. (using minwax oil based jacobean)

    Is this concept of popping to help with sanding and popping again to prep for oil based stain a terrible idea?..

    Thanks any advice is much appreciated

  • PRO
    G & S Floor Service
    4 years ago

    220 grit is too high for floors. You do not want to go beyond 150 grit on bare wood for floor finishing. Water popping will help with stain penetration.


    Resand your floors and finish off at 150 grit. Inspect your sanding with a light, touch up with a orbital sander. Then clean and water pop.


    What are you using for equipment?

  • PRO
    Quality Granted
    4 years ago

    I use my whole arsenal.. multitool for tight spaces, belt sander along straight edges, 3 different palm sanders (I try to use most of these early stages of sanding where needed but even light feathering with high grit seemed to be useful but became very visible in my stain, the only rental equipment I have available is a drum sander/edger wich I've been pretty good at just using these for clearcoated floors and blending the edge with my palm sanders.. to get the higher grit for staining I'm using a 18x12 buffer.. I took my stained area to 60G with this to try and remove the stain but its proving difficult.. I didnt want to get aggressive with the drum sander again since this floor is now on its 3rd attempt and been taken pretty deep at this point.. the color left is faint but still looks terrible compared to the rest of the floor wich is sitting at 220 with clear maple..
    my big question is using water popping to help me open up the grain for more productive sanding to get the whole thing to a flawless 150.. also my concern is introducing these methods at different grits on two sections that intersect ending up with two sections that stain differently.. but I'm spinning my wheels trying to remove the stain where my anomalies where and I think I'll be in the same boat trying to buff the rest of the floor to remove the same anomalies that havnt been stained yet.. fighting invisible enemies on that section.. I feel I should raise the grain so when I'm buffing it back down from 220 I'm actually getting somewhere (it will be really hard to tell from look and feel at this point if I'm actually removing these imperfections that have been polished into the grain)

  • PRO
    Quality Granted
    4 years ago

    my hope was to only use the buffer to get everything consistent on my last passes.. I've gotten the floor to a flawless look that I went over every square inch with my palm sander and spotlight.. but now I've realized that the small imperfections I thought I was removing at this stage I was actually polishing them into the grain.. I could possibly just raise it as it is now at 220, then sand it to 150 (I couldnt find any 180 so I had to jump from 150 to 220 and will be the same thing to get it back down.. 100 and lower are the only grits that are available to me that I havnt had to get shipped.. so I'm ok with trying to take it from 220 straight back down to 100, do the majority of my buffing at 100 and then return it to 120 then 150 (i only have a couple of these screens to work with)
    .. I'm currently looking for information on using the water popping methods to help with sanding.. obviously this is a little bit of a different case since I'm working two sections at different grits trying to bring them to the same consistency.. and the riskyness of using these grain raising methods to help me with the sanding at different stages that may cause one section to stain differently than the next is a big concern yet feels like it may be essential to not inadvertently buff everything that is polished without getting much result wich will only be apparent when I attempt to stain again..
    the safer way may be to return this section to 220 so I can take the entire floor back down to 100 using the same methods on the entire floor..
    but I'm still stuck trying to remove the last bits of stain that went deep.. if I raise the grain at this early sanding stage in hope that it will allow me to remove this color it may make this whole section penetrate deeper down the road even after it's taken from 60G all the way to 150G.. hmm.. my brain is starting to hurt.. and this project has now cost me so much $ time and effort.. I've got too much skin in the game to not be able to say that it was done very well at the end of the day.. reputation is in the line.

  • PRO
    G & S Floor Service
    4 years ago

    All sanding needs to be at the same grit and mineral. Water popping will not blend two different sanding. The sanding needs to be done the same way. Water popping will eliminate light sanding scratches, anything from 120 and higher. For 80 or 100, the sanding needs to be perfect for the scratches not to show.

  • PRO
    Quality Granted
    4 years ago

    I'm taking the 220 portion back down to 100 to eliminate some scratches and sanding patterns that arent visible but theyve been polished into the grain.. the other portion I took down to 60 to remove the stain I started to attempt and decided I better stop and sand it out.... I stained about 25% of the floor so now I have a section that I'm trying to buff the stain out and then bring it back to match the rest of the floor.. havnt gotten 100% of it out yet.. but I'm now starting to move up the grit.. my question was to water pop my 220 portion to raise the grain so i can sand it easier.. its closed pretty tight at 220.. once I have both sections thoroughly buffed at 100 I plan on taking it back up to 150 and then water popping it before stain..
    I was curious about ppl opening the grain during sanding process to help buff out stubborn areas.. I did this already and it helped the productivity a bit with the sanding.. I didnt want to cut out more than I had to since I've cut the floor twice already but buffing it at 60G to remove my stain has been pretty exhausting. theres still some discolored wood that I'm hoping isnt visible once ive gone through the rest of my sanding process along with water pop and stain..

  • PRO
    Quality Granted
    4 years ago

    there was a water damaged area that took the stain really deep as well..

  • PRO
    G & S Floor Service
    4 years ago
    last modified: 4 years ago

    Sanding maple is a pain. The trick is to not skip grits and changing out the paper as soon as it gets dull. Dull paper will burnish the wood and will prevent stain penetrating. Using a square buffer to sand it will make it more of a challenge to get the scratches out. It's time consuming.

    You can water pop and then sand the floor. You will clog up a lot of paper also, since the fibers will be wet.

    Those leftover stains will not come out. No need to worry, if, you're re-applyig the same color. Just get the sanding scratches out, so your stain is even.

  • SJ McCarthy
    4 years ago

    And to add insult to injury, maple is a P.i.T.A to stain. Even some of the best flooring professionals mess up maple. Even more of them know better not mess with staining maple = they say thank you but no thank you (because they lost their financial shirt/skin during the process). And then there are small, dedicated group of wood flooring professionals who can and will accept a maple staining job.


    Is it possible you can reach out to a NWFA Certified Wood Flooring Sanding/Refinisher to deal with this part of the project? How much wood do those planks have left on them? You really want to START a sand/refinish with 3mm of wood sitting above the tongue. Please measure the wood before you bring this down again. I would hate for you to keep trying only to find you have taken too much life out of the wood and now are required to remove the entire floor and start with mill fresh wood (with the purchase, install and staining costs).

  • PRO
    Quality Granted
    4 years ago

    this was a prefinished solid dark floor that had never been refinished.. it was beat up to a surprising extent and had some water damage where the fridge must have leaked.. the finish was incredibly hard to remove even though it had been chipped off all over.. 36G drumsander changing directions and aggressively sanding to get to bare wood.. I knew this floor would be challenging but 2 months later I'm a little bit flabbergasted to the amount of effort that has gone into it and still a bit unsure how it will come out.. but I remain hopeful.. too much skin the game at this point. cant break even but i can save my pride..

  • PRO
    Quality Granted
    4 years ago

    thanks guys appreciate the input.. I'm not so far I'm going to expose staples.. buffed for three days rather than drum for 1he to make sure of that..