I recently painted 15 cast iron radiators. Since I had trouble finding information on
the internet on the process, I wanted to post my experience. Hopefully it will be helpful…
About 2/3s of the way through the construction of my new
house, I was informed by my GC that the painter’s quote did not include
painting the radiators, and that they were not willing to paint them. He suggested sending them to a local autobody
paint shop to get them professionally painted.
After some internet searching, I estimated that the cost to paint the
radiators would be $200 - $300 per radiator, plus an unknown cost to transport
them from my garage to a local shop and then back. Given that I had 15 radiators to paint, that
seemed like an expensive proposition. So
again, I searched the forums for tips and pricing of a DIY solution. My main questions were: (i) type of paint that is appropriate for hot
water radiators that operate between 120 – 180 degrees; (ii) relative costs of
buying cans of spray paint versus a new air compressor / hvlp set up.
One poster said that it took 4 – 6 cans of spray paint to
paint one radiator. I don’t know if that’s true or not…. But at roughly $5 per can, that seemed quite
expensive and a lot materials to handle and dispose of. I wanted to buy an air compressor anyway, so
I looked at the roughly $375 that I would have spent on spray paint as a way to
defer (or justify) buying the compressor set up. I spent approximately $150 on paint and hvlp
specific gear, so I guess that my break-even would have been approximately 2
cans per radiator. If you don’t want an
air compressor, spray paint is probably a much cheaper and easier way to
go.
I settled on an oil based enamel, based on (i) the difficulty
spraying latex paint through an air gun, and (ii) enough professionals
recommended it on-line. I purchased
Benjamin Moore Super Spec Alkyd, which is a semi-gloss oil based enamel that
can come in any of BM’s colors. A gallon
cost approximately $50, and I used a little less than half a gallon to spray
two good coats on all 15 radiators (ranging in size from 4 tube 10 section models
to 6 tube 20 section models - ~ 90,000 btu output for those pricing things out). Two coats were enough, three might have been
better, but I didn’t have the time and energy to put another coat on… It sprayed on well, looks great. It dried for about 6 weeks before the radiators
were installed and the heat went on. It
seems to be holding up fine with the heat on, no bad odors or impairment of the
paint so far.
Setup: (i) DeWalt 30
gallon air compressor, which worked well.
Its rated at 7.7 scfm at 40 psi.
It was the largest compressor I could find without upgrading electric to
240 volt outlet. It was able to put out
enough cfm to spray a good clean coat through my gun, and would kick on to
recharge the pressure after about one half of one radiator (10 minutes?) which
didn’t seem excessive. (ii) 50 foot half-inch
air line into a dehydrater / air filter into a 25 foot quarter-inch air line
into an inline air filter into the gun.
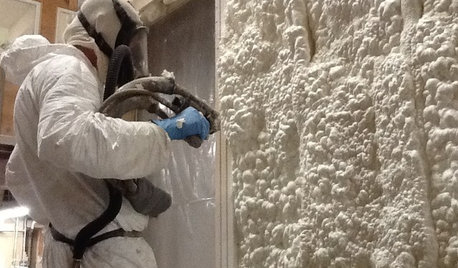
You need to do a lot of research on how to set this up to get the right
air discharge and to prevent the paint job from being ruined by water vapor and
impurities going into the gun; (iii) Neiko HVLP gravity feed gun with 1.5 mm
nozzle, which was fairly cheap and worked fine.
Process: Setting up
the compressor took half a day and required a lot of attention to getting each
connection air tight. Cleaning the
radiators before painting was the most tedious part of the job and took about 4
hours. I used a rag soaked with paint thinner which was very difficult and I
probably didn’t do a good enough job getting into every nook and cranny. Brake cleaner or squirting paint thinner would
probably be much faster and more thorough (although you would need to have a
way to catch and dispose of all the solvents).
Painting each coat took about 6 hours; including setup, painting and
cleaning equipment. Painting on the
second day was much faster than the first as I was more efficient, but I spent
a lot more time getting the gun set up and cleaned (I didn’t do a good enough
job cleaning the first day, which caused problems with the gun).
Some Tips:
(i) position the radiators so that you have freedom of movement around
each one independently. I tried to fit
too many into a bay of a garage without enough room around each one, and so had to spray with my body contorted in awkward
positions, which was very fatiguing for my lower back and arms. (ii) its about having a very systematic
approach / pattern to painting each radiator and having a slow, steady,
controlled spray pattern; (iii) clean the gun very thoroughly at the end of
each day – there are many good youtube videos on the process; (iv) wear an appropriate
respirator / safety glasses. There was a
lot of overspray and solvent fumes in the air, even in an open garage.


Elmer J Fudd
fsq4cw
Related Discussions
pain on radiators
Q
What color are your radiators? To match or not...
Q
Painting hot water radiators
Q
Are you a 'Spray Painter?'
Q
gekkodojoOriginal Author
fsq4cw
mike_home
Elmer J Fudd
Vith
gekkodojoOriginal Author
jay met
gekkodojoOriginal Author