


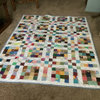
Hand Applique: Lesson Three (First Half)
mrseldoo
16 years ago


Sort by:Oldest
Comment (1)
Related Stories

REMODELING GUIDES6 Must-Know Lessons From a Serial Renovator
Get your remodel right the first time, with this insight from an architect who's been there too many times to count
Full Story
SELLING YOUR HOUSEA Moving Diary: Lessons From Selling My Home
After 79 days of home cleaning, staging and — at last — selling, a mom comes away with a top must-do for her next abode
Full Story
REMODELING GUIDES8 Lessons on Renovating a House from Someone Who's Living It
So you think DIY remodeling is going to be fun? Here is one homeowner's list of what you may be getting yourself into
Full Story
DECORATING GUIDESLessons in Living Comfortably: Embrace the Scratches and Dents
When you celebrate wear and tear, you send a message that your home is designed for relaxation
Full Story
SMALL SPACESLife Lessons From 10 Years of Living in 84 Square Feet
Dee Williams was looking for a richer life. She found it by moving into a very tiny house
Full Story
GARDENING GUIDESLessons in the Rewards of Selfless Gardening
Let go of gardening for your own vision and watch the garden’s own true vision come forth
Full Story
HOUZZ TOURSDesign Lessons From a 10-Foot-Wide Row House
How to make a very narrow home open, bright and comfortable? Go vertical, focus on storage, work your materials and embrace modern design
Full Story
CONTRACTOR TIPS6 Lessons Learned From a Master Suite Remodel
One project yields some universal truths about the remodeling process
Full Story
LIFEDesign Lessons My Mother Taught Me
In honor of Mother’s Day, professionals on Houzz reflect on the design and style wisdom their mothers passed on
Full Story
SMALL SPACESDesign Lessons From Tiny Homes
Microspaces in a Phoenix exhibition abound in innovative ideas we can all use
Full StorySponsored
Central Ohio's Trusted Home Remodeler Specializing in Kitchens & Baths


toolgranny
Related Discussions
Lesson(s) you've learned this year.
Q
Hand Applique Sign Up
Q
Hand Applique HELP....
Q
My first hand applique!
Q