


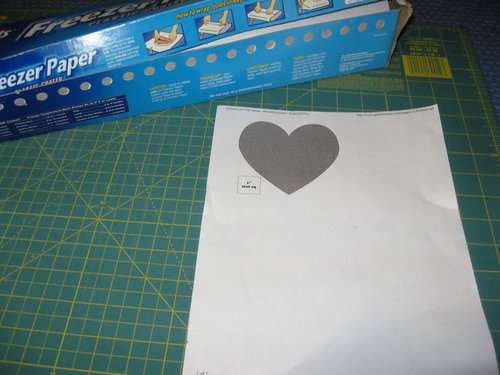
Hand Applique: Lesson Two
mrseldoo
16 years ago


Sort by:Oldest
Comments (15)
Related Stories

HOUZZ TOURSDesign Lessons From a 10-Foot-Wide Row House
How to make a very narrow home open, bright and comfortable? Go vertical, focus on storage, work your materials and embrace modern design
Full Story
REMODELING GUIDES8 Lessons on Renovating a House from Someone Who's Living It
So you think DIY remodeling is going to be fun? Here is one homeowner's list of what you may be getting yourself into
Full Story
SELLING YOUR HOUSEA Moving Diary: Lessons From Selling My Home
After 79 days of home cleaning, staging and — at last — selling, a mom comes away with a top must-do for her next abode
Full Story
REMODELING GUIDES6 Must-Know Lessons From a Serial Renovator
Get your remodel right the first time, with this insight from an architect who's been there too many times to count
Full Story
LIFEDesign Lessons My Mother Taught Me
In honor of Mother’s Day, professionals on Houzz reflect on the design and style wisdom their mothers passed on
Full Story
COLORNature’s Color Wisdom: Lessons on White From the Great Outdoors
Blizzard fierce or butter soft, white can highlight shapes, unify a room and perform miracles on the cheap
Full Story
DECORATING GUIDESLessons in Living Comfortably: Embrace the Scratches and Dents
When you celebrate wear and tear, you send a message that your home is designed for relaxation
Full Story
DECORATING GUIDES9 Life Lessons From Nordic Style
As Houzz launches in Denmark and Sweden, we provide you with a step-by-step guide to enjoying a real Scandinavian lifestyle in your home
Full Story
GARDENING GUIDESLessons in the Rewards of Selfless Gardening
Let go of gardening for your own vision and watch the garden’s own true vision come forth
Full Story
REMODELING GUIDESHope for the Future: Lessons From Midcentury Modern Design
11 ways we can learn from the built-in optimism of midcentury modern homes
Full StorySponsored
More Discussions


toolgranny
kasapa
Related Discussions
My first hand applique!
Q
Hand Applique: Lesson Three (First Half)
Q
Hand Applique: Lesson Three (Part Two)
Q
how do you carry hand applique?
Q
nana24
geezerfolks_SharonG_FL
hlac
mrseldooOriginal Author
geezerfolks_SharonG_FL
sewready
cziga
downsouth
nanajayne
littlefire
mrseldooOriginal Author
rosajoe_gw
nanny98