


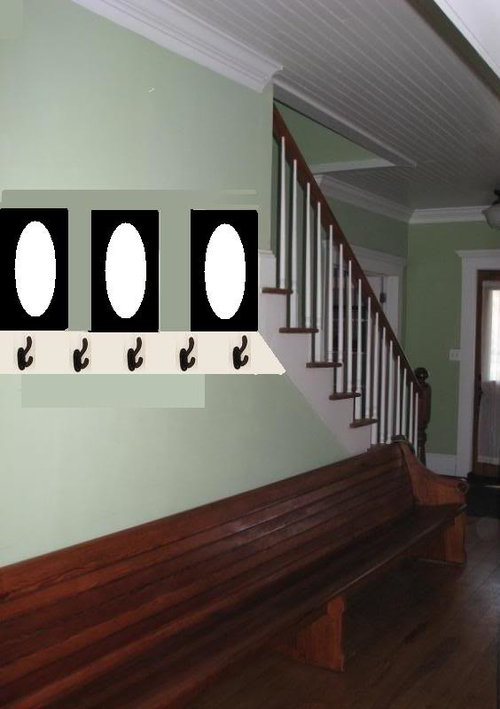
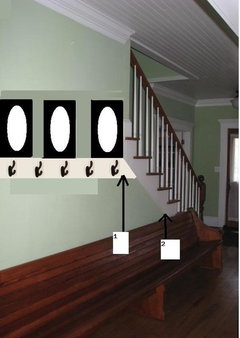
I need your thoughts on trying to camouflage an area that bugs me
zipdee
14 years ago


Featured Answer
Sort by:Oldest
Comments (31)

wodka
14 years agoRelated Discussions
Please give me your thoughts
Comments (4)Bryan_Glenda ... Hi! Read thru the threads here ... great advice! Also ... you can go to ... http://www.squarefootgardening.com/ Lots of info there. Click on New ADD-ONs on home page to see some photos of what other SFGer's have done. Our's is at Mt. Gilead, OH. I built some 6" deep boxes and acquired some at 18" deep. If I had to do it over, I would go a minimum of 8" deep. We used Mel's Mix our first year, last year. Don't think our homemade compost was cured enough. In the one box that we used purchased compost, the plants grew better. Wish I had had your gravel ... we used cardboard as a weed barrier in the ground level boxes and for our mulched walk area. Below is a link to a very cool tool, scheduling guide for the lazy ... or smart gardener. Best to you in all you do! Here is a link that might be useful: Grow Guide - Weekend Gardener...See MoreEnergy Audit Post Mortem....Your thoughts are needed!
Comments (60)Ok,..as I'm in my usual hurry, I haven't read ALL the posts so if this conflicts with any you will have to weigh that.Here's my 2 cents. I DO like cellulose,..it prevents many bugs and saved one of my buildings from burning down (also said by the state fire marshal) Superhot fire in the attic caused by an electrical mistake was so hot that copper wire melted.Huge beams too. (blast furnace effect because we hadn't done walls at that time and the races allowed this effect) However only 2 inches of the 15 inches of the cellulose burned off You can stop it from settling by adding 10% of blowing in fiberglass when doing it,.. You can generally stop moisture by a good moisture barrier paint on the inside of exterior walls. OK,.here is an old post of mine from a Landlord board so parts might not totally apply. ************************************************************ Here are a few more considerations. Yes if you can afford to do your units with a good color thermal camera and have someone come and do properties with a blower door, it would be better but you can come pretty close to finding out a lot about your property without them. We still have half the heating season to go,..and they seem to come around again pretty fast esp if you are paying for heat. I find that tenants appreciate units that are not energy inefficient and EZer to heat,and a selling point tp prospective tenants these days. Go to my picture page and see pics of the way we add another layer of "glass" (plexi) to windows.The upper sashes,if they can't easily be accessed from the outside, we fit them in by holding them in with spaces made from foam 1/2 inch weather striping and then further holding them in with Daps clear Alex Plus. (so that you can still raise the windows up) We also add "pulls to the bottom sashes so that you have someplace to lift up same,.. A thermometer left on the still measuring the cold air falling from these windows are very close to new Anderson,Harvey etc window temps. You will also see examples of what missing insulation looks like from the steam test. The colder areas of the walls have moisture condensed on them and show up darker. Here's the old post: Ways to reduce heat loss in homes/apartments. First find the air leaks in your house. Air infiltration is a major source of heat loss, often surpassing the effect of good insulation. First of all consider there is an inner and an outer seal of the envelope in your house. Both of these are important to seal. Note: despite what some people will tell you, it is extremely hard to get an older house too tight. Most that think they have done so have been shown to fail miserably upon testing. To find the inner leaks you can place a HIGH capacity fan (about 50-60 dollars at HD ) in a window blowing air OUT, best place is a hall window on a first floor but any window will do. Make sure its secure (bungees, whatever) and then put polyethylene over it, secure that with either tape or staples. Cut out an area very slightly smaller than the cage of the fan. At this time make sure the furnace is shut off and fireplaces are long out and flues tightly shut. Turn off any fueled hot water heaters. If you can, plug the exhausts of these with fiberglass insulation and make a big note to unplug them before you turn them on later! If you cant, you can still run the test pretty well. In furnaces you can usually do this by stuffing the fiberglass in the barometric damper toward the chimney. Now turn on the fan set on high. If its set up on the first story, go outside and feel the air leaving your house. SOMEWHERE its coming in just as fast! This amount of air comes pretty close to the amount of air that presses in your house and comes in on a cold day! Your job is to find out WHERE. Have a friend open a window in the house. Can you feel much of a difference if they open/close the window? Probably not very much. Now go back inside and close all interior doors that connect to the rooms that the fan is pulling from. That is, if its in a common hall, all the rooms that branch out from the hall. The whole house is connected in some way, think how the air flows to the fan. Now crack open one door at a time. Feel the air coming out of that room. Note which has most of the air coming out. Go back to that room and feel around, the windows, the base moldings, electrical outlets, etc. find out where its coming in and fix them with appropriate caulks, insulative ropes, Weather stripping. Check that room/door again. When you feel a lot less air coming out of that door go to the next room. After you get the rooms done be sure to check the basement. This is very important. Often people will say they dont have a leaky house because they do the check for cold drafts on a cold windy day thing. This isnt really a good test because of the cold air pressure on a house causes a "chimney effect" That is, air coming in from the lower floors, will push out the air of the upper ones. That pressure is substantial so the warm air will always go OUT. You wont feel cold coming IN from those areas but cold air IS coming in from micro and not so micro cracks in the lower levels and pushes a lot of hot air outside! Like pushing an inverted glass down in water, the fact that the glass doesnt let any air out, no water can go IN. You try to seal the top floors leaks that you NOW can find because of the fan to causing a vacuum. Now after this is all done, Go outside again and feel the amount of air coming out of your house again. Do the open and closed window thing again. There should now be a difference. You might still have a lot of air coming out, remember that it still is coming in somewhere. Can you see if you can find any more? Now it would be good if you can do the outer envelope test. To do this see if you can get a theatrical smoker , this gives off a LOT of non toxic "smoke" They are real cheap from Walmarts at Halloween. It also comes with a optional switch that will keep it going w/o having being in the room pushing the button each time its ready for the next cycle. Now you do the same fan thing but have it blowing IN. Start the smoke. You might call the fire dept to let them know you are doing a smoke test in case someone sees smoke leaving your building and calls them. Turn on the fan and go out, maybe with a video cam and note where the smoke is coming out. This is the outer envelope you should try to seal. Once you do this, with good caulk its should be a one time thing. It will pay you year after year. Another way is a "poor mans" infrared test. Its an easy way to point out weak/no areas of insulation. Let temp in unit go down to around 60 degrees. On a very cold day, all you need to do is to boil water on all the stove burners. Add hot tap water as needed. It make take an hour or two. Use a few fans on high to circulate the air in the unit. You will find that the coldest surfaces will have moisture condense on them. In a while you will see windows condense first. Note which condense first,. Use a non flash camera to take pictures as you may not remember exactly where later and it limits the time you have to boil the water. After the windows,. generally parts of the exterior walls will get wet. Once in a while you might see an exterior wall condense. If so you may have a race in the wall open or a connection to a poor top seal in the attic. The pattern is very similar to what you may see on an infrared scan costing (in this area) hundred s of dollars....See MoreYour thoughts on this farmhouse kitchen I need to plan out asap?
Comments (12)You have a lot of space, it's just not working very well, esp those little lips that pass for work spaces. If you could really re-do the entire space cost effectively, that would be best, not only for now but for longterm. Can you give us a good idea of what you have in budget and how much DIY you can expend? And where you are in the nation--climate, costs, labor, etc? One problem with planning on finding antiques and useful castoffs is that you will find them a week after you quit your search and commit to a plan B. Doesn't sound as if you have the luxury of time to collect useful stuff. I like to think that our G-shaped kitchen is somewhat like a farm kitchen. We can have 4 working cooks inside without saying "excuse me." We got new oak "shaker" cabinetry by a local guy at $8,000-10,000 and $3500 for finish and installation--you can avoid much of this if you re-use your oldies and work in some additional ones or perhaps just doors, trims, etc. We had to put in new floor and walls and plumbing and electrical fittings and had to marry three wood floors and accompanying walls, which was a big expenditure in time and money. You're in a better position--not making new spaces. As you note, you don't need to follow all the fanciest choices--we sure didn't for much of our project. I like the idea of Ikea butcherblock (we have two hunks of this in beech) but don't discount the new laminate countertops either. Don't feel the need to buy new appliances right now--you can leave standard spaces and swap out your stuff later. That's what we did--hard to trash or sell a 4 yr old Energy Star refrig so we didn't put it into a custom housing. When it dies or someone decides to trade it out, it can go. We have very modest appliances; affordable white enamel in sinks and appliances. If the old cabs are salvageable, it's possible to get doors to match new units. Or give your plain slab fronts a custom paint treatment, perhaps paint with one color and add a distinctive recurrent stencil motif along the bottoms of doors or such in a complimentary color. Then if the other new unit doors are similar, the motif can be used to make them match more. It's very important to plan for the young people when they become adults, or at least adult in physical presence. What will grown up women feel like in the space--you and a subordinate or co-cook? That collision potential was the worst aspect of our old kitchen and the best part of our better planned new space. I actually like other people better in an efficient kitchen than in an inefficient kitchen, or put it another way, my old kitchen made me dislike my own family sometimes. On one of my constant tirade topics, I recommend pullout breadboards/cutting boards to expand work surfaces and plunk space. Are your countertops less than 24 inches at present or do they just seem narrow? Eliminating the 1-inch backsplash at back give you another inch of room on counter. What amp electrical service do you have and how extensive will the work be to bring everything to code if it's not there already? Will you be opening up any exterior walls? If so, insulate, insulate, insulate. Even if it costs. Since you have marked that you are moving the sink, give yourself permission to really redo the room arrangement--you're committed to plumbing costs already. Strongly urge you to visit the paint counter each time you are in a store--ask about "mistake paint." One of our vendors gives it away; others ask $5 per gallon. This stuff might give you the freedom to paint insides of cabs & closets, clean up stained areas, etc. You can try some experiments with it too. Consider a movable work/island cart as a way to expand efficiency. If the floor cleans up but still looks sad, consider stencil painting a design on it, perhaps in a classic folk motif if that's your taste. Or just checks, stripes, rectangles for rugs, whatever. There are a lot of examples to look at and a wise pattern can reinforce or define a room's visual layout--walkpaths, work zones, etc....See MoreOK-I'm back with a revised plan--your thoughts?
Comments (17)Hi holligator-don't apologize-I'm posting so I get this from all angles... The thing that I do like about bmorepanic and lyfia's plans is that they open up that door again to the living room to direct traffic there. But bmorepanic's plan just initially seemed very broken up to me. I think the other thing working on me mentally is--now that we've kept the kitchen in place rather than moved it, I'm finding myself less apt to change the things I actually LIKE about my current kitchen--and there are indeed a lot of things I like.So that may be a mental block for me. One of our other things is, we're re-using our 10 year old cherry cabinets. We picked them out, still love them and they are still available--so we're just using what we can of those and filling in with more. My priorities for the remodel as a whole are: -Master bed and bath -A more open kitchen/dining footprint that allows guest to hangout while I cook without being in my way, and has room to seat 8-10 diners on a fairly regular basis. (we're only a family of four but host Sunday dinners weekly) It has been hard not to be distracted by other issues in achieving these two primary goals--I think there are several perfect solutions here, we just can't afford them. We are in a stage of the design where a detailed itemization of costs will be provided soon--and that's where we can really get into what is and isn't possible on this more detailed level. We're dealing in such big squishy numbers right now... In a sense I do agree with you about the step backward--hubby and I had a few go-rounds regarding switching over to this sort of layout--but it's tradeoffs...and we think this might be the way to go---but everything is still on the table. The two triangles (top right corner) and one other that has moved around the plan quite a bit---are two built-ins that I'm somewhat irrationally committed to saving and using. Anyhow, still playing with all this-- Right now trying to weigh the benefits of opening that wall to the living room back up as opposed to the benefit of more cabinets/counters in that space--and where does MW go? :) We're not big MW cookers but use it enough for reheating... Your continued comments appreciated..... B...See Moreleafy02
14 years agobusybee3
14 years ago
Oakley
14 years agomary_lu_gw
14 years agodilly_dally
14 years agozipdee
14 years agopalimpsest
14 years agoteacats
14 years agoIdeefixe
14 years ago
stolenidentity
14 years agonatal
14 years agogwbr54
14 years agozipdee
14 years agomegsy
14 years agonatal
14 years agoruthy1
14 years agozipdee
14 years ago
graywings123
14 years ago
anele_gw
14 years agonatal
14 years agoruthy1
14 years agoroobear
14 years agozipdee
14 years agogwbr54
14 years ago2ajsmama
14 years agonicole__
14 years ago
bac717
14 years agoUser
14 years agozipdee
14 years ago


Related Stories

GARDENING AND LANDSCAPINGBreezy and Bug-Free Modern Porches
Screening keeps pests out of these diverse porches across the U.S., while thoughtful designs keep them visually appealing
Full Story
GARDENING AND LANDSCAPINGPorch Life: Banish the Bugs
Don't let insects be the bane of your sweet tea and swing time. These screening and product ideas will help keep bugs at bay on the porch
Full Story
EARTH DAYHow to Help Your Town’s Beneficial Birds and Bugs
Make a habitat using local materials to provide a home to the creatures that help our gardens
Full Story
GARDENING AND LANDSCAPINGBid Bad Garden Bugs Goodbye and Usher In the Good
Give ants their marching orders and send mosquitoes moseying, while creating a garden that draws pollinators and helpful eaters
Full Story
GARDENING GUIDESGreat Design Plant: Common Boneset Helps Good Bugs Thrive
Support bees, moths and butterflies with the nectar of this low-maintenance, versatile and tactile prairie-style plant
Full Story
HOUSEKEEPINGGot a Disastrously Messy Area? Try Triage
Get your priorities straight when it comes to housekeeping by applying an emergency response system
Full Story
DECORATING GUIDES28 Decorating Moves to Try This Month
Treat your interiors to a pick-me-up with these quick and cheerful decorating tricks
Full Story
LANDSCAPE DESIGNTry Slow Gardening for Some Unexpected Benefits
Why set your garden on the fast track? Here's how to relax and enjoy it in an entirely new way
Full Story
COLOR12 Tried-and-True Paint Colors for Your Walls
Discover one pro designer's time-tested favorite paint colors for kitchens, baths, bedrooms and more
Full Story
PLANTING IDEASWant a More Colorful, Natural Garden? Try a Perennial Meadow
Spend less time tending and more time taking in the sights by improving on Victorian and prairie garden designs
Full Story


teacats