


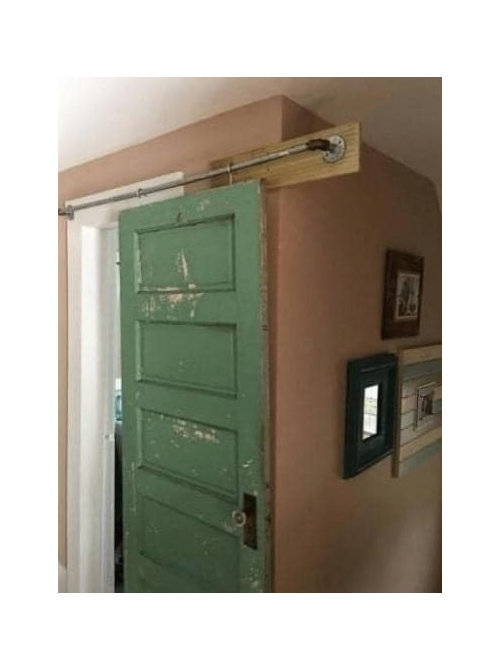
Unfortunate DIY
Gizmo
2 years ago
Featured Answer
Sort by:Oldest
Comments (6)

texanjana
2 years agoRelated Discussions
Photos - Grow Box / Cold Frame
Comments (30)Thanks for the birthday wishes. Yeah I always want to take pictures later during the season and I always put it off for tomorrow - then I never get around to taking them. Will have to try harder this year. I enjoy seeing other people's gardening photos as well so I urge all to post their gardening pics in whatever forum in which they may apply. Regarding my system, the cost savings is really what my system is all about. As with you, I disliked spending so much money on plants every year and not having much selection to choose from regarding veggie starts, so that is what got me going. That and getting cabin fever so badly during winter that I get desperate to see something, anything growing. Today is a good negative example of my system. The high is 39 degrees and it is cloudy so I only have cold-weather plants (cabbage family mainly and greens) out in the grow box. The impatiens and veggie starts are all under lights in my nice warm growing room. Plants go out or stay in depending on outside temperature and sunlight potential (which affects the potential temperature inside the grow box). It is a bit of a labor intensive system but by doing this I never really have to acclimate my plants. By late April, though, the plants end up outside in the growboxes 24/7 until they are planted in May. I am zone 4b. My average last frost date is around May 10 - I always figure two weeks into May because it is easier to remember when doing my count-back regarding when to start certain seeds. I up-potted 100 impatiens and quit for the day. Went out and did some dividing and transplanting of some perennial flowers until I got chilled. Harvested fresh asparagus, wild ramps, leaf lettuce, winter onions, green garlic, and fiddleheads for my annual charcoal and cherry wood-grilled free-range Black Angus porterhouse steak birthday dinner. Picked up a bottle of wine to round out the celebration. Life is good, despite the inclement weather. Only bummer is that the Morel harvest is still weeks away......See Moresupports for vining crops (melons and squash)
Comments (5)We live in Surrey, England, and have an allotment (for non-UK residents, an allotment is an area of land (125 square metres) that you rent from the town council on an annual basis; there are usually 50 - 100 of these plots, and most have access to water, via a stand pipe (faucet). We're growing Marina di Choggia winter squash. From 6 seeds potted on the kitchen window-sill, four sprouted. One got nibbled by slugs (pernicious creatures!) in the cold frame, but three are doing well on the plot. I have built a trellis (basically two capital 'A' shapes leaning together) out of lengths of 2" x 1" treated timber. The squash are doing fine, but I'm going to have to provide sling supports of some sort, as the fruit can reach 10 or 15kg each. I'll see if I can get some photos uploaded somehow. Cheers...See MoreNovalis vinly flooring
Comments (8)Here is my story posted on the Lowe's website and my resolution is to rip out the floor: With all the great reviews about this product I am almost afraid to post something negative so people think, ah another poor DIYer that doesn't know what or in this case how to do it. Anyway let me give you the facts and you can judge for yourself. After removing the old carpet including all carpet staples the floor was scraped, nailed and sanded where needed. 5mm plywood, (not Lauan!) was put down with rink shank nails. All gaps filled with wood filler and sanded. Before applying Henry's vinyl tile primer floor was swept and vacuumed. So much for the prep work and since I couldn't think of anything else installation was next. Laying down the planks is pretty much a no-brainer and using a hand roller as recommended should be all to it. I did notice from the get go that a couple of planks needed some extra attention and I ended up using full boxes of Novalis planks to keep them down. The next day, which is today, I inspected the work and found that the majority of planks were in one form or shape not sticking. Even the ones with the extra weight on them did not seem to hold well. I was able to lift the tiles up with hardly any resistance. The glue was still soft and it was obvious that hardly any adhesion between the floor and the plank exists. Let me assure you, the preparation was painstakingly done, ambient temperature around 85F, low humidity (Nevada) of 25%, each plank was rolled and rolled again,... I do understand that I am obviously in the minority of unhappy Novalis customers and I have no explanation why this floor is not sticking. I still wait to receive a call back from the customer service representative, not that I expect much of it anyway....See MoreTearing out walls to create great room
Comments (17)OK - here's one....and no moving the sink or adding a second sink! The ability to move the Garage Door made all the difference! (Select/Click on it to see a larger version) The Prep and Cooking Zones are close to each other with the refrigerator and MW nearby for easy access The Cleanup Zone has sufficient separation from the Prep & Cooking Zones so someone can be cleaning up while others are prepping or cooking. It has plenty of room for an open feeling If they can do it, the window has a bumpout to add more space behind the sink. It also helps contribute to an open feeling. I suggest the window be counter-height to increase the amount of light and open it up even more. The bumpout also reduces splashing of the window and gives them more faucet options. There is plenty of workspace where it's needed: Between the range and sink (39" + 30") - btw, I find I like working with a corner - more of the counterspace is reachable when standing in one place. The peninsula has 85" total width (approx 57" from edge to corner) If needed, 45" on the Cleanup Zone side of the sink Dish storage is above the DW and, if needed either in drawers in the peninsula or in the upper cabs on the other side of the sink. (That upper cab above the DW area could be another 3" to 6" wider going out over the peninsula - it depends on how tall the family is) The refrigerator and MW are situated on the perimeter so that those outside the kitchen can access it without getting in the way of those working inside the kitchen There's a 6' wide reach-in pantry. It could be longer if they don't mind a longer wall. Counters on the top and right walls are 28"5" deep - 3" deeper than normal. I show 27" deep base cabinets - if they can get them, the deeper base cabinets will add quite a bit of cumulative storage. If they cannot get them, then they can use standard 24" deep cabinets pullout out from the wall 3". With the exception of the easy reach, the upper cabinets are 15" deep - you'd be surprised the difference those 3" makes! There is a portable island for additional workspace and/or carting things from the pantry or refrigerator to one of the Prep Zones (primary or secondary). There's also another coat closet facing the front door. It could also be a set of cubbies for boots, gloves, hats, sneakers, backpacks, etc. If they have children, this might be an attractive alternative to another coat closet. Or, if there's a Mudroom in the garage and cubbies aren't needed, it could be an alcove for a nice table and mirror or maybe a "message center" with a place for keys, charging phones, mail etc. (they might want to store them in a cabinet that closes to hide mail or similar clutter.) The coat closet/Pantry wall helps to hide the kitchen from the main entry - so the first view of the house when coning in the front door is not a......See More
Gizmo
2 years ago
Jilly
2 years agolast modified: 2 years agoblfenton
2 years agoUser
2 years ago

Related Stories

DECORATING PROJECTSDIY: Make a Designer-Look Pillow Sham
Give a sofa or bed a high-end touch in about an hour with low-cost materials — if you don't tell, they'll never know
Full Story
DECORATING GUIDESBudget Decorator: How to Save When You Don’t DIY
You don’t have to be crafty to decorate your home inexpensively. Here are other ways to stretch your design dollars
Full Story
KITCHEN DESIGNShow Us Your Fabulous DIY Kitchen
Did you do a great job when you did it yourself? We want to see and hear about it
Full Story
BEFORE AND AFTERSHouzz TV: See Recycled Walls and Cool Cassette Art in a Woodsy DIY Home
Walnut countertops join hardwood floors and pieces made from leftover framing in a bright Spanish colonial
Full Story
DIY PROJECTSDIY Project: Knickknack Makeover
See How to Turn Random Clutter Into a Glossy New Vignette
Full Story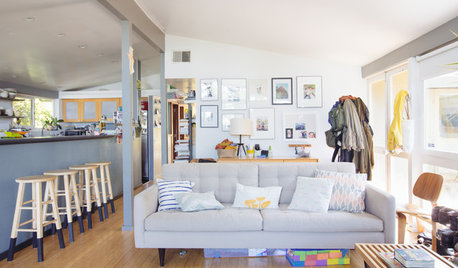
HOUZZ TOURSMy Houzz: DIY Efforts Reward a Berkeley Family
California parents-to-be roll up their sleeves to transform the landscape and spruce up the interior of their Cliff May home
Full Story
HOUSEKEEPINGFurniture Clinic: Quick DIY Glides for Sofa, Chair or Table
Smooth things over between your furniture and floor with easy glides cut from leather scraps
Full Story
HOLIDAYSShine Up Your Holidays With DIY Mercury Glass Globes
Get expensive-looking decorations for the cost of paint and glass, with blinged-out orbs you can make at home
Full Story

DECORATING PROJECTSDIY Project: Wallpaper Goes Mobile
Paper Plywood Panels for a Great Look That Can Move When You Do
Full StorySponsored
Zanesville's Most Skilled & Knowledgeable Home Improvement Specialists

Jilly