


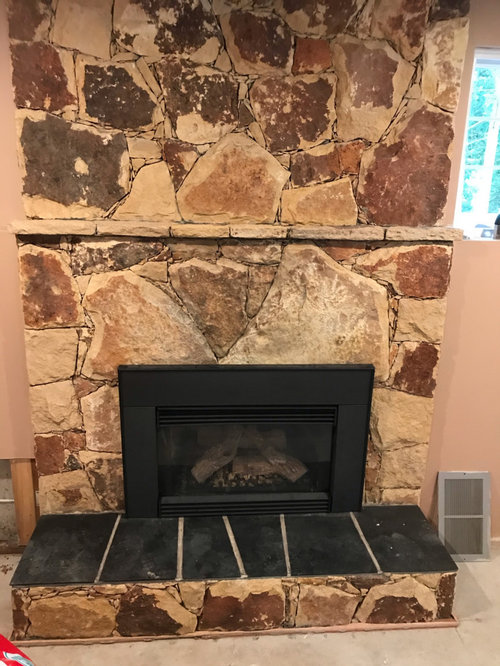
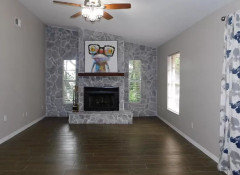
bleh 1970s stone fireplace.
Humble BEe
3 years ago
Featured Answer
Sort by:Oldest
Comments (12)

AnhitA Nazeri
3 years agoRelated Discussions
long - need advice about 1970's basement family room
Comments (6)"We have not had any leaks but how difficult is it to change out portions of a drywall ceiling?" I've had a drywall ceiling for 15 years in the basement and haven't had any reason to touch it. If you want to identify any potential problems while the ceiling is open, fine. This way you minimize opening the ceiling at a later time. Say for instance there's a bathroom above on the first floor in a house that's 40 years old. I might look at the tub or shower traps as potential issues and replace them while the ceiling is open. Every house is different and you don't need to anticipate every possibility. It's drywall. If you need to cut it open, cut it open. You repair the ceiling and paint it. It's not brain surgery, but alot of the tools are the same. Ron...See Moreadvice for my 1970's family room in all its paneled glory
Comments (26)Hi, so glad to find this forum. Help! I guess you would call my husband and I 'gluttons for punishment', as over some time, we've restored an 1898 Queen Anne Victorian 3-story gingerbread home, redone a beautiful 1980's home (pretty structure but awful 'cosmetics'), and now are working on a 1971 roomy home on a big treed lot, the lot being the reason we bought the home. The room I'm thinking of has dark, dark paneling in the room the former owners used for a game room; we've used it as my husband's study but are about to turn it into a media room. The paneling is DARK, but it is that good, high quality dark walnut...I've really gone back and forth about what to do with it. The house has straight modern lines but really, with a few major changes, could look very '1910 Arts and Crafts/Edwardian', so my goal has been to add much wider baseboards, wider and 'crowned' window & door trims and eventually transform the whole house. The home's original 'bones' lend itself to that nicely...AND I have so many antique furnishing from our Victorian house days, that I needed to figure out a look in which my things can work. 1971 doesn't do it, and since the Edwardian Era followed the Victorian, I figure, why wouldn't that work for me now? Our lot is gorgeous, and houses can always be changed. I've really debated about what to do: paint over the paneling, OR mud the seams and paint over it, OR take it down and dry-wall then texturize it, and more...BUT knowing it's quality, I'm now thinking of 'white washing' or 'glazing' it with some type of colored wood-stain/or light glaze that would let the pretty quality of the wood come through, yet give us a lighter look. I'd LOVE to know if anyone knows of a good product to use/ or knows how to do this or has seen this done. PICTURES WOULD BE SUPER if anybody has any! It's dreadfully dark in that room. The room is also our main computer/office room, so even though the dark paneling could come in handy for watching movies (once it's a media room), it is drearily dark for any other purpose. Any feedback or ideas are WELCOMED! My dilemma now is, since we're shooting for that Arts/Crafts 1910 look, which the bones of the house can well adapt to...1970's paneling doesn't do the trick....See MoreHelp with 1970's Kitchen with Monster Soffit
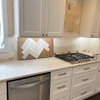
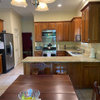
Comments (2)Hi, Thank you for your very detailed and thoughtful response. First, some information on me and my mindset regarding updating this kitchen as a whole. My husband and I have renovated quite a few kitchens, bathrooms, etc ourselves over the last 30 years and we are quite familiar with the concerns about the cabinetry you brought up. I have replaced old, dated cabinets with high quality units in previous kitchens and bathrooms and I have refaced cabinets. I have also refreshed those same rooms on a shoe string by reusing what's in place and updating the look creatively while saving a ton of money. I plan on helping this particular kitchen work better for us for as little money as possible, although I know I will need to spend more money than I would like to on certain areas of concern. The house we are currently in is a very dated 1970s house we purchased two years ago in order to downsize and to use as a project for our retirement. We like remodeling and building things, it's fun. The house needs lots of work and we are slowly addressing each issue based on importance. If this were an upscale house in a different neighborhood, I would completely gut the kitchen and start from scratch. However, I can't see spending thousands and thousands of dollars on this particular house. We may enjoy the kitchen if we did a complete gut job, but I doubt we will ever get that kind of money back out of it regardless of how nice we make it. So I need to take a different approach here. The Soffits My main question and concern in this post is regarding the soffits, particularly the big, intrusive soffit over the windows. The soffits house only electrical wiring used for the soffit lights so removing it shouldn't be that big of a deal. I am waiting for estimates from a few contractors and if I think it's worth it to have them removed, I will. In years past, we would have already done this ourselves but our older bodies no longer want to do this type of large, dirty work. If I can find an interesting and attractive work around that visually makes some sense out of it, I will. This is why I posted my plea for help. RIght now the soffit is just a big, clunky light holder. The fact that it stops in the middle of the windows is what bothers me the most about it. I am sure they stopped it there to line up with the end of the cabinets to the right of the sink, but it is awkward and overpowering. It is the first thing you see when you enter the kitchen. The Cabinets While I am not thrilled with the appearance of these cabinets, I would like to work with them. These are not high end cabinets, but the boxes are made out of plywood and they are sturdy and sound. They are better quality than the inexpensive cabinets you can buy today and better than some of the mid-priced cabinets, so I would need to really spend a large amount of money to get mid/high end cabinets in order to make an improvement. I am happy with the general layout of the kitchen cabinets so I don't feel the need to reorganize with the exception of the area to the right of the sink base cabinet which has a tiny 6" countertop. More on that later. The other reason I would like to keep the boxes is that I want to add as little debris as possible to our landfills. As I've gotten older, I am much more aware of just how much our society throws away and I have trouble throwing something out if I can make it beautiful, which I believe is possible here. One of our fun retirement projects we have planned is to reface the cabinets. We have the ability and will have the time to custom create our door fronts to fit our existing cabinet boxes. This is another reason I don't want to replace the cabinets. Prior to the refacing we plan on replacing the cabinet hinges and drawer glides and we may even convert some of our lower cabinets to drawer bases near the stove. Time will tell if we still feel this is important when the time comes. If we remove the soffits, I plan on building open storage shelves/cubes that match the width of each cabinet below. These will be lit and will extend to the ceiling and finished with a matching crown. We have a collection of art that I would like to display. Yes, I know that I will need to dust these, but I'm ok with that. Vent/Range Hood Funny you should mention adding a range hood. We absolutely will be doing that soon and it is one of the reasons we want to remove the soffits. Due to there being no attic above the stove, we have to remove the soffit over the stove at the very least in order to install it. We plan on doing this in the near future. I have done this in the last 4 houses I have lived in and renovated because we love to cook and need a hood in order to remove the intense cooking smells to the exterior. Kitchen Sink Part of the reason we want to address the huge soffit over the window is that we will be adding base cabinets (drawers) to the right of the sink terminating them at the right edge of the windows. Currently, there is only 6" of countertop next to the right side of the sink which disturbs the flow of stacking and rinsing dirty dishes before putting them into the dishwasher on the left. Not only does the shallow, 1970s sink splash water everywhere, but it seems to direct water out and over the 6" countertop and onto the hardwood floors. Temporarily we placed a piece of furniture under the window which has a finish that is very close to the cabinets and is the height almost matches the countertop, but water still has a way of getting in between the two and drenching the hardwood floors. We did this to have a place to stack dirty dishes before rinsing and washing, but it's not a great solution. Ideally we want to extend the countertop out to the right edge of the windows with drawer bases below. Luckily, our sink base is 42" so we plan to install a 36" single bowl sink that is deep enough to wash our small dogs. I haven't yet decided if it will be a front apron sink or not. Whether it is an undermount or a drop-in sink will depend on the countertop we decide on. Finals Thoughts So, I am still looking for ideas on making the monster soffit look intentional or for a way to minimize it's bulk. If you have any creative ideas on how to deal with it, I would love to hear them. I hope this gives you a better understanding about my project/s. Thank you for your input....See MoreIs updating a 1970s worth the investment? My honey says no, I say yes.
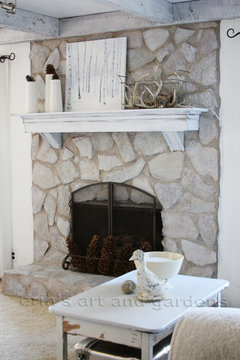
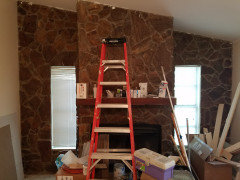
Comments (20)I'm guessing those corbels are decorative--in fact, your beams probably are. On second look, your beams really aren't THAT awful (they're darker and not orange like ours were), nor are the ones that run around the sides. I'd definitely take the corbels off though, and probably remove that skinny shelf next to the fireplace, and likely remove the grasscloth (we had that, too, only floor to ceiling and it was badly damaged). You might be able to paint the doors if they're smooth hollow-core (that's what we did). That will reduce the visual clutter, and then if you replace trim/baseboards with white (which I can't really see in these pictures) you may have enough of a new look that the beams are fine. Here's a "before" (well, middle, as the popcorn ceilings had been scraped) that shows how ghastly those beams were. I'll see if I can find an "after."...See More
partim
3 years agoAnhitA Nazeri
3 years agoAnhitA Nazeri
3 years ago
Humble BEe
3 years agotedbixby
3 years ago- PRO
Patricia Colwell Consulting
3 years ago Humble BEe
3 years ago
Melissa R
3 years agolast modified: 3 years agofelizlady
3 years ago
alwayscold
3 years ago


Related Stories
DECORATING STYLESIs Your Home Ready for a 1970s Revival?
Seventies chic is a trend that’s been brewing for some time, but this year it could hit big — with a few modern tweaks
Full Story
HOUZZ TOURSMy Houzz: Elegant DIY Updates for a 1970s Dallas Home
Patiently mastering remodeling skills project by project, a couple transforms their interiors from outdated to truly special
Full Story
ECLECTIC HOMESMy Houzz: 1970s Texas Ranch House Gets a Boho Update
Before and after: Graphic tile, black paint and a new open floor plan transform this Austin couple’s live-work home
Full Story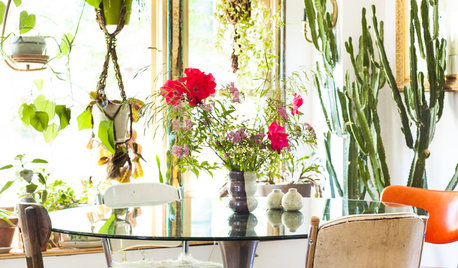
ROOTS OF STYLEDesign Through the Decades: The 1970s
Concern for the planet spurs a shift toward ecologically and socially responsible architecture and products
Full Story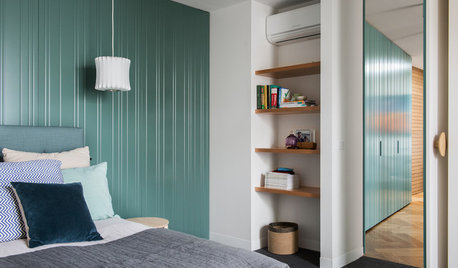
HOMES AROUND THE WORLDHouzz Tour: 1970s Home With a Cool Contemporary Look
A home renovation in Australia promotes indoor-outdoor living with an open plan that improves connections to the backyard
Full Story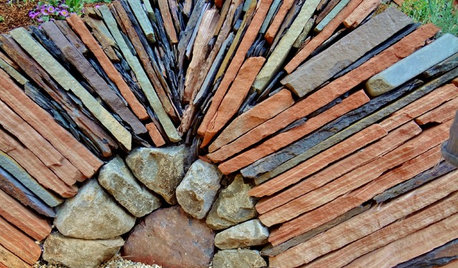
LANDSCAPE DESIGNFollow Nature’s Lead for Artful Stacked Stones
Surprise and delight in the landscape with rock formations resembling wildland hoodoos and cairns
Full Story
HOUZZ TOURSNew Layout and More Light for a Family’s 1940s Ranch House
A Los Angeles designer reconfigures a midcentury home and refreshes its decor
Full Story
BEFORE AND AFTERSMy Houzz: Minimalist, Airy Style in a Chicago Family’s 1950s Home
See how these homeowners resolved their layout design dilemmas in a midcentury split-level house
Full Story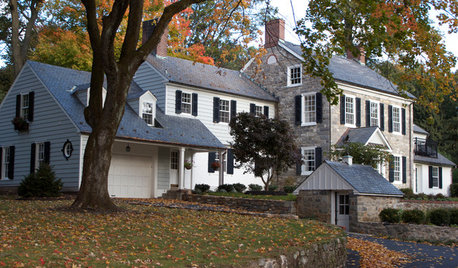
HOUSEKEEPINGIt’s Time to Clean Your Gutters — Here’s How
Follow these steps to care for your gutters so they can continue to protect your house
Full Story
TRANSITIONAL HOMESHouzz Tour: An 1800s Sea Captain’s House Sails Into Modern Times
A California designer and his wife lovingly restore their throwback gem while carefully adding some modern-day style
Full Story

Beth H. :