


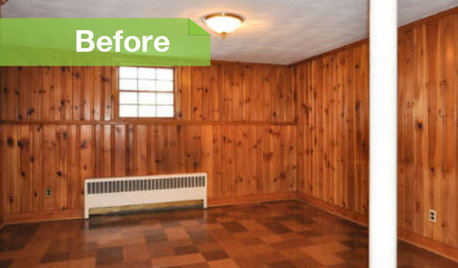
advice for my 1970's family room in all its paneled glory
that70shouse
17 years ago
Featured Answer
Sort by:Oldest
Comments (26)

kimkitchy
17 years agosierraeast
17 years agoRelated Discussions
1960 - In all of it's glory
Comments (34)Maybe the owners knew exactly what they liked and saw no need to keep up with any trends. My parents built a house in 1969 and all the furniture was bought between 1969 and 1975 with a couple exceptions. They didn't let things deteriorate, and if something needed to be replaced for practical reasons, it was done. My parents both got recliners when they got older and my mother needed an armchair at the kitchen table, she got one. Things got reupholstered, but to go with what was already there. That said, my mother had absolutely no emotional attachment to the furniture, the drapes or anything like that. She said she had no particular memories that were attached to the house, because the house and it's contents were all inanimate objects, her memories were of people, and those she could take anywhere. She liked the house, she liked living there and she liked the way it was decorated, but if I knew anyone who did not dwell on the past or form attachments to objects, it was her. She just saw no reason to be influenced by trends or to idly redecorate just because. In her mind, there were many more important things to do....See MoreDesigning a kitchen for the first time; original 1970s kitchen
Comments (8)Could you please tell us about you and your family and how your family plans to use the Kitchen? It's just me and my husband. I love to bake bread and use my mixer and bread machines on a weekly basis. I also use my rice cooker all the time. Oh and I recently bought an espresso machine. Could you please tell us more about the space you have to work with? As you can see the current footprint is small. We could lose the closets and the door adjacent to the kitchen but it will require moving the water heat and washer and dryer to another part of the house. We were also thinking that maybe we could keep the water heat where it is (replace it with a tankless water heater) and turn the rest of the closet space into a pantry if that is feasible. Where are you flexible? What can/cannot change? If something cannot change, why? (We might have tips for you that may allow you to change it.) Very flexible! I would love to keep the budget down because the rest of the house needs so much work (we are talking shag carpets in the bathrooms type of work). My main concern is having enough space for prep and baking. And I would love a wall oven/micro combo if at all possible but I'm just not seeing where I could fit it in. The seller had a table in the kitchen which I think would be nice to incorporate if we don't open the room up but I also don't want it to get in the way either. I look forward to learning more about kitchen design from this forum. It's very tricky as I'm discovering! Jen...See MoreI need help renovating this 1970's living room!
Comments (28)I agree that the ceilings are beautiful, unique, and cozy. You could really incorporate them into a very interesting modern farmhouse look. However, A. I really feel for your husband who is 6 feet tall, and B. I think the beams contribute to the congested feeling of this space. The beams, the columns, the trim, the multiple levels of tray ceilings, and lighting fixtures trapped between the lanes of beams make this space feel jumbled and confined. There are many things you can do to make this space feel more streamlined, open, and airy without removing columns. (Though I would still explore what is inside those columns and why they were added to this house. It looks like the recessed and tray ceilings were there before the columns because the columns so strangely protrude out into the recessed areas. 1. Remove the beams Check to be sure they are not structural. Yes, they are beautiful, but they really confine the space and narrow the lighting. They would be great in another house but not in this one. If you must keep them, paint them the same color as the ceiling and walls to help them disappear. Again, they are beautiful, but not in a room with a low ceiling, 4 brick columns and a tall guy. 2. Consider recessed lighting. These round light fixtures are awkward to look at and bring the height of the ceiling down when you want it to feel more vast and open. 3. Remove and reduce as much ceiling trim as possible. There is way too much trim happening here: odd trim spanning opening to dining room. The trim at column tops are over the top, and trim around the columns at the front door overlaps oddly with the tray ceiling. There may be some areas where trim cannot be moved. In those areas reduce it's appearance: Replace with a trim that has fewer ridges, a lower profile that protrudes less from the wall, and paint it the same white as the walls and ceiling. 4. Consider switching layout How do you all spend your time together? Do you eat at the table a lot or more so at a counter? When you eat at the table is it dark out? Do you spend time together in a formal living room setting? Do you need an area to play with toys? Does much TV watching happen nearby when someone is in the kitchen? I don't understand the layout here or your usage needs, but for the sake of your husband's height and potentially maximizing light, can you make the current dining room be more of a living room / family room space and put the dining room where the current sofas are? If the dining room with all of those open windows is not being heavily utilized during daytime hours, then you are not utilizing the sunniest part of this first floor....See MoreWhat did we get into? 1970's chalet/cabin with lots of potential
Comments (25)Niiiice! Are the deck and supports in good condition? I would put my money there.... You need a wood shed ASAP to run the woodstove. Place an order for kiln-dried wood. Storing wood under the back deck will be super inconvenient when it's 20 below. Plus, snow melt will drip through the boards of the deck and ice the logs together (been there, done that). The shed should be nearer the front door. Sometime this summer collect blow-down twigs on your property. Garbage cans are great for storing these. Will you have auxiliary heat to keep the pipes from freezing? Otherwise, you're not going to be visiting on winter weekends, 'cos you're going to have to drain the pipes for winter. No concrete for a porch. It will crack in no time. Use wood. Try Trex for the steps, and make them extra wide so you can easily schlepp stuff like firewood into the house. You can use crusher for your front pathway; it does well in freeze/thaw cycles and is cheap to replace. Consider having a more substantial entrance, like a big vestibule or enclosed porch (a very New England thing). There will be muddy boots, wet jackets, skis, fishing rods, waders, hats, snow, wet, mud, everywhere. These get stashed BEFORE people go into the house front door in some kind of fore-room. Slippers get put on. You need a bench or chair there. Extensive doormats and drip spaces. Yep, have a mouse treatment of some kind for the house. Have a way to store food so mice can't get it. At least carpet is warm underfoot. Maybe the right idea would be to have some comfy rugs. The knotty pine is fab. Even minor changes to it would lower the property value, especially whitewash, scraping, paint... If there's a way to take down a tree or two to add more interior light and/or open the lake view, I think that would be smart. I don't think that house has been in the woods very long, so it's not like you'd be taking down historic trees. I disagree that the woodstove should be in a corner or to the side. It's essential for heating the home: it should be central so warmth reaches everywhere. If you have kids or pets, you MUST put a metal barrier around the woodstove for safety reasons. This can have a gate so an adult can access the front of the stove to load wood. Do you have a security system of some kind? Might be a good idea for a seasonal place that's that nice....See Morethat70shouse
17 years agosierraeast
17 years agothat70shouse
17 years agosierraeast
17 years agosierraeast
17 years agothat70shouse
17 years agotalley_sue_nyc
17 years agothat70shouse
17 years agokillinsnakes
17 years agothat70shouse
17 years agonewenglandbuilder
17 years agothat70shouse
17 years agodavidandkasie
17 years agothat70shouse
17 years agoscott2006
17 years agothat70shouse
16 years agosarschlos_remodeler
16 years ago
awm03
16 years agomildredpots
16 years agothat70shouse
16 years agothat70shouse
16 years agolotsahouses
15 years agoiloveflowersinpa
15 years ago
Related Stories
PAINTINGKnotty to Nice: Painted Wood Paneling Lightens a Room's Look
Children ran from the scary dark walls in this spare room, but white paint and new flooring put fears and style travesties to rest
Full Story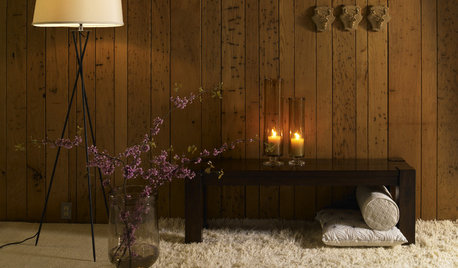
How to Update Cozy Wood Paneling
See how to give fresh life to once-retro woodsy wall coverings
Full Story
REMODELING GUIDESMajor Remodel: Restoring a Queen Anne to Glory
Misguided 1970s changes marred this Victorian-era home in Portland, until a dedicated family moved in
Full Story
KITCHEN DESIGNSmart Investments in Kitchen Cabinetry — a Realtor's Advice
Get expert info on what cabinet features are worth the money, for both you and potential buyers of your home
Full Story
REMODELING GUIDESContractor Tips: Advice for Laundry Room Design
Thinking ahead when installing or moving a washer and dryer can prevent frustration and damage down the road
Full Story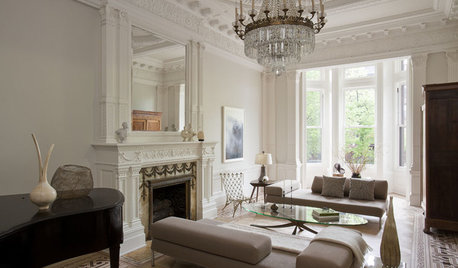
HOUZZ TOURSHouzz Tour: A Brooklyn Landmark Returns to Glory
Careful renovation turns heritage brownstone to modern family home and community hub
Full Story
DECORATING GUIDES10 Design Tips Learned From the Worst Advice Ever
If these Houzzers’ tales don’t bolster the courage of your design convictions, nothing will
Full Story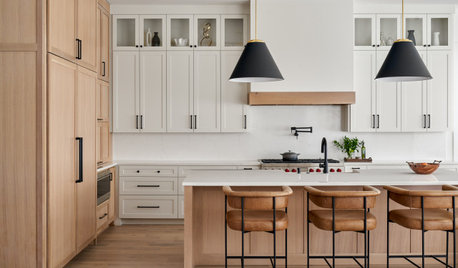
KITCHEN DESIGNStash It All: Know the 3 Zones of Kitchen Storage
Organize storage space around your kitchen’s main activities for easier cooking and flow
Full Story
DECORATING GUIDESDecorating Advice to Steal From Your Suit
Create a look of confidence that’s tailor made to fit your style by following these 7 key tips
Full Story
BATHROOM DESIGNDreaming of a Spa Tub at Home? Read This Pro Advice First
Before you float away on visions of jets and bubbles and the steamiest water around, consider these very real spa tub issues
Full Story

sierraeast