


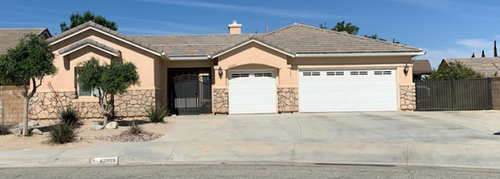
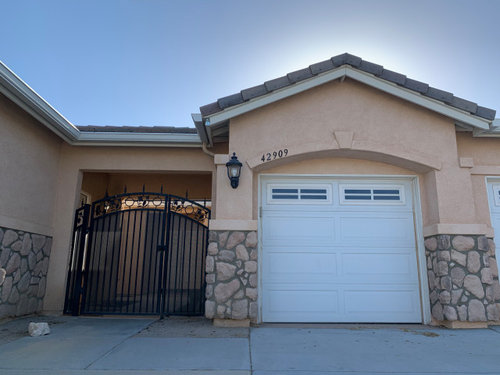
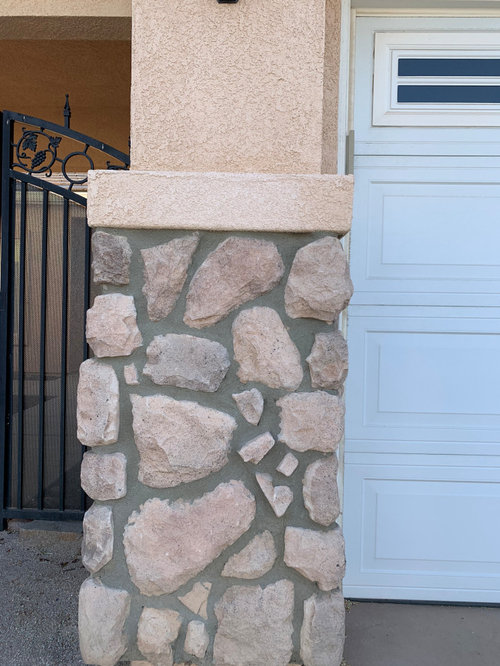
How to match exterior paint to existing rock facade or recolor rock?
Steven Irwin
3 years ago

Featured Answer
Sort by:Oldest
Comments (9)
Related Discussions
White Rock Mistake
Comments (16)Hello Clueless Gardener. I think I can help. :) First though would you mind describing your property? The backyard notably since this is the area you seem focused on at this time. Approximate dimensions? You say "uneven" but you do not say whether it is uniformly uneven, or randomly uneven. "uniformly" uneven would infer a slope in one direction or another, whereas "randomly" uneven would infer ups and downs, knolls of potentially various heights, and dips of varying depths, either somewhat of a "pattern" or completely sporadic. This is where you need to take a REALLY GOOD LOOK AND STROLL around your backyard - crossing, crisscrossing, winding, and grid-walking - all of those "patterns" of walking around the entirety of it so that you can see AND feel the variations in level of the space. Once you've done that, note which direction is North and where the back of your house is in relation to compass directions. Make note of any existing vegetation - notably shrubs and trees or other firmly established or large botanicals (or is it void of such, and if so, what neighbours each of the property lines?) - these are bits of information that would be relevant in "designing your landscape" and selecting plants and other things. If you "doodle" at all, by all means take a pencil and some paper out with you and do rough sketches of your backyard and/or a rough outline and draft of it on graph paper. Now, let me address the existing white stones. Yes, they can be absolutely blinding, but no you haven't entirely wasted your money. Take a breath and give yourself a pat on the back, because while you have made some "mistakes" - there is no reason to beat yourself up about it and you shouldn't have regrets. You can STILL USE what you have. You just need to plan things out a little bit better. The fact that you chose white stones for the reasons you did means that you ARE THINKING, and you do have an internal vision. The vision just needs to be tweaked or refined a bit, okay? Yes, the stones will discolour with time. I'm not sure exactly where you are at, but I live in a clay-type soil area and have lived in others - including those with a clay that was RED-RED and "godawful" - the type of red clay that if you get/got it on your bare skin when wet and often just when powdered, or on "good clothes" - forget it, you weren't ever going to get the staining out of clothing and it would take several scrubs with stout soap and no small amount of "abrasive action" to lift the staining from your skin. Suffice to say, most (not all) clays are quite capable of staining white stones and discolouring other colours of stones varying in degree with the colour and type of stone. The landscaping fabric, as you have by now figured out from others' comments, is both a blessing and a curse. But your investment here again, isn't all for nought. Okay, before I get ahead of myself.... (because I get really excited about stuff like this, "less than ideal" areas to re-do are a thrilling challenge - and I'm not one that thinks all lawns should be perfectly level and golf course-like, in fact, with some exceptions to individual spaces/areas, I think it's more rewarding to work WITH terrain rather than trying to change it 100%)... Get your dimensions, your compass directions, your graph paper or regular paper and a rough sketch with rough/approximate ratios.. when it comes to sketching or indicating dips and rises, decide on your own method for denoting those areas - you might want to use arrows to indicate a slope or get really detailed and do it like a topographical map. The important thing is that YOU know what symbols or lines or shapes indicate - make a "key" to your "map" if need be. You will be using this draft to pencil in other things later on (or you can do it with tracing paper or onion skin laid over your original if it is dark enough OR use a program like Adobe Photoshop to do it in layers so you can change from one layer/idea to another and even decrease opacity so only layers you are working with at the time are visible - not sure how familiar you are with Adobe Photoshop?). Next, another FUN part. Sit or stand (initially) out in your backyard. Look around you - not just at your yard, but as far as your eyes can see to what is visible on adjoining property and will have an effect on how your backyard appears. Do the neighbours have a 100ft tree fifty feet back from one property line that will give you shade in part of your yard in the AM or PM? Is there privacy fence or chainlink or other artificial or natural barriers that may or may not obstruct view or give shade or ... ? Take note of what lighting is like from dawn to sundown. Take note of the noise level and sounds you hear at different times of the day and night, weekdays and weekends. Many people don't stop and think about the impact of sound on "their space". It frequently contributes to how much or how little people use space outside - and how much they enjoy it and how/what they use the space for. Ask yourself (any that are potentially applicable): What do I want to/be able to do in my backyard when it's just me? What do I want /be able to do if it's just me and my spouse? With the kids? With pets? With my friends, our friends, my spouse's friends, the kids' friends, a girls-only get-together, "the boys", neighbourhood get-togethers, holidays, family, etc. ? Do I want to "invite" any type of wildlife? (hummingbirds, birdwatching, etc. insects like large moths or butterflies, small mammals (some people thoroughly enjoy squirrels visiting for instance) Your backyard, ideally, will become a manifestation of the "energy" you want to project into it and be able to draw from it, it will "speak" of you and/or your household and what you enjoy. It WILL be a beautiful thing and it will be unique. :) A key thing to remember is that gardening, even "landscaping", is very much like a never-ending story, chapters always being "written", or an ongoing piece of art - and any "real" artist will tell you that "a piece" like a painting, is never really finished - even after the paint has dried. :) "Instant gratification" type landscaping is rarely gratifying in the longterm - there's always something that can be done to make it even better. :) I want to pause here to reiterate about you really going out there and looking at it, walking it, feeling it, smelling it, listening to it - and allowing ideas to flow freely even as you begin to answer some of those questions above. (It would be really helpful to have dimensions and a sketch - even better photos - but without those I'm just going to "toss" some things out to you here...) You don't have to have instant gratification lawn, that's for starters. If I think I know the type of white stone that you went with, then chances are that without some more indepth manual work, it isn't really suitable for walking on barefoot - and if you can't walk on it comfortably barefoot, then it would take a good bit of effort to make it suitable to walk on even with shoes - so you can probably (at this time) rule out using it for pathways. But if you can envision some pathways you can discern whether you'd want them "solid" (with some type of stone or pavers) or if you'd like them to be a nice, plush grass that would be like walking on cool pillows while barefoot. Despite how "godawful" your soil sounds to be, it CAN and WILL support grass growth and you can take it in small sections at a time. A little work with a hoe, a tined tool or garden/rock rake, perhaps even a tiller - just enough to turn the first few inches of soil - deeper if you have the equipment or are willing to go deeper manually. Select a grass seed that meets not only your preferences but the lighting conditions and the type of soil. I have some small areas here growing in "godawful" clay that must be Fescue or Bermuda or something along those lines - it is a deep green, thin bladed but doesn't cut, establishes in thick clumps and spreads even over/through the worst soil with quiet diligence. It's the kind of grass that you'd be happy to sprawl out in and sleep under the stars. I didn't put it here, but I have had very similar in the past at a place I used to live. I tackled it as a small section at a time. I did "splurge" on a large bag of "potting soil" for each small area each time I began a new section - I would first hoe and rake, plucking out rocks (and putting them in a bucket, because they were put to use later no matter how big or how small), rake the area level to itself and in respect to how I wanted things (each individual area in respect to the bigger picture of the whole yard), then I would thoroughly water it, saturating the ground for three days in a row (watering usually at night just as the sun was going down, sometimes very early in the morning), then I put down a thin layer of the "potting soil" (sometimes the cheapest I could find, other times/areas a higher-end mix, and my decision to include coir or peat depended upon whether or not the area and soil was worth a flip in retaining enough moisture for grass to do well on starting from seed or if the area was going to be prone to "run off" during heavy rains, etc.) OR an inch-ish thick layer of COMPOSTED manure (a bag costing between $1-$2, composted manure I would hoe and rake a bit into the native soil) and a light raking (like with a leaf rake - the more flexible, lighter weight type) just to double-check the level and insure no stones or heavy clumps (which do show up in potting soil and composted manure from time to time). The potting soil/or/composted manure layer was strictly to provide a more amicable INITIAL layer for grass seed to get a foot-hold in. Sometimes I would use a mix that already had fertilizer in it, other times I'd just add bone meal over the native soil before the thin layer of potting soil - composted manure was good without any "fertilizers" for obvious reasons but bone meal wouldn't hurt as it is helpful for establishing root systems. When I say "thin layer", I mean an inch max. Sprinkle/mist again - just enough to have it settle so that with the next sprinkling/misting it wouldn't shift terribly. Then I would sow the grass seed of choice, and I sowed it THICK, sprinkle/mist thoroughly but using the finer spray so as to cover the entire area well but without causing water to pool or a flow so heavy that it shifted the seeds and made them "run". I tried a variety of things to cover freshly sown grass seed - straw (found it was best if it was "chewed up" rather than in standard lengths, so I'd either run straw through a mulcher or run it over with a mower that had a "catch bag" so I could get the smaller pieces), grass clippings (again, fine cut/small pieces - I had identical results regardless of whether grass clippings were fresh/"hot"/still green, totally dried-out/old, and stages in between - the key with grass clippings though was trying to use them only from mowing that I knew was a relatively weed-free area so that I didn't unintentionally transfer undesirable 'weed' seeds too), a light sprinkling of a "seed starting mix" (especially when I got a "bad bag" that was less than the standard ideal for seed starting - I have encountered plenty of those before) or even a return to another (thinner) layer of potting soil - just enough to weight down the seeds. The absolute BEST "top dressing" I've used on freshly sown grass seed was ground alfalfa (It was organic for culinary/medicinal usage, but I had kept several-several pounds of it in the freezer for some time for indefinite storage, but at some point the bag was punctured and it got "freezer burnt" so it wasn't really suitable for human consumption anymore) - but I don't recommend that unless you a) come across a really good deal on it or b) have the means to grind/powder alfalfa "pellets" sold for rabbit/other small mammal or horse feed because in pellet form it doesn't work out so well. I then happily "pampered" each area in turn and was rewarded with thick, lush carpets - each section eventually (I took my sweet ol' time with it) "connected" the sections. I should probably include here that when I was doing that "back then", I was exercising creative license - I was preparing each section in designs... it all began with a circle and when I was done with one particular yard (have moved multiple times, it was a Navy-thing) and the grass sowing, no matter which way the lawn was mowed, the original - rather ornate - pattern was still discernible... spirals and whorls and visually leading pathways and "outlines of rooms/spaces" - my children were just tots with the most ornate grass sowing so the patterns/design that emerged actually served as something for them to incorporate into their playtime outdoors - they'd carefully follow the spirals, erect invisible walls in areas that gave the visual impression of a rectangle, square, solid circle, triangle, etc. (their favourite "spaces" and those in the shade were often bordered with marigolds, calendula, a specimen citronella plant here and there, etc. - to naturally repel insects and it worked out really well.) The reason I give the details on sowing grass like that is so that a) you can do it a section at a time rather than all at once and it makes it much easier if you suddenly decide to change your plans for where you want grass and go in a different direction b) so you can get a nudge and a nod that it is totally okay to not have an all-grass lawn/yard or even a mostly-grass yard... you can do just pathways in grass and go with stone/rock gardens elsewhere or raised beds, etc. or you can have "islands" of grass, a "chessboard" staggering grass "squares" and stone "squares", mock-mazing,... the possibilities are perhaps infinite. If the uneven aspect is such that you might encounter "run-off", consider using stones in conjunction with plantings (grass or beds - formal or informal) for erosion (gads, did I spell that right? It's been a long day) control. You can readily adapt things to even re-direct water flow for times of heavy rain - if water runs in a direction you don't want it to, design things to re-route it the way you want it to go. (It doesn't sound like you have a problem with standing water after heavy rains, but I could be wrong, nonetheless run-off possibilities should be taken into consideration because while "everything" seems to jump on the running-water-wagon [debris, including seeds and uprooted seedlings and plants] and all that "stuff" can make for excellent soil amendment/OM, compost, even mulch, it doesn't necessitate that you want to see heavy rows of the stuff after a heavy rain in any given spot. For instance, you don't want stuff like that becoming an informal border by default against the outline of stones - because it gets in nooks and crannies, dirties the look of stone(s), and is a PITA to clean out. A good place to channel stuff to run-off though is as-yet-developed/landscaped areas - like where you have nothing but crappy dirt and not-pretty rocks that will eventually be removed. Vegetative run-off is great for spots like that if you allow it to build up and set there, breaking down naturally - it will improve the bad soil. Now, while I generally don't use chemical "killers", I must confess that Round-Up does have its place for some things. If you're going to use landscaping fabric/cloth and you know you don't want anything to come up in a specific spot, then spray it with Round-Up a couple of times (not all on the same day) and the last time you spray, lay down your landscape fabric/cloth OR (even better) wetted newspaper in layers over the area, and then put down your stones. That's a basic. If you want to take more pre-control of what will happen, then a better trick I learned from someone else was to dig around the basic shape of the bed (even if it will have stones on/in it) down 6 inches or more, use the soil you dig up to outline the bed/raise the edge and shape to deflect run-off and blow-in debris. You would lay the newspaper or cloth over the mounded outline as well (no worries on height, it will settle and be less prominent). Of course, with "beds", you can also opt to use above&below ground level border/trim to keep stuff out (or keep good soil or wandering/quasi-invasive plants "in" if not entirely a stone bed) or bricks, pavers, just about any "solid" line. White stone reflects A LOT of light - hence the blinding you are experiencing. But it also doesn't hold heat as much as darker stones. So when used with plants, it is a good choice for reflecting light "up under" plants and promoting growth with the added angle of the light exposure through reflection, and it's a better choice if you want to incorporate stone but don't want to overheat them like you would with darker stones. White stones are an obvious sharp contrast (which can be a stunning/lovely effect) with darker coloured foliage if you want great contrast (would really make plants stand-out). As someone else mentioned, mixing in a bit darker coloured stones would give the illusion of lessening the intensity of the white. Going with a far darker colour of stones to mix in, depending upon the amounts and size, can effectively provide a "speckled" appearance. Staying with the forum topic - "Gardening with Stone"... having white stones as a "blank canvas" can draw great attention to larger, more prominent stones (and other landscape/garden "decor") of different colours. A piece of driftwood or old Cypress placed in a bed of white stones with bed size and wood size taken into consideration to find "just the right ratio" (visually perceived percentages/ratio of space each takes up to promote a thought/association) is both simple and awesome. Size/shape of a white stone bed with such a piece of wood could evoke the feel of a white sand beach, without the bother of sand (even more of a PITA to keep clean). Oh, and don't forget - white stones are PRIME for a moonlight stone garden - especially at Full Moon! Beds of white stones under moonlight can readily provide a "map" to walk safely at night. White stones would also reflect candles and torches burning if set amongst or near the stones. White stones are also a good "canvas" to place cacti and some succulents into (and from the sounds of the soil - it wouldn't take much at all for those types of plants to feel right at home in the native soil - you'd only have to insure good drainage for them). If you really still want a good bit of "lawn" in the backyard - consider using the white stones to border the outside of the yard's space - a border as deep/wide as you want it from the property line inward and grass inside the "frame" of white stones - perhaps still with some intermittent, smaller beds laid with the white stones through the yard or at compass points, etc. and well-chosen plants planted within them. If you went with a "frame" for the yard done in the white stones, depending upon how deep/wide the frame - the deeper (vertical) you can pile the white stones on, the longer and harder it would be for things to grow up from underneath. If you have a campfire pit or an area where you have a grill (gas or charcoal), the stones would be of use under and around such an area - simply to help prevent the spread of accidental fires - and anyone grilling should have shoes on for safety anyway, so you could level the stones well enough that they wouldn't be truly horrible to stand on. With all of that/this... also ask yourself what general type of plants you like or think you might like - and then find out their soil preferences, water needs, climate requirements or limits, lighting needs, etc. and compare those plants and their relevant info to how your yard is now - and how you'd like it to be in 5-10 years (like if you put in a small tree now, know how tall it will be in 5-10 years and know from its placement if it is going to shade-out sun-loving plants that won't do well in shade). You might like to have a "themed" yard or there might be certain colours that you are especially attracted to or that match your home's exterior colour or induce tranquility for you (if you want a peaceful retreat to escape into) or fire you up (if you want your yard to be party-central on the weekends or something). The glaring white stones can be reined in and kept in check visually with thought-out choices on how you design things and what you implement to contrast or compliment. Perhaps you have areas that perpetually seem "dark" - the white stones can bring light to such areas. So - how about some more details about your yard, location (to get an idea about your weather through the four seasons - or even better, tell us what your perception of your seasons are like - sometimes a better weather gauge than statistics), what trips your trigger in the way of "gardens" and "landscapes", how you want to use your space, etc. I sure wouldn't offload the white stones... but, as a word to the wise, in the future if you think you want to go with a certain type of stone - start with just about a 5 gallon bucket of the stones you have in mind, put them out in a small area in relation to other elements you have in mind (near the home, along a walkway, whatever/wherever you have them in mind for) ON TOP OF a sturdy cloth/fabric/plastic/layers of paper - to make it easier to lift them if you decide against them - trust me on that one LOL, I came by three or four different types of stones and colours because a gal went through that many before settling on what worked for her/she liked, BUT, she poured them out on wet red clay. While she slowly figured out to get fewer of each one as she changed her mind and began "testing" them, once they had been in place for a minimum of a month a maximum of a year, me trying to get them all out was an effort that came very, very, very close to NOT being worth the effort. For all the sweating, shoveling, loading and hauling - I came very close to just throwing in the towel. Only my saying I'd take them and get them out of there for her had me stick to my word and guns on the project. The job would have been tremendously easier if there had just been one layer of something between the stones and that red clay! If you don't have a concrete/asphalt/paved driveway - worst case scenario you could always move all of the white stones to your driveway. They're good for showing you when/if you have an oil, tranny fluid, etc. leak from vehicles.......See MoreHow can I make this 70's rock look good?
Comments (17)My alarm bells are ringing. My concern is water damage, both old and ongoing. Any house should be gone over by a home inspector before buying and I suggest you hire one. Check the lawn's slope to see if rain floods the crawl space. Check the stone for cracks that let rain soak the framing. Check for leaks where the siding meets the concrete porch. Check the eaves, rafters and roof decking....See MoreHow to modernize/add curb appeal to a 2-storey with river rock?
Comments (4)When you say modernize are speaking of style or more of updating the look? That can send you in 2 different directions. If you are looking for a more modern style, I love the warmth of mixing in wood stained elements with stone and steel. Maybe do an interesting wood trim around the garage doors - wide enough to mount new fixtures on and then carry that over to the posts and make those arches straight. I actually like the rock but I feel like it needs an anchor - the wood stained trim might do that. I don't know if it is possible but I would also consider changing the grout color in the rock to something a little darker. I would also want to change the walkway and maybe do an interesting steel railing between the posts. Good luck - take your time and just do one thing at a time - sometimes the simplest changes can make the biggest difference...See MoreDo you paint gutters? Exterior paint and trim color
Comments (29)Wow! I've never reached out to this community before. The response has been wonderful! Thank you so much for your work and ideas. An especially big thank you to Flo and Melissa for the visuals. I really appreciate your time. You have given me such great ideas and much to think about. Thank you, thank you!...See More
Steven Irwin
3 years ago
Leah L
3 years agoSteven Irwin
3 years ago
Design Girl
3 years ago
crovossier
2 years ago


Related Stories

MOST POPULARChoosing Color: See 1 Cute Home in 3 Exterior Paint Palettes
Here’s proof that a little bit of fun color can add a whole lot of flair to your house
Full Story
EXTERIORSHelp! What Color Should I Paint My House Exterior?
Real homeowners get real help in choosing paint palettes. Bonus: 3 tips for everyone on picking exterior colors
Full Story
TRANSITIONAL HOMESHouzz Tour: A Home That Honors Family in Little Rock
A third-generation homeowner keeps her family history at the forefront of a thoughtful remodel
Full Story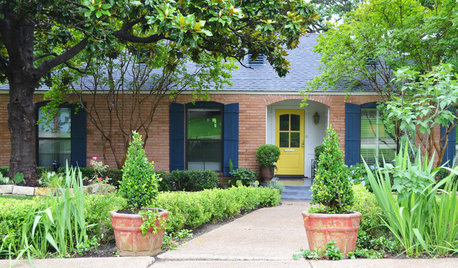
EXTERIOR COLORChoosing Color: Transform Your Exterior With 2 Cans of Paint
One charming brick house takes on 4 color combinations to show you the power of paint choice
Full Story
COLOR PALETTESChoosing Color: See This Home Try On 5 Exterior Paint Palettes
Dark and dramatic, or soft and neutral. See how paint color alone can change the look of a home
Full Story
PAINTINGWhat to Know About Milk Paint and Chalk Paint — and How to Use Them
Learn the pros, cons, cost and more for these two easy-to-use paints that are great for giving furniture a vintage look
Full Story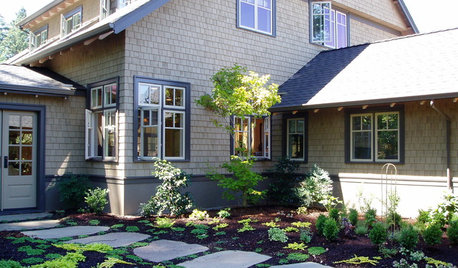
WINDOWSShould My Window Trim Match — or Contrast With — the Sash?
The short answer: It depends
Full Story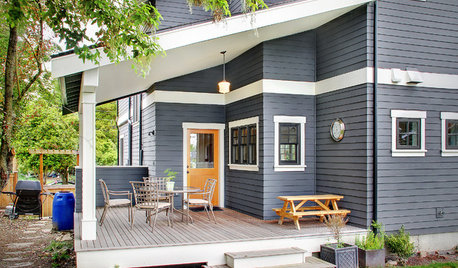
ORANGEFresh Start: Paint the Front Door
Go for it! Add instant curb appeal with a great coat of orange, blue, red, yellow, green, purple or black on the door
Full Story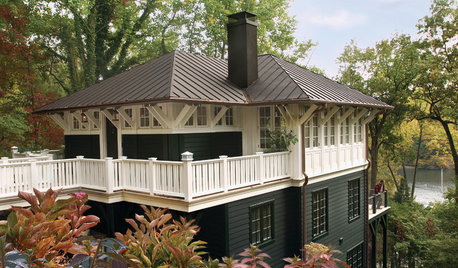
HOUZZ QUIZHouzz Quiz: What Color Should You Paint Your House?
Is white right? Maybe dark blue-gray? Take our quiz to find out which color is best for you and your home
Full Story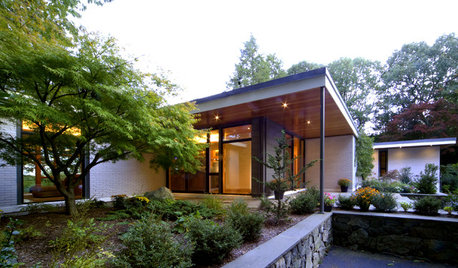
ARCHITECTUREHigh-Impact Updates for Your Midcentury Facade
Focusing on exterior details can be key to an affordable remodel that allows the original design to shine through
Full Story


Beth H. :