

Stuffing with white & whole wheat bread ?
7 years ago
Featured Answer
Sort by:Oldest
Comments (6)
Related Discussions
Corn Bread with whole wheat and applesauce?
Comments (10)I almost always make my cornbread with whole wheat PASTRY flour, because I LIKE it, I like the "rustic" texture it adds to things. You can sub splenda for sugar in cornbread, that's what I do if I know I'm going to eat it up relatively quickly. I'm one of those people who thinks splenda is best in things that get eaten right way because if not I think it develops a chemical taste in foods over time. I have never made cornbread with applesauce, but that's a way to add the moistness sugar adds to things but less sweet. But still sweet. I like a middle of the road type cornbread, not sweet but not completely sugarless either, so I would probably like it with applesauce. My recipe calls for sour cream except I use non-fat plain yogurt with just as good results. I also use two egg whites instead of one egg. Sourcream (or yogurt) Cornmeal muffins 1 cup unbleached white flour 1/4 cup whole wheat pastry flour 3/4 cup fine yellow cornmeal 1/8 cup Splenda baking mix (or 1/4 cup sugar) 3 tsp. baking powder scant 1/2 tsp. salt 1 cup nonfat plain yogurt 1/2 tsp. baking soda added to yogurt 2 egg whites I entered this recipe in my recipe box on "SparkPeople" (check it out, it is GREAT for recipe and meal planning ideas). It's OK to join, they won't send you a bunch of junk mail. The stats on it are: Amount Per Serving Calories: 91.9 Total Fat: 0.5 g Cholesterol: 0.3 mg Sodium: 23.8 mg Total Carbs: 18.2 g Dietary Fiber: 1.1 g Protein: 3.0 Kinda low on fiber and high on carbs so you could improve it by subbing whole wheat flour for all or some of the white flour. I'd start out with half and half and move up as my tastebuds adjusted. Also could possibly reduce salt, but I can't vouch for that part since I have never made it that way. I've done it with at least half WWH flour though. I eat these muffins with spreadable "lite" butter, which you might want to look into since it is a mix of sat. and unsat. fat. Also, here's my recipe for lima beans, which I have served at a couple of potlucks and people have said they liked them. Elegant Lima Beans 4 cups cooked lima beans (I use the green baby limas, the frozen ones, but I'll bet this would be good with the white butter bean limas too. I've seen both green limas and butter beans sold canned some places. I just cooked up a batch of dry limas for the first time last year and I really liked them. I make my beans in the crockpot.) 1 can (15 oz.) tomato sauce 4 oz. shredded lowfat, lowsalt swiss cheese. Frankly I actually use jarlsburg swiss for this, or kasseri cheese, but both of those are high salt high fat cheeses. 1 - 3/4 cup chopped walnuts (I use the lower amount, walnuts are high in calories and fat. I'll bet you could even go down to 2/3 cup on those.) 1/4 tsp. dried basil, crumbled, (or maybe a little more, depends on how you feel about basil, I love it) 1 green pepper, diced (I also sometimes add a small diced zuchinni, which you can also add or sub. for the green pepper since some people don't like peppers. Can also use celery if you like it. Start with what you know you will like though. The additional veggies add more good fiber but I guess you could leave them out if you hate those green veggies.) 3/4 cup water or veg. broth, unsalted if possible 1/2 tsp. salt (you could experiment with less, I almost always use less than the recipe calls for, or even omit because canned tomato sauce has salt in it. I get unsalted veg. broth bouillon cubes in the health food section of Wegman's, but if you can't find unsalted broth, then use water or leave out additional salt.) 1/4 tsp. pepper minced parsley to garnish Combine cooked or defrosted limas, vegetables, tomato sauce and water or broth. Simmer 10-15 min. until vegetables are just starting to get tender. Mix in shredded cheese and walnuts, and bake in 350 degree oven for 30 min. Notes: You can toast the walnuts in the oven as it is preheating before adding them to the casserole, but watch them carefully so they don't burn. Usually about 8 min. in the oven at 300 is enough to toast. I hardly ever had fresh parsley so I stir in about 1-2 tsp. dried parsley to the stew before putting it in the oven....See MorePeter Reinhart Whole Wheat Bread (pics)
Comments (24)Lisa, bread baking is addictive although I don't do it as much anymore because we don't eat a ton of bread. Just wait until you decide you want to try a sourdough starter-I become completely obsessed and even asked my friend to "babysit" it when I went out of town. As far as baking it free form, I don't see any differences in instructions except scoring the loaf right before baking. There are instructions for hearth baking which include using a steam pan and baking stones/tiles. I don't have the patience for that so what I would probably do would be to place it on a baking stone covered with parchment and mist it lightly with water before baking. More experienced bakers will probably have better suggestions. Lisa, Instant yeast vs. regular yeast from the book: "instant yeast is recommended because it can be added directly to the dough. Active dry yeast will also work, but it must be hydrated in warm water before it is added." I believe instant yeast is the same thing as bread machine yeast. I buy my instant yeast in bulk packages from Sam's club. As for the water, I think the chlorine can be a factor so that's why they say to use spring or filtered water. Please let me know how yours turns out! It really was good bread-it's a little crumbly but not dry if that makes any sense and the flavor is awesome. No bitterness or heavy wheat taste. I don't know how much it affected the final flavor but I did use white wheat flour which is a lighter flour than traditional whole wheat. I really hope some of you guys try this and let us know how it turns out! Tracey...See MoreSoft whole wheat/miulti grain bread...can you make this?
Comments (18)White whole-wheat (also called whole wheat pastry flour) will yield a softer bread and still have the fiber. The vital wheat gluten is a must. Here is David's (Lakeguy) recipe which I have saved but have yet to make (still no oven, but soon!). It looks great. Struan Bread Makes 1 large loaf or 2 small loaves Soaker 3 tablespoons polenta 3 tablespoons rolled oats 2 tablespoons wheat bran 1/4 cup water Dough 3 cups unbleached bread flour 3 tablespoons brown sugar 1 1/2 teaspoons salt 1 tablespoon instant yeast 3 tablespoons cooked brown rice 1 1/2 tablespoons honey 1/2 cup buttermilk 3/4 cup water topping 1 tablespoon poppy seeds Mix together the ingredients for the soaker. Cover and allow to soak for at least half an hour or as long as overnight. In a larger bowl, combine the dry ingredients, then stir in wet ingredients and soaker. Add more flour or water until the dough can be formed into a ball that is tacky but not sticky. Place the ball of dough on a clean work surface and knead it for 10 to 12 minutes, then return it to the bowl. Cover the bowl with plastic wrap and allow the dough to ferment until doubled in size, approximately 90 minutes. Remove the dough from the bowl, degas it gently, and split it for two loaves or shape it as is for one. Place the loaves in greased bread pans, spritz or sprinkle water on top, and sprinkle a handful of poppy seeds on top. Cover the pans loosely with plastic and allow the loaves to rise until doubled in size again, approximately 90 minutes. Bake these loaves at 350 for 40 to 60 minutes, until the internal temperature is around 190 degrees. When ready the loaves will be quite brown on top and will make a hollow thud when tapped on the bottom. Nothing like homemade bread...I love it! David...See MoreMy first whole wheat bread
Comments (17)This recipe was given to me by a dear friend, Mildred, from Arkansas. She got a similar recipe from Pleasant Hill Grain but wasn't happy with it, and together we "tweaked" it. This recipe is designed for a Zojirushi Bread Machine (make the dough only - not baked in the bread machine), but it will work if you want to make it by-hand. We call it "Mildred Bread" at our home, and there is a 3x5 recipe card with the ingredients safely taped to the bread machine. It's our everyday bread. I make loaves, dinner rolls, burger buns, hot dog buns, cinnamon rolls, etc. all from this same dough. Sometimes I'll make one 1-pound or 1-1/2-pound loaf and use the remaining amount of dough for rolls, cinnamon rolls, burger buns, etc.... This recipe is a bit wordy with explanations (that's the teacher in me from teaching so many bread classes ;-), but once you've made it, you'll be able to follow a 3x5 recipe card with the ingredients listed on it, like I do. CAUTION: Not all bread machines are capable of mixing 100% whole wheat bread dough, so check your user's manual. Enjoy, -Grainlady 100% WHOLE WHEAT BREAD Sponge: The night before, remove the bread machine pan and add the ingredients: 3/4 c. warm buttermilk (I use homemade kefir) 3/4 c. warm water 2\-1/2 c. freshly milled hard wheat (red or white) flour 1/4 t. ascorbic acid (if you don't have, or can't find, ascorbic acid, use Fruit Fresh \- but the acid is important!!!) 2 t. SAF\-Instant Yeast (I suggest SAF\-Instant Yeast and have never used anything else for this recipe) Place the pan into the bread machine and set on the Quick Dough setting and allow the ingredients to mix together well for a few minutes (you may need to scrape down any dry particles with a spatula), then turn the bread machine off (at the button, don't pull the plug or you risk damaging your bread machine computer). Shut the lid, and allow this mixture to set overnight. (If you are in a hurry, let the ingredients sponge for 1\-1/2 hours and then finish making the bread.) \*\*If making the recipe by hand, mix the ingredients well using a Danish Dough Whisk or a wooden spoon. Cover the bowl (using a shower cap, a Quick Cover, or a sheet of plastic wrap) and allow to sit on your counter at room temperature. If you have a dough\-rising bucket, use it for mixing the dough as well as for rising. After mixing in a dough\-rising bucket, snap on the lid and allow the sponge to sit on your counter. The next day (or anytime after 1\-1/2\-hours), remove the bread machine pan and add these ingredients to the sponge: 2 T. coconut oil (melted \- or use vegetable oil or melted butter) 2 T. honey or agave nectar 1 egg (I also add 1/3\-1/2 c. of chia seed gel, but that's optional.) On top of these ingredients in the bread machine pan add: 2\-1/4 c. freshly\-milled whole wheat flour 2 t. salt Place the pan back into the bread machine. Set bread machine to Quick Dough Cycle and start the machine. After it has been working for 5\-minutes, or so, be sure to check the hydration of the dough. You want a nice soft ball that is slightly sticky to\-the\-touch. It's better to err on the side of a wet dough than a stiff dry dough, so adjust the dough by adding more flour, or adding more water, if necessary. As soon as the dough has completed the kneading cycle (don't allow the dough to rise in the bread machine), turn the machine off. Remove the pan from the bread machine and dump the dough out onto a SILPAT (no flour necessary). With oiled hands so the dough doesn't stick, pat the dough into a dough\-rising bucket (I use a 2\-quart plastic food storage container that has graduated measurements on the side. I got the container at the local restaurant supply store, but you can find dough\-rising buckets at King Arthur Flour and elsewhere on\-line. I have them in three sizes for different amounts of dough.) Snap the lid on the dough\-rising bucket and allow it to rise until just under "double". (If the dough comes up to the 1\-quart line, it will be double when it reaches the 2\-quart line.) Check the rise after 20\-25\-minutes. It rises quickly if your kitchen is warm, and slower if your kitchen is cool. \*\*If making the dough by\-hand, add the 2 t. salt, 2 T. agave nectar (or honey) and egg to the sponge mixture, and then add enough of the 2\-1/4 c. of whole wheat flour to make a nice soft dough (add more flour than 2\-1/4 c., if necessary). Add the flour gradually \- a little at a time, and beat each addition of flour into the mixture before adding more. A Danish Dough Whisk is the perfect tool for this process (as well as stirring all batters and doughs), but a wooden spoon will also work well. If you do a good job of mixing, you won't need to spend as much time kneading. When making bread dough by\-hand, you need to spend a good deal of time beating the dough with the spoon or Danish Dough Whisk. You develop the gluten during the mixing, as well as during kneading. When you don't have the strength to mix it with a spoon anymore, place the dough on an oiled counter top and knead until the gluten has developed (6\-10 minutes). If you use an oiled counter top you won't have to add flour to the dough. By doing a good job of mixing, you will need only a little additional flour \- or none at all. If your dough is a shaggy sticky glob, you didn't do a good job of mixing. Oil your hands so they don't stick to the dough while handling it. Place dough in a dough\-rising bucket, snap on the lid, and allow the dough to rise until it's just below "double". Follow the remaining instructions... \-\-\-\-\-\-\-\-\-\-\-\- When the dough has doubled in bulk, you will need to take the lid off the dough\-rising bucket and punch it down. To do that, oil your hand and make a fist. GENTLY drive your fist through the center of the dough. Now grab the outer edge of the dough and pull it into the center hole. Do this all the way around. This moves the cooler outside dough to the inside (you have essentially turned the dough inside\-out.) This method degasses the dough and also redistributes the yeast throughout the dough. Place the dough out onto a SILPAT (a silicone mat). Handle the dough with oiled hands \- no flour necessary. If you are making more than one loaf from this dough, now is the time to scale it (weigh it on a kitchen scale), and divide the dough into equal portions. Round each portion. You round the dough by cupping both hands around the dough ball while it sits on the counter and gently pull the dough from the top to the bottom, moving it slightly each time you pull it down, until you have a nice, smooth ball of dough. A smooth ball of dough will get the gluten strands running in one direction and will hold in the gasses in. Cover the dough (I use a bowl or my dough rising bucket, or a sheet of plastic wrap) and allow it to rest for 10\-15\-minutes. This allows the gluten strands to relax. To form a loaf... With oiled hands, pat the dough out on the Silpat until it's about 1\-inch thick and the width of the pan you are going to use. Roll the dough up and pinch the seam closed. Tuck the ends under the bottom. Place the dough, seam side down, into a greased loaf pan/s and cover with plastic wrap. Allow it to double in bulk. Bake in a preheated 375 degrees F oven for about 25\-minutes, or until it's between 195\-200\-degrees F when you check it with an instant read thermometer....See More- 7 years ago
- 7 years ago


Related Stories
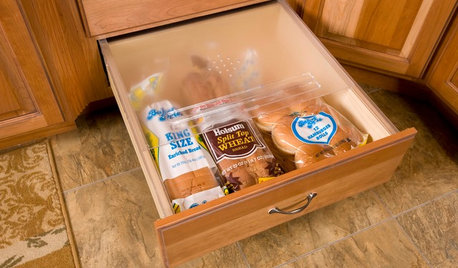
DESIGN POPBakers’ Home Storage Tips for Sliced Bread’s 90th Birthday
In honor of the bread slicer’s debut in 1928, we offer the best bread storage tips since, well ... you get it
Full Story
HOUZZ CALLChristmas Stockings Stuffed With Memories
The chimney-side socks may come and go, but the love they represent is constant. What’s the story behind your stocking?
Full Story
KITCHEN DESIGNA Designer Shares Her Kitchen-Remodel Wish List
As part of a whole-house renovation, she’s making her dream list of kitchen amenities. What are your must-have features?
Full Story
LIFE21 Things Only People Living With Kids Will Understand
Strange smells, crowded beds, ruined furniture — here’s what cohabiting with little monsters really feels like
Full Story
LIFEHouzz Call: What Makes Your House Feel Like Home?
Sometimes just one thing gives you that warm and fuzzy feeling. Let us know what it is for you
Full Story
KITCHEN DESIGNKitchen Accessory: The Breadbox
The breadbox — freestanding or built-in — still has a place in the modern kitchen
Full Story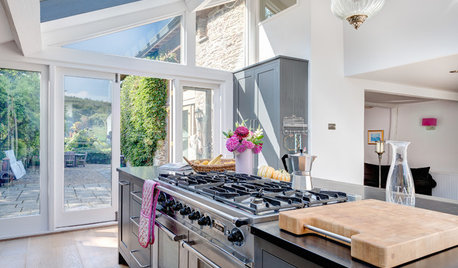
LIFESimple Pleasures: The Joy of Baking
Fill your house with a heavenly scent and your heart with cheer by making time to bake
Full Story
KITCHEN DESIGNHouzz Call: Tell Us About Your First Kitchen
Great or godforsaken? Ragtag or refined? We want to hear about your younger self’s cooking space
Full Story
HOUSEKEEPINGHow to Clean Your Fridge, Inside and Out
Keep your refrigerator clean and fresh, while you gain storage space and lose those ‘UFOs’
Full Story
KITCHEN DESIGNRemodeling Your Kitchen in Stages: Planning and Design
When doing a remodel in phases, being overprepared is key
Full StorySponsored

Central Ohio's Trusted Home Remodeler Specializing in Kitchens & Baths



cookebook