


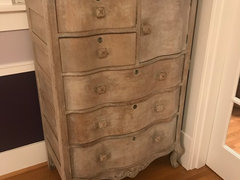
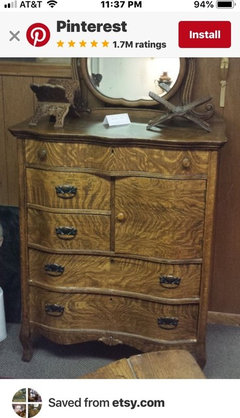
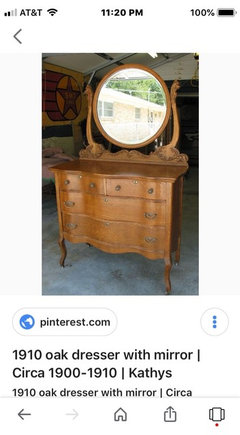
What is this dresser and how can I restore it?
Kristopher Wood
5 years ago
last modified: 5 years ago
Featured Answer
Sort by:Oldest
Comments (46)

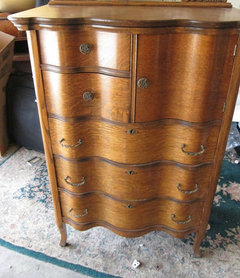
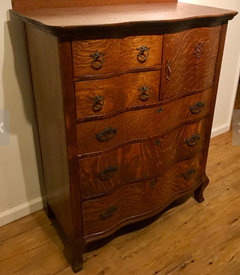
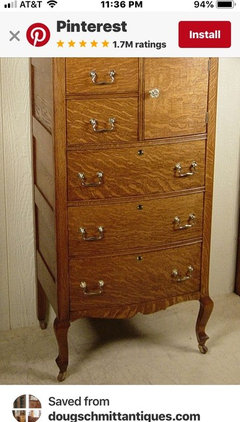
Kristopher Wood
5 years agoRelated Discussions
Im bummed b/c I may have to return a Restoration Hardware dresser
Comments (2)I have seen the same thing in other brands. One of the problems is that many off-shore manufacturers build with wood with too high moisture content. (And based on what I've seen don't reject any wood, if a cracked or knotty piece appears, it just goes in to the piece instead of the scrap bin.) As the wood dries, it can shrink, warp, crack or twist. The last one of these I saw the divider had warped up about 1", leaving a gap between the drawer below and binding the drawer above. Unfortunately, there was nothing I could do to repair it....See MoreRestoring Vintage Dresser (Pic)
Comments (0)I have to clean and sand a bit more, need to glue pieces together, and knobs need cleaning. I am not sure what is best way to clean the knobs?...See MoreRestore-A-Deck question - how do I know if I have solid stain?
Comments (1)It all depends on what finish is on.If its behr,cwf,things like that from the box store your going to have to use md 80 /oxalic base brightner. In other words strip the whole thing and refinish. You could try the rad stripper in a small area along with the second stage and just see if it all comes off. J....See MoreMaimed my ivy, how can I restore it to health?
Comments (14)@Mentha Thank you for the suggestions! You mentioned a few things that I'm not entirely sure if I'm doing them right. - For pinching stems, it seems like you literally pinch the stem near where the vine starts growing a new leaf to break it off. I tried but the stems either just fell off because they were so dry, or it seemed I was breaking the vine, so I just kind of pulled lightly at the parts with dry leaves and let the plant do the work for me. Is that okay? - For feeding, do you mean fertilizer? I ended up using a MAXSEA seaweed fertilizer (http://www.maxsea-plant-food.com/products_all_purpose.html) that I had on hand. - For light, I don't really have a place where I can put it outside (I'm in an apartment), but since you mentioned more light would help it, I moved it from the east-facing kitchen window to the south-facing living room window. The temperature in here usually never ranges further than between 60 to 75 degrees. (I ended up moving it back to the kitchen after a couple days.) Here's a picture of it after removing the dried leaves and in its new location, plus an up-close one. I realize its chances are slim, but most living things want to live, so I'm hoping it will work with me if it sees I'm trying to help....See MoreKristopher Wood
5 years agolast modified: 5 years agoKristopher Wood
5 years agoKristopher Wood
5 years agolast modified: 5 years agoKristopher Wood
5 years agoKristopher Wood
5 years agoKristopher Wood
5 years agoKristopher Wood
5 years agoKristopher Wood
5 years ago PRO
PROFlo Mangan
5 years agolindac92
5 years agocolleenoz
5 years ago- PRO
Flo Mangan
5 years ago Kristopher Wood
5 years ago
elunia
5 years agolast modified: 5 years agolindac92
5 years agocolleenoz
5 years ago- PRO
Flo Mangan
5 years ago - PRO
Flo Mangan
5 years ago lindac92
5 years ago- PRO
Flo Mangan
5 years ago elunia
5 years agoelunia
5 years agolast modified: 5 years agomaifleur01
5 years agomaifleur01
5 years agolindac92
5 years agoelunia
5 years agolast modified: 5 years agomaifleur01
5 years agolindac92
5 years agoKristopher Wood
5 years ago
Iberville Duchesne
4 years agolindac92
4 years agoIberville Duchesne
4 years agojemdandy
4 years ago


Related Stories

THE POLITE HOUSEThe Polite House: Can I Put a Remodel Project on Our Wedding Registry?
Find out how to ask guests for less traditional wedding gifts
Full Story
REMODELING GUIDESAsk an Architect: How Can I Carve Out a New Room Without Adding On?
When it comes to creating extra room, a mezzanine or loft level can be your best friend
Full Story
FUN HOUZZEverything I Need to Know About Decorating I Learned from Downton Abbey
Mind your manors with these 10 decorating tips from the PBS series, returning on January 5
Full Story
REMODELING GUIDESReplace vs. Restore: The Great Window Debate
Deciding what to do with windows in disrepair isn't easy. This insight on the pros and cons of window replacement or restoration can help
Full Story
FEEL-GOOD HOME12 Very Useful Things I've Learned From Designers
These simple ideas can make life at home more efficient and enjoyable
Full Story
KITCHEN DESIGNThe Cure for Houzz Envy: Kitchen Touches Anyone Can Do
Take your kitchen up a notch even if it will never reach top-of-the-line, with these cheap and easy decorating ideas
Full Story
LIFEReluctant DIYer’s Diary of a Dresser Makeover
Weekend project: Glossy new black-and-white dresser, hold the sandpaper
Full Story

DECORATING GUIDESSee How Wabi-Sabi Can Bring Harmony and Beauty to Your Home
Create your own wabi-style style with beautifully weathered, humble materials around the house
Full Story
LIFEWe Can Work It Out: Living (and Cleaning) Together
Run a household without fussing and fighting with these ideas for how to work together on household chores
Full Story


lindac92