

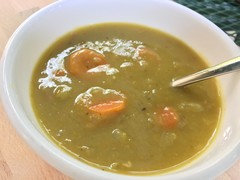
My first pressure cooker.... need recipes please
8 years ago
Featured Answer
Sort by:Oldest
Comments (55)
Related Discussions
Help! Used pressure cooker for first time - Uncertain of results!
Comments (7)Siphoning can be a common problems for those not used to using a pressure canner and it takes practice to get it right. ;) Unfortunately it looks like most of our discussions on siphoning have fallen off the forum so I'll try to hit the highlights. Everytime you adjust the heat under the canner the pressure inside is affected and siphoning occurs so you need to avoid changing the level of heat. If the pressure goes a bit highr than the 11 lbs required that's fine. It also helps to bring the canner up to pressure at a lower stove setting than max. You also need to let it steam well for a full 10 mins before placing on the weight. And when time is finished, let it return to zero all on its own. When it reaches zero, remove the weight but DO NOT open the lid. Wait an additional 10 mins before opening the lid. If you are going to be using your pressure canner then you need to do several practice runs with it first to get use to controlling it and how your stove controls it. Put some sealed jars inside filled with colored water and process them as the recipe calls for. If at the end the water in the canner is colored then siphoning happened, refill and try again. If you are using an electric stove try to avoid making any changes in the heat setting during processing. For future reference please note that canned roasted peppers that are not pickled require the addition of acid - 1 T per pint bottled lemon juice usually - so if your recipe did not include that instruction then it is likely an outdated/unsafe book/recipe. See link below for more details or review the guidelines at NCHFP. Hope this helps. Dave Here is a link that might be useful: Processing Peppers...See MoreDifference between pressure cooker and pressure cooker/canner?
Comments (12)"Pressure canners come deep enough for one layer of quart or smaller size jars, or deep enough for two layers of pint or smaller size jars. The USDA recommends that a canner be large enough to hold at least 4 quart jars to be considered a pressure canner for its published processes. " If you go to the Presto site, nowdays you will see they only list the larger size as canners. They have 18 quart and 23 quart. Anything smaller is under cookers. http://www.gopresto.com/products/products_search.php?search_value=58&operation=Search&search_type=category Here is a link that might be useful: National Center for Home Food Preservation...See MoreTried-and-True Pressure Cooker Recipes please!
Comments (11)Oh--you asked for recipes. Here are two from Lorna Sass, either of which would justify the purchase of a PC: Curry in a Hurry This recipe from Lorna Sass’s Pressure Perfect is a quick and easy way to make a pretty tasty curry. You can make it with chicken, beef, lamb or pork, and vary the hotness by using mild or hot curry paste. 2 tablespoons of mild curry paste makes a pleasant-but-wimpy curry; 4 tablespoons of mild paste makes it pleasantly zingy; 4 tablespoons of hot curry paste makes it very hot, near my limit of tolerance (and I really like hot food). I generally use 2 tablespoons of hot and 2 tablespoons of mild curry paste. This is another recipe that’s ridiculously easy yet produces delicious food. If you don’t want to mess with the yogurt, peas and cilantro, don’t bother—the dish will still be very tasty, but the sauce won’t be as rich or velvety-smooth. ( I personally don’t like cilantro, so I don’t use it.) The recipe calls for 3 pounds of bone-in chicken; I find it easier to use about 2 or 2.5 pounds of boneless skinless chicken thighs. –Once you get the pressure cooker up to pressure, make a pot of rice. By the time the rice is done, so is this. 1 cup water 4 tablespoons Patak’s Mild Curry Paste 1 medium onion, coarsely chopped 3 pounds bone-in skinless chicken thighs or breasts, or 2-2.5 lbs boneless skinless thighs, or 2 lbs. other meat (see chart below) 1 cup plain yogurt 1 ½ cup frozen peas 3 tablespoons cilantro, chopped (optional) Pour the water into a 4-qt or larger pressure cooker and blend in the curry paste. Place on high heat and add the onion and meat of your choice. Lock the lid in place. Over high heat bring up to high pressure. Reduce the heat just enough to maintain high pressure and cook for the time indicated in the chart. Turn off the heat. Allow the pressure to come down naturally. (If cooking chicken, release any remaining pressure after 4 minutes.) Remove the lid, tilting it away from you to allow steam to escape. If the chicken or meat isn’t tender, cover again and simmer until done. If necessary, skim off the fat that rises to the surface or degrease the broth in a fat separator. Blend the yogurt into 1 cup of the broth. Stir the peas into the curry and simmer until they are defrosted, about 1 minute. Turn off the heat and stir the yogurt mixture into the curry. Stir in the cilantro and salt to taste. Serve in bowls over rice. Meat choices and Cooking times Chicken (see notes above) 8 min high pressure, 4 min of natural release, then quick release Beef (boneless chuck, 1” cubes) 8 minutes high pressure, then natural release Pork shoulder (1” cubes) 8 minutes high pressure, then natural release Lamb (boneless, 1” cubes) 12 minutes high pressure, then natural release If using beef, pork or lamb, trim off excess fat and cut the meat into approximately 1” cubes before cooking.. Osso Buco alla Milanese (Braised Veal Shanks, Milan-style) Serves 4 This recipe for Osso Buco is from Lorna Sass’s Cooking Under Pressure. I have made Osso Buco both as a slow braise (traditional), and made it in the pressure cooker. I actually prefer the pressure cooker version. Even if you’re only cooking for two and using just two veal shanks, don’t halve the remaining ingredients; the sauce is wonderful by itself, and any leftover sauce will make a great pasta sauce for the next day. Once you get the Osso Buco started in the cooker, cook up some pasta or rice to soak up the sauce. The gremolata garnish is traditional, but I don’t care for it; some authorities, such as Marcella Hazan, don’t use it. 4 veal shanks, about 10 oz each 2 tablespoons all purpose flour 3 tablespoons olive oil, divided 1 large onion, coarsely chopped ½ cup dry red wine or dry vermouth 1/3 cup beef or chicken stock or bullion 2 medium carrots, coarsely chopped 1 stalk celery, sliced thinly 1/2 pound mushrooms, thinly sliced One 14 oz can tomatoes, coarsely chopped, including juice 1 teaspoon dried basil 1 teaspoon dried oregano ¼ teaspoon grated nutmeg (optional) ½ teaspoon salt, or to taste (less if using canned bullion) Freshly ground black pepper to taste Gremolata: (optional) 1 tablespoon finely minced garlic 2 tablespoons grated lemon zest ½ cup finely minced fresh parsley Rinse the veal shanks, pat dry, and dredge in flour, pressing the flour into the veal with the heel of your hand. Shake off excess flour. Heat 2 tablespoons oil in the cooker. Over medium heat, brown the veal on both sides and set aside on a platter. Add the remaining oil and sauté the onions until soft, about 3 minutes. Add the red wine and stir, taking care to scrape up any browned bits that are stuck to the bottom of the pan. Add the stock, browned shanks, carrots, celery, mushrooms, tomatoes, basil, oregano, nutmeg and salt and pepper to taste. Lock the lid in place and over high heat bring to high pressure. Adjust the heat to maintain high pressure and cook for 18 minutes. Let the pressure drop naturally or use a quick-release method (venting the steam or putting the cooker in the sink and running cold water over it). Remove the lid, tilting it away from you to allow any excess steam to escape. Prepare the gremolata, if used, by combining the garlic, lemon zest, and parsley. When the shanks are done, stir in the gremolata and simmer for a few minutes. Adjust seasonings and serve. Note: if using smaller shanks, check for doneness after 15 minutes of high pressure....See MoreI LOVE my pressure cooker!
Comments (47)I have a small (4qt) Cook's Essentials similar to that one. It got me hooked on pressure cooking, and now I have a 6 qt Kuhn Rikon, a 4 and 8 qt Fagor, and a ridiculously huge 30 quart All-American pressure canner which I have used as a pressure cooker on occasion. Lorna recommends (and I agree) that chuck is the best beef to use for most pressure cooking; you do need a little fat content in the meat. Ann, the pressure cooker's forte is comfort foods done quickly. If you like slow-cooked braises you can probably adapt a recipe for pressure cooking that will yield 99% of the goodness in 33% of the time. Indeed, some of the PC versions are preferable. I prefer osso buco made in the PC (in about 50 minutes) to the slow stovetop method, and you can have corned beef & cabbage in about an hour. One recipe that I've become addicted to is Lorna's Curry in a Hurry. Decent curry in about 15 minutes. Takes you longer to cook the rice than to make the curry. But you can also cook really healthy, too. I love steamed artichokes, but I don't like having to wait 45 minutes for them to be done. The PC can do them in about 12 minutes. (Of course, whatever health benefits come from eating artichokes is probably negated by dipping the leaves in hollandaise or melted butter...)...See More 8 years ago
 8 years agosooz thanked dcarch7 d c f l a s h 7 @ y a h o o . c o m
- 8 years agolast modified: 8 years ago
- 8 years agolast modified: 8 years ago
- 8 years ago
- 8 years agolast modified: 8 years ago
- 8 years ago
- 8 years agolast modified: 8 years ago
 8 years ago
 8 years ago
- 8 years ago
- 8 years agolast modified: 8 years ago
- 8 years ago
- 8 years ago
- 7 years ago
- 7 years ago













Related Stories
KITCHEN DESIGNKitchen of the Week: Function and Flow Come First
A designer helps a passionate cook and her family plan out every detail for cooking, storage and gathering
Full Story
KITCHEN APPLIANCESConsidering a New Kitchen Gadget? Read This First
Save money, time and space by learning to separate the helpers from the hassles
Full Story
MOST POPULARModern Party Etiquette for Hosts and Guests
Learn the mannerly way to handle invitations, gifts and even mishaps for a party that's memorable for the right reasons
Full Story
PETSSo You're Thinking About Getting a Dog
Prepare yourself for the realities of training, cost and the impact that lovable pooch might have on your house
Full Story
KITCHEN DESIGNGet Organized for Holiday Baking
Before you crack that first egg, establish a game plan for stress-free success
Full Story
HOUSEKEEPINGHow to Wash Your House
Avoid damage to siding and plants while getting your home's exterior shining clean, with this guide to using pressure washers and hoses
Full Story
HOUSEKEEPINGBaking Soda: The Amazing All-Natural Cleanser You Already Own
Battle grime, banish odors and freshen clothes with this common nontoxic cupboard staple
Full Story
KITCHEN WORKBOOKHow to Remodel Your Kitchen
Follow these start-to-finish steps to achieve a successful kitchen remodel
Full Story
MOST POPULAR12 Key Decorating Tips to Make Any Room Better
Get a great result even without an experienced touch by following these basic design guidelines
Full Story
KITCHEN DESIGNJump-Start Your Kitchen With These Minimalist Essentials
These kitchen tools will get you started on your path to culinary success or delicious downsizing
Full Story



cathyinpa