


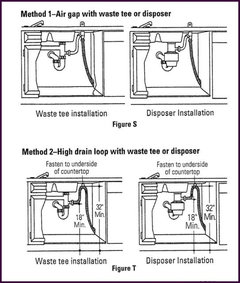
Diswasher doesn't work as well after air gap install
User
6 years ago
last modified: 6 years ago
Featured Answer
Sort by:Oldest
Comments (10)

User
6 years agoRelated Discussions
Well, that doesn't look right. Now what?
Comments (18)OK, I'm back with more exciting pictures! First, so it doesn't get lost below -- marcolo -- I read installation instructions for a different one of these shower kits to get an idea of how they are installed, and they said do NOT use 100% silicone caulk. I don't know why. Also, it said NOT to caulk the interior where the frame base meets the pan, only the exterior seam. Why is that? Before I ripped this out, it was caulked (and coming loose) on both sides. Anyway, I decided to partially disassemble the shower frame to get a better idea of what is going on and how to fix it. Here's where I am now: First, as you can see, the wall panel was not plumb when it was adhered to the wall. That would be, of course, because they didn't level the pan when they put it in, so when they lined the wall panel up with the pan, it ended up crooked. Duh. Pretty sure whoever installed this never heard of a level. A closeup view shows it even better. The jamb (metal frame part that was screwed to the wall) only barely overlapped the wall panel by the time it reached the bottom. The screws at the top of the frame went through the wall panel, while the screws at the bottom did not. The pan is badly out of level in all directions (the other wall is even more out of plumb, sigh). Now we can see the state of the drywall underneath the panel... ...and it is really not good. Crumbling drywall and scary black stuff (mold?) extends several inches up behind the wall panel. Here's a little drawing I did showing how the studs/drywall/shower wall come together -- or don't, as the case may be. The studs are badly out of plumb too. Easy to see how the slightest gap in the caulk inside the shower meant water getting under the edge of the shower wall panel and wicking up into the green board. Sooo....now I'm not sure where to go next with this. One thought is to cut away (from behind) the edge of the drywall that is sitting down inside the pan, and then insert some kind of extra flashing behind the wall panel so that any water that got behind it would not get any further. Another would be to cut away all of the damaged drywall (several inches) and patch it, adding flashing as in the first option -- again, this would be from behind. No, I don't exactly know how I would do that, but maybe there's a way to McGyver it. ;) I could try to remove the wall panel (it seems to come away from the green board pretty easily), replace the studs (they are not plumb either) and all the green board, and re-adhere the wall panel. The studs are only there to support the shower wall. This could help solve the fact that the wall flexes where it doesn't meet the studs. The risk of course is that I could break the wall panel, and then I'd really be in trouble. Also, I'm not sure how easy it would be to get just the one panel out without having to take the corner and the other panel as well. Removing only the one panel wouldn't address the other wall of the shower which doesn't seem to have leak problems (probably due to the slope of the pan and the fact that the shower head is on that wall) but I would not be surprised to find water damage to that side as well. And of course there's always the chance this is just a complete waste of time and I will have to bite the bullet and replace this shower kit with another. I don't think there's any way to get the pan leveled, and the fact that it's not level really throws the rest of the installation off. I'm not clear on whether removing and leveling the pan would mean having to do something with the drain height, which might be outside of my DIY abilities (though I do have a great plumber I could call). I'm just not too confident this shower can be made watertight enough to not leak into the room beneath. I haven't even shown the issues we have with the seal thingy at the bottom of the door, where water can easily leak out onto the bathroom floor, and I know that if a good bit of water ends up on the floor, that alone can mean a leak downstairs -- water that goes under the baseboard pretty much goes right on through the subfloor. Any advice at all would be very much appreciated. As is my usual habit, I decided to dig into this problem while my husband is out of town, and I'm going to be nobody's favorite person in my house if I don't restore this bathroom to working order pretty soon! (The other shower is in the basement, and none of us really likes using it -- plus it's the same shower kit and I'm betting it isn't installed any more accurately than this one was!)...See More(Lazy-pup) Dishwasher Help - Air Gap or High Loop
Comments (4)I had the GE repairman out yesterday to fix our wall oven. While he was here I asked him about GE dishwasher problems I had read about. He said that GE makes a lot of good appliances but the dishwasher is not one of them. He gets regular complaints about their dishwasher not cleaning and there is nothing he can do. They are functioning as designed and it is a design problem. I don't believe you need an air gap to work well, but you do need a loop high enough to make a downhill siphon to the drain pipe....See MoreDiswasher 'after-taste'
Comments (6)I once had a very old GE dishwasher that stopped pumping all the dirty water from the sump during cylces and I had to have it serviced. The man found something lodged in the drain air gap that was blocking the passage and causing dirty water to syphon back into the sump. This might be a diy project if you can access your lines. I had an old Whirlpool that had the pump fail and had to rebuild it too. Don't just assume it is too much soap, especially if you are following the same processes that used to work well....See MoreCabinet designer screw up??? Crown doesn't cover gap
Comments (16)Thanks to all who have responded. I was unable to get back to my computer since I posted so I will reply to all questions / suggestions in this response. Here goes: To weedmeister: tile goes down lastâ¦after the cabinets are in. As you will (or already have read), many of the pro installers will install plywood or some suitable material over the Hardie board to bring the cabinet install up to finished floor height. To monkeymo: You are correct. The solution is to use a stacked molding. My KD did not provide a crown diagram (she had to leave town on family business right after we ordered cabinets). When we met with our âÂÂnewâ KD yesterday to address this issue, she provided the crown diagram which showed the stacked molding. Our order did include the Single Bead Molding which is attached to blocking. As âÂÂlive wire oakâ remarked, the crown is installed on top of the SBM. Nonetheless, the crown that was ordered would still not have reached the ceiling. By ordering the Large Crown Molding (LCM8) we will get the necessary height. To live wire oak: You are correct: this is my first kitchen install and it has been very challengingâ¦and will likely continue to be. However, I will get it done and it will look great! And, yes, had I been aware of the stacked molding that was intended to be used, that would have covered one base. The crown originally ordered has a vertical height of 1 15/16; the LCM8 that we will be ordering to replace it has a vertical height of 2 13/16 so all will be fine. Several installers, including the one that works with HD to install cabinets, have told me that installing the cabinet bases on the Hardie board is perfectly OK. I know where they live so IâÂÂm sure they werenâÂÂt setting me up. :-) To lisa1 517: Thanks for your suggestion. You, too, are right on the money. Stacked it is! To kitchenkrazed09: All I can tell you is that my cabinet, including the base, is 93â tall. Kraftmaid calls it an OC302493. The base is 4 ýâ and the cabinet is 88 1/2â (the front of the cabinet âÂÂoverlapsâ the base by ýâ so it appears to be 89 (does that count for 90âÂÂ? ;-) ). To Buehl: Thanks for your picture. The link I posted and referred to in my post is of the same picture. Not trying to be a smart a**, I just didnâÂÂt want that look with painted cabinets. It really looks nice with your stained installation, however! Once again, I sure appreciate everyoneâÂÂs comments, etc. This forumâÂÂs members are a tremendous resource! I will be posting some pictures as my installation progresses....See Moreoneandonlybobjones
6 years agolast modified: 6 years agoweedmeister
6 years agoUser
6 years ago
Sammy
6 years agooneandonlybobjones
6 years agolast modified: 6 years agoUser
6 years agolast modified: 6 years agodadoes
6 years agoUser
6 years ago


Related Stories

FENCES AND GATESHow to Install a Wood Fence
Gain privacy and separate areas with one of the most economical fencing choices: stained, painted or untreated wood
Full Story
PETSHow to Install a Dog-Washing Station
Find out the options for pet showers and bathing tubs — plus whom to hire and what it might cost
Full Story
MATERIALSThe Most Popular Roofing Material is Affordable and Easy to Install
Asphalt shingles, the most widely used roof material in the U.S. are reliable and efficient, and may be right for you
Full Story
KITCHEN BACKSPLASHESHow to Install a Tile Backsplash
If you've got a steady hand, a few easy-to-find supplies and patience, you can install a tile backsplash in a kitchen or bathroom
Full Story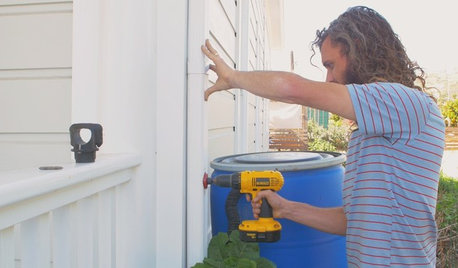
HOUZZ TVHouzz TV: How to Install a Rain Barrel
This DIY tutorial shows how easy it can be to capture rainwater from your roof to use in your garden later
Full Story
TILE6 Questions to Answer Before You Install Tile Flooring
Considering these things before tackling your floors can get you a better result
Full Story
REMODELING GUIDESContractor Tips: How to Install Tile
Before you pick up a single tile, pull from these tips for expert results
Full Story
WINDOWSContractor Tips: How to Choose and Install Windows
5 factors to consider when picking and placing windows throughout your home
Full Story
PATIOSSpring Patio Fix-Ups: Install an Outdoor Fireplace or Fire Pit
Make your yard the place to be by adding a fire feature that draws a crowd
Full Story
KITCHEN COUNTERTOPSWalk Through a Granite Countertop Installation — Showroom to Finish
Learn exactly what to expect during a granite installation and how to maximize your investment
Full Story

oneandonlybobjones