


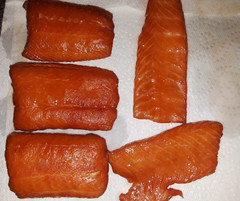
Brine and smoked fish
catfishhoward
6 years ago
Featured Answer
Sort by:Oldest
Comments (8)
Related Discussions
feeding frozen brine shrimp
Comments (7)If you can find them Freeze dried foods are usually better and cleaner. In the case of Brine shrimp, when its frozen the exoskeleton bursts, and most of the nutritional value is lost. I have not used it in over 15 years. I don't think Daphnia has much to offer either, I do raise some occasionally, but its not the best food around. Frozen Blood worms, and mosquito larvae another thing altogether, they both freeze well, and are very nutritious. The only problem with bloodworms is some people have had allergic reactions to them, and some of them have been very bad, so be careful. I have heard of some people being hospitalized from reactions from them. The Golden pearls have impressed me, something that is not easy, I've been keeping fish for most of the past 45 years, worked for a couple of wholesalers, and owned a Pet shop. I'm currently raising groups of Killifish fry using them and newly hatched brine shrimp, and see very little difference between them, but I want to see how the fry color up. I am impressed so far, the Golden Pearls are easier to use,and would be perfect for those unexpected spawns that catch you off guard with nothing to offer fry for their very important first meals. I like the variety of sizes they come in, and won't miss hatching brine shrimp and paying what I feel is too high a price for cysts....See MoreFood Saver bag vs. ZipLock for brine pork belly ??
Comments (3)Instead of using the largest sized gallon Food Saver bag, suggest you use the roll material. The rolls are about 22 feet long by 11 inches wide. Because of the maximum width of 11 inches, you may be limited as to the width of the meat you want to brine. But keep in mind the length can be many feet long if need be. Some food Saver machines will allow an immediate seal, and will stop the vacuum process. Mine has a button to do a fast seal, but sometimes it will not function and will start pulling a vacuum no matter how I push the fast/quick seal button. Because I go through quite a lot of the rolls and prefer to make my own bag sizes, I also bought an impulse sealer. These are adjustable in their heating and I have even use them to make small bags out of some garden fabric thats used as row covers. These porous bags are placed over ripening fruits on the trees to block bugs a birds. The only concern would be that the bag would have to lay a bit flat with a liquid in it, and if the sealer starts a vacuum as well as a seal, you could pull in liquid. The main reason I use the vacuum canisters to brine is because it opens the pores in the meat and allows the air out, while pulling in the brine. If you do brine without the vacuum, be sure to give it at least another day or two in the fridge. The follwing link shows a big 6 quart container, that I prefer to use when doing my peppers in vinegar. http://www.foodsaver.com/ProductDetails.aspx?productid=3661 They also have a taller, narrower one that I use for brining almost a half a whole, boneless pork loin. I think the following link is the biggest and tallest they sell, but you would have to call them to be sure. http://www.foodsaver.com/ProductDetails.aspx?productid=2487 With my very high powered vacuum pump, I tried using one of the following, but every time a vacuum was pulled, they would crack. http://www.foodsaver.com/ProductDetails.aspx?productid=3672 In any event, another option to get plenty of brine inside the cut or meat would be to use a meat pump. The site below also has, or had a 4 ounce version too. Here is a link that might be useful: Meat pump...See MoreSmoked fish ideas?
Comments (5)I just saved this recipe for Smoked Salmon & Cream Cheese Crepes. I haven't tried it yet, but it sure sounds good! I "think" it came from Recipezaar...(oops, forgot to save the source). Deanna Smoked Salmon Crepes with Cream Cheese This recipe serves: 6 For the crepes: 3/4 cup all\-purpose flour 3 teaspoons sugar pinch of salt 1 1/4 cups 1% milk 3 large eggs about 1 tablespoon olive oil For the filling: 2 ounces low fat cream cheese, softened 1 tablespoon fresh lemon juice salt and pepper to taste 1/2 pound thinly sliced smoked salmon For the Crepes: 1. Whisk together the flour, sugar and salt in a medium-sized bowl. 2. Make a well in the center of the mixture and pour in the milk. Whisk the milk into the flour mixture until the batter is smooth and well blended. 3. Whisk in the eggs until blended. 4. Strain the batter through a sieve into another medium-sized bowl. Cover with plastic wrap and refrigerate for at least 2 hours to give the batter time to rest. 5. Heat an 8-inch nonstick skillet or crepe pan over medium heat. Lightly brush the pan with olive oil. 6. Ladle about 1/4 cup of the batter into the skillet and tilt the pan in all directions to evenly coat the bottom. 7. Cook the crepes for about 30 seconds or until the bottom is lightly brown. Loosen the edges with a spatula and flip the crepe over. 8. Cook the underside for 10 to 15 seconds or until it is set, dry and browned in spots. 9. Slide the crepe onto a flat plate and cover with a piece of wax paper. Repeat with the remaining batter, brushing the pan with more butter as needed, and stacking the crepes between wax paper. The crepes may be made up to 3 days ahead. Cover with plastic wrap and refrigerate. Bring to room temperatrue before using. For the filling: 1. Put the cream cheese in a small bowl with 2 teaspoons of the lemon juice. Mix well and season with salt and pepper. 2. Using a 3-inch round cookie cutter , stamp out 4 rounds of the smoked salmon and 5 rounds of crepes. 3. Place 1 crepe on a work surface and top with a salmon round. Spread about 1 tablespoon of the cream cheese over the salmon. 4. Continue the layering, ending with a plain crepe on top. 5. Cut the stack of salmon crepes into 6 wedges and serve. Serving Size: 1 crepe wedge Number of Servings: 6 Per Serving  Calorie 105  Carbohydrate 9 g  Fat 4 g  Fiber 0 g  Protein 8 g  Saturated Fat 1 g  Sodium 246 mg...See MoreFor those who brine the turkey --
Comments (10)I switched to Judy Rogers' Pre-salting method about two years ago. I think that the end result is better and so much easier to deal with. I roast using Barbara Kafka's high heat method (500F). Home Cookin Chapter: Recipes From Thibeault's Table Pre-Salting =========== Judy Rogers' Zuni Cafe method Servings: 11 to 15 Note: This is more a technique than a recipe. It makes a bird that has concentrated turkey flavor and fine, firm flesh and that is delicious as it is. But you can add other flavors as you wish. Minced rosemary would be a nice finishing addition. Or brush the bird lightly with butter before roasting. 1 (12- to 16-pound) turkey Kosher salt 1. Wash the turkey inside and out, pat it dry and weigh it. Measure 1 tablespoon of salt into a bowl for every 5 pounds the turkey weighs (for a 15-pound turkey, you'd have 3 tablespoons). 2. Sprinkle the inside of the turkey lightly with salt. Place the turkey on its back and salt the breasts, concentrating the salt in the center, where the meat is thickest. You'll probably use a little more than a tablespoon. It should look liberally seasoned, but not over-salted. 3. Turn the turkey on one side and sprinkle the entire side with salt, concentrating on the thigh. You should use a little less than a tablespoon. Flip the turkey over and do the same with the opposite side. 4. Place the turkey in a 2 1/2 -gallon sealable plastic bag, press out the air and seal tightly. Place the turkey breast-side up in the refrigerator. Chill for 3 days, turning it onto its breast for the last day. 5. Remove the turkey from the bag. There should be no salt visible on the surface and the skin should be moist but not wet. Place the turkey breast-side up on a plate and refrigerate uncovered for at least 8 hours. 6. On the day it is to be cooked, remove the turkey from the refrigerator and leave it at room temperature at least 1 hour. Preheat the oven to 425 degrees. 7. Place the turkey breast-side down on a roasting rack in a roasting pan; put it in the oven. After 30 minutes, remove the pan from the oven and carefully turn the turkey over so the breast is facing up (it's easiest to do this by hand, using kitchen towels or oven mitts). 8. Reduce the oven temperature to 325 degrees, return the turkey to the oven and roast until a thermometer inserted in the deepest part of the thigh, but not touching the bone, reads 165 degrees, about 2 3/4 hours total roasting. 9. Remove the turkey from the oven, transfer it to a warm platter or carving board; tent loosely with foil. Let stand at least 30 minutes to let the juices redistribute through the meat. Carve and serve. Notes: This same method can be used for chicken, chicken pieces, pork roasts, ribs, chops, etc.. With the smaller cuts just pre-salt 4 or five hours in advance. Even this short period of presalting makes an amazing difference. Don't cover, just refrigerate and then remove from the fridge in time for the meat to come to room temperature before cooking. Home Cookin Chapter: Recipes From Thibeault's Table Simple Roast Turkey - High Heat Method ====================================== Source:Barbara Kafka Roasting A Simple Art Many Thanksgivings at my house have proved the high-heat method to be ideal. A fifteen-pound turkey at room temperature takes two hours to roast. However, it may take several hours for the turkey to reach room temperature. While the turkey is sitting out, cover it loosely with a towel, otherwise the skin will dry out. I prefer a fifteen-pound turkey as it isn't too heavy for me to handle. It usually gives lots of good leftovers and is generally available. There are certain things to think of to ensure success before beginning: Remove the giblet bag from the interior of the bird. Remove the wing tips. Put everything except the livers into a pot and start Basic Fowl Giblet Gravy. By the time the bird is roasted, the gravy will be done. Use the liver in the dressing/stuffing or store in the freezer, covered with milk. Make sure there is a pan big enough for the turkey without it's touching the sides of the pan. Do not truss. Consider whether the bird should be stuffed or the stuffing served as dressing baked separately. If stuffing, think in terms of twelve cups of stuffing for a 15 pound bird, which will allow the big cavity to be stuffed and some more stuffing to be crammed under the skin flap at the neck. I seldom stuff because there are real food safety questions about the bird and its stuffing sitting out at room temperature. The oven must be very clean before roasting, or cooking at this high temperature will cause unpleasant smoke. In any case, there will be some smoke, so turn on the fan or open a window. Don't put the oven rack too high or the skin on the breast will get over cooked. For a twenty-pound turkey, the rack should be in the lowest position. Always put the turkey in legs first - dark meat takes longer to cook and the rear of the oven is the hottest area. If the top skin seems to be getting too dark, slip a doubled piece of aluminum foil on top of it. Don't move the turkey. Use an oven mitt to protect hands and forearms. Remove the foil with the same oven mitt ten minutes before the turkey comes out. Large turkeys are most easily removed from the pan by holding them with two pot holders, which will need to be washed. After the meal, get out a large stockpot to boil up the carcass and leftover bones for turkey soup and stock. 15 pound turkey, thawed, if necessary and at room temperature, wing tips removed, reserving giblets and neck for gravy, liver for stuffing. Fresh ground black pepper to taste 1 cup water or basic turkey/chicken stock Place oven rack on second level from bottom of oven. Heat oven to 500°F. Rinse the turkey inside and out. Pat dry. Sprinkle the outside with pepper. If stuffing, stuff cavity and crop, securing openings with long metal skewers. Lace them. Do not truss. Put turkey in an 18 X 13 X2 inch roasting pan, breast side up. Put in oven legs first. Roast until the leg joint near the backbone wiggles easily, about 2 hours. After 20 minutes, move the turkey around with a wooden spatula to keep from sticking. Remove the turkey to a large platter. Let sit 20 minutes before carving. Pour off grease from roasting pan and put pan on top of the stove. Add water or stock. Bring to a boil while scraping bottom of pan vigorously with a wooden spoon, loosening all the crisp bits in the bottom of the pan. These add intensity to the gravy. Let reduce by half. Serve on the side in a sauceboat or add to giblet gravy. 9 pounds stuffed 1 hour 45 minutes unstuffed 1 hour 15 minutes 12 pounds stuffed 1 hour 50 minutes unstuffed 1 hour 20 minutes 15 pounds stuffed 2 hours 30 minutes unstuffed 2 hours 20 pounds stuffed 3 hours 30 minutes unstuffed 3 hours...See More
catfishhoward
6 years agolast modified: 6 years ago
dcarch7 d c f l a s h 7 @ y a h o o . c o m
6 years agocatfishhoward thanked dcarch7 d c f l a s h 7 @ y a h o o . c o mcatfishhoward
6 years agocatfishhoward
6 years agolast modified: 6 years agocatfishhoward
6 years agocatfishhoward
6 years agolast modified: 6 years ago

Related Stories

KITCHEN APPLIANCESLove to Cook? You Need a Fan. Find the Right Kind for You
Don't send budget dollars up in smoke when you need new kitchen ventilation. Here are 9 top types to consider
Full Story
KITCHEN DESIGNA Cook’s 6 Tips for Buying Kitchen Appliances
An avid home chef answers tricky questions about choosing the right oven, stovetop, vent hood and more
Full Story
KITCHEN DESIGN16 Practical Ideas to Borrow From Professional Kitchens
Restaurant kitchens are designed to function efficiently and safely. Why not adopt some of their tricks in your own home?
Full Story

ARCHITECTUREHouzz Tour: Sturdy Enough for a Tsunami
Storms don't scare this Washington state home; breakaway features and waterproof finishes let it weather high winds and waves
Full Story
HOMES AROUND THE WORLDWe Can Dream: Stunning Seaside Abode in Sydney
This coastal house has been designed to make the most of its location and views
Full Story
DISASTER PREP & RECOVERYMore Power to You: How to Pick the Right Generator
If your home's electricity goes, don't let it take your necessities with it — keep systems running with this guide to backup power
Full Story
HOUZZ TOURSHouzz Tour: Country Cabin in Virginia
Simple family retreat is a comfortable place to take a break from modern life
Full Story
KITCHEN DESIGN8 Kitchen Design Tips for Foodies
If you own at least one pricey knife and have a slew of kitchen tools, you’ll want to read this
Full Story
BATHROOM MAKEOVERSBathroom of the Week: Retirees Splash Into Soothing Beach Style
A Southern California couple works with designers to create a dream bath that celebrates a breezy coastal location
Full Story
nancyofnc