


Tile GoBoard Seams & Nail
jft1314
6 years ago

Featured Answer
Sort by:Oldest
Comments (10)
 PRO
PROCreative Tile Eastern CT
6 years agolast modified: 6 years agojft1314 thanked Creative Tile Eastern CTRelated Discussions
Underlying the tile question for tile experts Bill and Mongo
Comments (15)"Mongoct-- (sorry OP) If not using Kerdi shower pan, but just a mudbed/liner, can you use a topical membrane for a shower floor? I've posted previously, but it didn't catch your attention. I'm trying to understand this more as well... " Sorry if I missed your previous post. I seem to be hit and miss on the forums these days. I'm a little confused by the "mudbed/liner" comment and the desire to use it in conjunction with a topical membrane. So let me ramble a bit: I consider "liners" to be the CPE or CPVC thick shower membrane liners, the ones where you use a deck mud preslope, then install the liner over that with a clamping drain, then top the liner with another layer of deck mud, and you tile upon that. If that's what you're asking about, no I wouldn't use a topical membrane on top of all that. Here's what I consider to be a liner installation. Now back-tracking a bit: There are folk that use a topical membrane with a clamping drain, but they have to "dish out" the sloped mud bed as it gets close to the drain. It's sometimes referred to as the "divot method". That way the topical membrane will drain to the drain's weep holes. If you don't use a divot, then the raised part of the clamping drain can sort of act like a dam, causing water under the tile to pool around the drain. The area around the drain might appear perpetually wet. The divot method is not a technique I embrace. Nothing really wrong with it, it's just not my cup of tea. Here is a photo showing the "divot" carved out of the mud base: Virtually every shower I do is a one-off size or shape, so I'm almost always doing a sloped deck mud base. As to which topical membrane to use, when using Kerdi, I'll do a sloped mud pan and then cover that with Kerdi. If using Hydroban, then I'll still use a Kerdi drain in the sloped mud floor but then use Hydroban on the floor and walls. So if you want to use a topical membrane, then no , do not also use a liner within the floor. One membrane is all you want. Does that help?...See Moreneed opinion regarding seam in my caesar stone
Comments (44)Do you see the little black cams sticking up between the white blocks? The vacuum is so powerful on the rods through the blocks that the cams will take the bend out of a sheet of stone or estone. The cams push down while the black adjusters on the right blocks pull the pieces together....See MoreQuartz countertops - seam and corner joint/is it fixable?
Comments (46)HU: HD contracts with different fabricators all across the country. They like to award all the work in a particular state to a single fabricator....See MoreNail and glue 1/2" engineered 7" wide hardwood planks
Comments (7)Traditionally a nail-down "wide plank" hardwood receives "glue assist". That is to say glue is applied to the back of the planks and then nailed into place. Your problems will be SHRINKAGE due to VERY DRY conditions. A wide plank is VERY tricky to install in DRY climates such as yours. And to be clear, "wide" is anything 5" or wider. Your 7" wide planks are VERY wide. The wider the plank, the MORE it will shrink. The more it shrinks the bigger the gaps (where water and urine can fall into). The more it shrinks the unhappier you will be. A solid, narrow strip hardwood (such as 3" wide planks) would be the best option if you want wood. Some of the worst shrinkage/splitting/checking occurs in DRY climates. Humidity is SUCKED OUT of the wood so quickly it starts looking like 20 year old cedar shakes. Please check to see if you can ADD humidity to your entire home at the touch of a button (whole home humidifier). If you do not have this device, I highly recommend you purchase one. I would suspect $6K should get you what you need - but that number is highly dependent on size of your home and the type/size of your furnace/duct work....See More
jft1314
6 years agojft1314
6 years ago PRO
PROMint tile Minneapolis
6 years agolast modified: 6 years agojft1314
6 years ago- PRO
Mint tile Minneapolis
6 years agolast modified: 6 years ago jft1314
6 years ago- PRO
Mint tile Minneapolis
6 years ago

Related Stories
BATHROOM DESIGNOut With the Old Tile: 8 Steps to Prep for Demolition
This isn't a light DIY project: You'll need heavy-duty tools and plenty of protection for your home and yourself
Full Story
EVENTSTile Goes High Tech at Italy's Big Expo
Cutting-edge methods are creating tile looks from handmade to avant-garde, as seen as CERSAIE 2013
Full Story
KITCHEN BACKSPLASHESHow to Install a Tile Backsplash
If you've got a steady hand, a few easy-to-find supplies and patience, you can install a tile backsplash in a kitchen or bathroom
Full Story
REMODELING GUIDESTop 10 Tips for Choosing Shower Tile
Slip resistance, curves and even the mineral content of your water all affect which tile is best for your shower
Full Story
BATHROOM DESIGNFloor-to-Ceiling Tile Takes Bathrooms Above and Beyond
Generous tile in a bathroom can bounce light, give the illusion of more space and provide a cohesive look
Full Story
FLOORSHow to Paint Your Hardwood Floors
Know how to apply nail polish? Then you can give your wooden floors a brand-new look
Full Story
BATHROOM DESIGNHow to Build a Better Shower Curb
Work with your contractors and installers to ensure a safe, stylish curb that keeps the water where it belongs
Full Story
MATERIALSAn Architect Shares His Go-To Materials
Aluminum doors, porcelain tiles, polished concrete. Here are the features and finishes this professional returns to time and again
Full Story
DECORATING GUIDESStandout Ceilings Give Rooms a Lift
Ceilings with mirrors, polka-dot decals and tin tiles help these rooms look pulled together
Full Story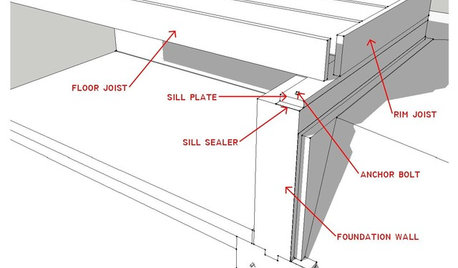
KNOW YOUR HOUSEKnow Your House: What Makes Up a Floor Structure
Avoid cracks, squeaks and defects in your home's flooring by understanding the components — diagrams included
Full Story

Mint tile Minneapolis