


Installing interior shiplap
gle2011
6 years ago
Featured Answer
Sort by:Oldest
Comments (6)

kalenangel
6 years agoRelated Discussions
question on installing shiplap
Comments (5)To do the stairs, you first need to scribe skirt board to connect the base mouldings on each level. You might find the following to be useful: http://www.thisiscarpentry.com/2011/04/16/scribing-skirt-boards/...See MoreShiplap Installation
Comments (25)I suppose I should begin with items that are definitely happening, and that's my cabinets, which are 60" and 48", and sit in diagonal corners of the room. I've attached a photo of what they look like, and also the exact color. A third corner is where the garden tub will be removed from. Do you have suggestions on a coordinating color to paint the beadboard? My trim is a light creamy color and will also be refreshed and lightened during the project. I'm using sherwin williams urethane enamel interior paint and it will be sprayed on by a professional painter....See MoreShiplap install
Comments (13)Here are some pictures of before. wasn't horrible but I wanted something less formal looking. As you can see, we are widening the sides. My husband is doing the work. He has made a mantel out of rough cedar wood that will fit over the existing mantle. I plan on doing a tea & vinegar stain to make it look like an old beam. trying to get more of a country/farmhouse vibe going. thoughts/suggestions? thanks...See Moreshiplap beam installation advice
Comments (15)Ship lap is not T&G. Shiplap boards have a rabbet cut from its edges and that allows them to overlap but stay flat. One rabbet is usually larger than the other so there is a slight gap iat the installed joint. But the biggest difference in the appearance is that shiplap paneling must be face nailed and T&G paneling can be blind nailed. T&G can also have a decorative v groove or bead at the joint. The "seam" in question is where the paneling changes from sloping to a flat kitchen ceiling. Apparently the OP wants something between the two boards. A simple sketch would have helped a lot....See More
Related Stories
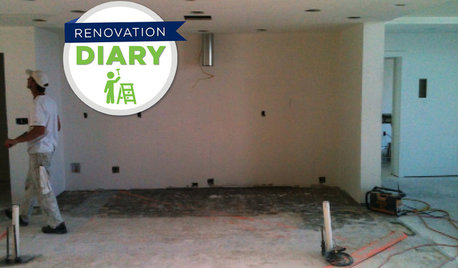
REMODELING GUIDESRanch House Remodel: Installing the Interior Finishes
Renovation Diary, Part 5: Check in on a Florida remodel as the bamboo flooring is laid, the bathroom tiles are set and more
Full Story
GREAT HOME PROJECTSHow to Install Energy-Efficient Windows
Learn what Energy Star ratings mean, what special license your contractor should have, whether permits are required and more
Full Story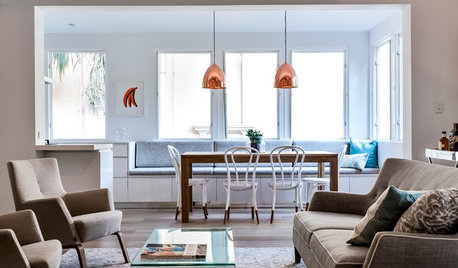
DINING ROOMSNo Room for a Dining Area? Install a Banquette
With built-in banquette seating, you can squeeze in a place to dine, even in a small space
Full Story
LATEST NEWS FOR PROFESSIONALSHow to Handle Client Installs During the Pandemic
Taking the time to be extra organized can help ensure everyone’s safety and put your clients at ease
Full Story
PETSHow to Install a Dog-Washing Station
Find out the options for pet showers and bathing tubs — plus whom to hire and what it might cost
Full Story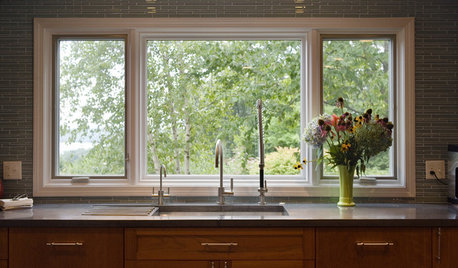
WINDOWSContractor Tips: How to Choose and Install Windows
5 factors to consider when picking and placing windows throughout your home
Full Story
FENCES AND GATESHow to Install a Wood Fence
Gain privacy and separate areas with one of the most economical fencing choices: stained, painted or untreated wood
Full Story
LIGHTINGReady to Install a Chandelier? Here's How to Get It Done
Go for a dramatic look or define a space in an open plan with a light fixture that’s a star
Full Story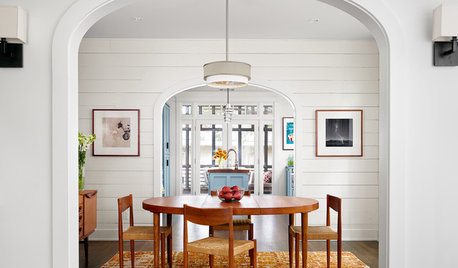
MATERIALSWhat Is Shiplap?
Read how a common exterior siding became so popular for interior paneling
Full Story
DESIGNING A BUSINESSHow to Make Sure Your Project Installations Go Smoothly
Interior design coach Beth Whitlinger breaks down the do’s and don’ts of a successful installation process
Full Story
Virgil Carter Fine Art