


Tips for pre staining floor B4 Oil/Varnish Blend topcoat?
Rusty Empire
8 years ago
Featured Answer
Sort by:Oldest
Comments (15)
Related Discussions
Southern yellow pine floors- thoughts? finishes?
Comments (38)It is best not to try and use products outside the standard products used by hardwood flooring professionals. Not because they will always not work, but because the products designed for this industry are optimized to deal with the challenges of coloring and protecting hardwood floors based on decades to centuries of experience. For example large planks get large gaps in between, not because they expand or contract more, but the that expansion/contraction is distributed over fewer gaps, so the gaps in the winter of a 9" board will be 3 times the size of the gaps in a 3" board, possibly over 1/8" this is why 1.5"-3.25" are the typical widths installed. Even old growth, quartersawn boards will have similar problems only 10-20% less, still unsightly. Finish-wise there are considerations that are unique to the floor coating industry. Firstly floors take tons more abuse than furniture or cabinets so need more protection, as a result floor finishes are more durable than other finishes not intended for floor applications. Secondly stains designed for floors are designed to be taken evenly because you have one large continuous area that make any uneven-ness very noticeable. My recommendations are to use straight-grain yellow pine 3.25" inches wide, maybe 4" or 5" but that is really pushing it and coat with duraseal products. However if you really want a specialty finish look for Pallmann Magic Oil, it is a hybrid wax/catalyzed oil finish....See MoreGel stain vs. Polyshades
Comments (50)I have read and re-read this post a thousand times. And just like Sherry74, I have spent well over $100 dollars on several stains, GF, Minwax Polyshades, Old Masters, Minwax Express, and even Varathane Stain+Poly. I have been practicing on a scrap cabinet sectioned off into small squares by blue tape, and for the past two months my fingers have been permanently stained brown. My goal has never been dark cabinets, but rather a rich medium brown (think warm walnut) that still allows the wood to show through. I have tried everything with the gel stain, quick wipe on - wipe off, longer wait time followed by wipe off, no wipe off, all applied in every way conceivable; sock, foam brush, and a good quality paint brush. Everything ended up looking about like Sherry74's cabinets. Then I tried building up layers of Polyshades, that went on so translucently that by the time I got to the color I wanted, there was sticky residue in every corner. However, enough experimenting to rival a woodshop, I think I have finally found the magic combination. * First a good cleaning with a green scrubbing pad and cleaner. * Then a very light sanding just to scuff the surface. * Next two lightly brushed on coats of brown paint mixed 1 part paint to 4 parts Valspar Clear Mixing Glaze. This tones down the grain and seals the dryest parts while staying translucent. (I used Valspar paint in Pumpernickel.) There is a great blog out there by Jenny on her blog Anything Pretty (linked at the bottom?) * Then one lightly brushed on coat of a 1:2mix of GF Walnut gel stain and Polyshades in Honey Satin. * Finally, when completely dry, one to two coats of GF Wipeon Clear Gel Coat. This method allowed all the working time of regular stain, without all the sanding. I am ready to start in my master bathroom. I will post pictures when I get done....See MoreHelp: Did I destroy my dining table? Long with pics
Comments (17)Looking at the leg of the table - you have what was mid-range stylish furniture in the late 1920s. They went in for those bulbous things on furniture in a big way during that decade. Mixed woods were common. You will find solid and/or veneer, either left visible as more than one variety, or stained/varnished to look like a single more expensive wood, usually mahogany or walnut because they are dark. They used multiple stains and colored varnishes, often more like a nearly opaque wood-colored paint. I've removed "mahogany" that was covering up blonde wood (ash or birch) Your choices are to live with it and enjoy the quirkiness of it or try to hide it because it wasn't what you thought you were getting. First: wipe it with mineral spirits and you will see approximately what a clear topcoat will give you ... It might be interesting. To lightly conceal it ... wipe on a medium toned penetrating oil-based stain (NOT a gel stain, not a water-based stain) followed by a clear topcoat. Minwax's oil-based stains can be wiped on and you wipe them off to control depth of color, building it up in layers. You will be able to see the grain differences. If you want a grainless table, one that is not of any apparent species, General finishes gel stains are easier to use than Minwax's. I wipe them on and then wipe most of it off so the grain shows, again using multiple coats. Painted on wiht a foam brush they are a close cousin of the wood-colored varnishes used in the 20s ... they cover it ALL. I would paint as the last resort....See MoreAny antique furniture restorers...question
Comments (36)Formbys and other 'wood finish' or 'tung oil finishes are all varnishes w/very little pure tung oil. I've used pure oil on numerous pieces I've redone. this one is an antique, mahogany/walnut solid wood. i used the pure tung oil over the wood and over the cobalt milk paint. you never want to use the oil on the inner drawers. yes, it can smell. repeated coats will eventually seal the wood and become hardened. First coat you put it on rather heavy, let it sit for 45 mins, and wipe up any residue. subsequent coats are thinner. Real Milk Paint Company sells the natural oil, but you must thin it w/a solvent. They also sell a natural citrus solvent. mix your own, or buy their pre-mixed version. https://www.realmilkpaint.com/category/oils/ hemp oil works just as good. or, just use GF topcoat. I like the oil based urethane (Arm r Seal) that you wipe on w/a cotton rag. no brush marks. Want a water base, easy clean up and easy brush on top coat? I've used this on many wood pieces. Very nice looking finish, easy to use. I used it on this walnut art-deco waterfall desk or, this one...See More
Rusty Empire
8 years agolast modified: 8 years agoRusty Empire
8 years ago
klem1
8 years agoRusty Empire
8 years agolast modified: 8 years agoRusty Empire
8 years agolast modified: 8 years agoRusty Empire
8 years agolast modified: 8 years agoRusty Empire
8 years agolast modified: 8 years ago


Related Stories
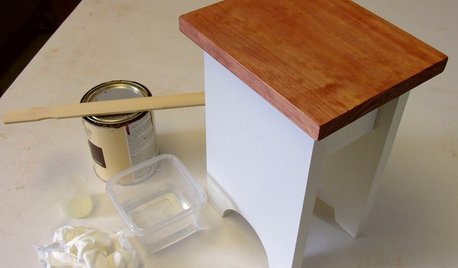
DIY PROJECTSCool Tip: Mimic Stain With a DIY Color Wash
Get the look of an oil-based stain without all the bother, using this easy wash made with paint
Full Story
REMODELING GUIDESContractor Tips: Smooth Moves for Hardwood Floors
Dreaming of gorgeous, natural wood floors? Consider these professional pointers before you lay the first plank
Full Story
GARDENING AND LANDSCAPINGContractor Tips: Build a Top-Notch Deck
Get an outdoor deck that fits your lifestyle and stands the test of time by keeping these 4 considerations in mind
Full Story
MOST POPULAR33 Magic Household Cleaning Tips
Houzzers from around the world share their tips for transforming housework into child’s play
Full Story
REMODELING GUIDESContractor Tips: How to Install Tile
Before you pick up a single tile, pull from these tips for expert results
Full Story
KITCHEN CABINETSKitchen Cabinet Color: Should You Paint or Stain?
Learn about durability, looks, cost and more for wooden cabinet finishes to make the right choice for your kitchen
Full Story
DECORATING GUIDES10 Design Tips Learned From the Worst Advice Ever
If these Houzzers’ tales don’t bolster the courage of your design convictions, nothing will
Full Story
TRIMTrim Color Tips: Get Your White Trim Right
Set off wood tones, highlight architectural features, go minimalist ... white trim is anything but standard when you know how to use it
Full Story
CLEANINGEco-Friendly Tips and Tricks for Cleaning Your Home
Are you wary of using chemicals to clean? These simple products and tricks will keep your home spotless naturally
Full Story
BATHROOM DESIGN10 Top Tips for Getting Bathroom Tile Right
Good planning is essential for bathroom tile that's set properly and works with the rest of your renovation. These tips help you do it right
Full Story


rwiegand