


Christmas Stocking and pattern I wrote
mrseldoo
16 years ago
Sort by:Oldest
Comment (1)
Related Stories

PRODUCT PICKSGuest Picks: Christmas Stockings for Stuffing
Not just any sock will do for this all-important holiday. Treat your mantel to one of these extra-special stockings this Christmas
Full Story
FEEL-GOOD HOMEThe Well-Stocked Minimalist
The trick is to have just enough of the right stuff at home — no more, no less. Here’s how to do it
Full Story
ORGANIZINGChecklists for a Well-Stocked Home
Thank-you notes, first-aid kit, clear glass vases ... It’s easy to go with the flow when you’ve got the items you need at hand
Full Story
PRODUCT PICKSGuest Picks: Fantastic Stocking Stuffers for Under $15
20 inexpensive gifts for even the pickiest recipients on your list
Full Story
HOLIDAYSHoliday DIY: Handmade Ring Holder and Pompom-Embellished Stocking
These last-minute projects will add a creative touch to your holiday decor and gift-giving
Full Story
PRODUCT PICKSGuest Picks: I'll Have a Blue Christmas
With 20 decorations in shades of aqua, teal and turquoise, the holiday will be anything but glum
Full Story
DECORATING GUIDES15 Rooms Bursting With Bravely Layered Patterns
With patterns mixed to bold effect, these rooms show that to the fearless sometimes go the style spoils
Full Story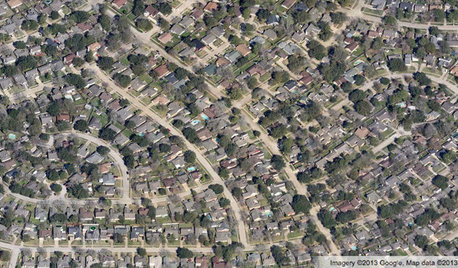
COMMUNITYGet a Bird's-Eye View of America's Housing Patterns
See the big picture of how suburban developments are changing the country's landscape, with aerial photos and ideas for the future
Full Story
EVENTSWhimsy, Color and Pattern Are Highlights of the 2015 Holiday House NYC
Step inside birthday-party-inspired playrooms and frosting-like spaces in this year's decorators' show house
Full Story
FUN HOUZZEverything I Need to Know About Decorating I Learned from Downton Abbey
Mind your manors with these 10 decorating tips from the PBS series, returning on January 5
Full Story

sandra_ferguson
Related Discussions
Hierloom Christmas Stocking Pattern
Q
Christmas Stocking patterns
Q
looking for Christmas stocking pattern
Q
Searching for Columbia Minerva Christmas Stocking pattern
Q