


Holiday DIY: Handmade Ring Holder and Pompom-Embellished Stocking
These last-minute projects will add a creative touch to your holiday decor and gift-giving

If you enjoy giving handmade gifts for the holidays or are simply looking for ways to personalize your decor without overspending, here are a few cost-friendly ideas that are easy to make.
Supplies
- Clay
- Knife or thin wire
- Toothpick or other items to add texture (optional)
- Acrylic paint
- Brush (with bristles if possible)
- Glaze (optional)
1. Pull a small piece of clay, about 1½ inches wide, from the block. Form a ball by rolling it between your hands or on a flat surface.
Tip: Clay can easily pick up dirt, so use a clean, flat surface like a kitchen countertop or marble cutting board.
Tip: Clay can easily pick up dirt, so use a clean, flat surface like a kitchen countertop or marble cutting board.
2. Once you’ve formed a ball, continue rolling the clay, adding more pressure to one side with the palm of your hand to shape it into a small cone. Continue rolling the clay until your cone is about 2 to 3 inches long.
3. Cut the thicker end of the cone with a knife or thin wire to create a flat base.
4. Make adjustments and add any desired textures before baking. You can try pressing small leaves into the side, stamping initials or adding other patterns with a toothpick or fabric. Clay is forgiving, so if you mess up, you can always knead away mistakes, reroll the ball and form a new cone.
4. Make adjustments and add any desired textures before baking. You can try pressing small leaves into the side, stamping initials or adding other patterns with a toothpick or fabric. Clay is forgiving, so if you mess up, you can always knead away mistakes, reroll the ball and form a new cone.
5. Bake the cone according to the instructions on the clay package. Once the cone has cooled, add paint.
6. When the paint is dry, you can add a small amount of glaze. This is optional, but it gives the cone a polished finish.
I created the small Christmas tree above with red and green paint to use as a seasonal ring holder on the windowsill above the sink.
6. When the paint is dry, you can add a small amount of glaze. This is optional, but it gives the cone a polished finish.
I created the small Christmas tree above with red and green paint to use as a seasonal ring holder on the windowsill above the sink.
Pompom Stocking
Although pompoms are readily available at craft and knitting stores, it can be difficult to find a specific color, size or style. If you’re having trouble locating what you want, create your own pompoms in any color or size.
Supplies
Although pompoms are readily available at craft and knitting stores, it can be difficult to find a specific color, size or style. If you’re having trouble locating what you want, create your own pompoms in any color or size.
Supplies
- Embroidery floss or yarn
- Plastic fork
- Scissors
- Needle and thread or fabric glue
- Burlap or other kind of stocking
I chose a nontraditional seasonal color palette and used embroidery floss for the pompoms.
If you’re making a stocking like the one pictured here, find inspiration for colors in a photograph from your travels, a first stocking or the cover of your favorite book.
If you’re making a stocking like the one pictured here, find inspiration for colors in a photograph from your travels, a first stocking or the cover of your favorite book.
You’ll need a form for weaving. I wanted small, thin pompoms, so I used a standard plastic fork and broke off two tines to make it easier to weave. If you want a larger pompom, use a larger form and yarn.
1. Leaving a short tail, weave the embroidery floss between the tines of the fork as shown.
1. Leaving a short tail, weave the embroidery floss between the tines of the fork as shown.
2. Continue weaving until you reach the top of the fork. Cut a separate piece of floss that’s long enough to tie around the center of the woven floss.
3. Tie a tight knot and slide the entire piece off the fork.
4. Cut through the loops of floss on each side.
5. The pompom should look like this. Cut the floss off the skein and trim the pompom as needed.
6. I sewed the pompoms to a plain burlap stocking, but fabric glue would work too.
Using the same technique, add pompoms to socks. For an additional holiday touch, sew on small bells as well.
Alternatively, you can use your fingers to create your pompoms.
Pompoms and tassels, with or without the bells, are a fun and simple addition for fabric items like cloth napkins, kitchen towels, fabric coasters, throws or pillows.
More
Make a Natural, Aromatic Holiday Swag
3 Easy Crafts for a Glittery Woodland Holiday Display
More
Make a Natural, Aromatic Holiday Swag
3 Easy Crafts for a Glittery Woodland Holiday Display


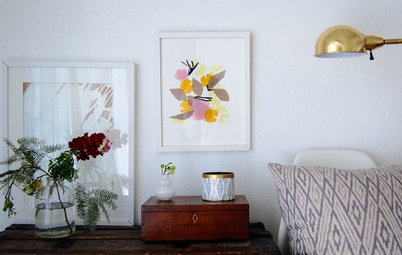


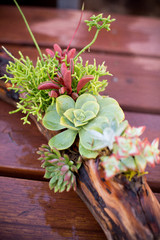
Crafting baked clay creations is a simple and mess-free activity that requires only a few supplies and offers endless design opportunities. The cones shown here are easy to make and give you a creative way to store rings on any flat surface.