


Is a linear drain for a curbless shower every really necessary?
elphaba_gw
11 years ago
Featured Answer
Sort by:Oldest
Comments (8)

User
11 years agoelphaba_gw
11 years agoRelated Discussions
okay for curbless shower to use a shower pan with regular drain?
Comments (8)With a curbless shower, I see two issues you may be facing. If he is planning on using a traditional rubber liner, a pre-slope under the liner is required. This slope is a minimum if 1/4" per foot from the drain to the farthest wall. In this case, I assume that to be the entry. I fugure that to be about 2 3/4" higher at the entry than at the drain. The rubber or vinyl liner sits on this and a FINAL mudbed is then formed over the liner. As you can see, there will be issues with no curb and how you'll terminate the slope to a feather edge at the entry. I don't see how that can be done. The other issue is with the liner itself. I see no way to attach it to a mudbed that would have to end at a feather edge. These liners are designed to go UP the vertical walls about 6-8" and nailed into place. Having built these before, scrap the liner and use the Kerdi. It's a bulletproof install, you only need ONE mudbed as the material is bonded directly to the mud and you can generally extend the Kerdi six or eight inches into the bathroom for a bit more insurance. On one hand, yes...it's a bit more cost, but realistically, it's also a shower you'll probably never need to repair or replace. The Kerdi is under $1.40 sq/ft. Their drain will run about a hundred bucks. On the other hand, you only have the cost of one mudbed, you eleminate the vinyl liner, as Kerdi is completely waterproof, you can save by using standard drywall in the shower as opposed to cement board. This is what Schluter recommends. Bottom line is that you'll pay a little more but get a far superior shower. If your tile installer isn't comfortable or familiar with Kerdi, find one that is. Here is a link that might be useful: Kerdi Shower Handbook...See MoreBasic Curbless shower - linear drain - what it looks like?
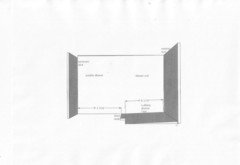
Comments (7)"So there has to be space for a "pool" somewhere around the drain whether you use a center regular drain or a linear drain." Yes. No matter what your design, or what type of drain you install, there are pretty much two basic requirements: 1) the shower floor area needs to be sloped towards the drain at a min pitch of 1/4" per foot and a max of 1/2" per foot. 2) With the drain plugged and with a 2" standing depth of water over the drain, waterproofing needs to contain the pooled water from intruding in to the non-waterproofed areas of the house. "In the diagram I included above, if the linear drain were recessed to meet the 1/4 inch per foot of run, then it would be okay but that gets us back to seeing that a linear drain requires being recessed just like a regular drain. " Correct. For your depiction above with no changes to the drain elevation, let's say you install the drain "as is". The floor to the right of the drain that is in the shower would need to pitch to the drain at 1/4" per foot, so the floor tile at the right wall would be elevated 1-1/8" (4.5' times 1/4" per foot) above the drain. If the bathroom floor to the left of the drain was flat (as it is in the drawing), you'd have to install a 2" vertical curb at the bathroom doorway. Your wall-mounted toilet and vanity protect those items. You'd then have to waterproof the entire floor and run the waterproofing detail up the walls several inches. Let's say you want to keep your bathroom floor flat with no curb at the bathroom/bedroom door threshold. Here are a couple of examples of how you could account for the required 2" vertical. In new construction they are easy to accomplish, in remodeling maybe not so easy: 1) drop the floor in the shower 2" below the bathroom floor by shaving down or dropping the floor joists. Then reverse the direction of the floor slope in your shower so it slopes down from left-to-right. Your trench drain will now be at the right wall. With your bathroom floor "flat", you'll have a curbless entry at the bathroom/shower floor transition. The shower floor will slope down to the drain at a little under 1/2" per foot of slope, about 7/16th" per foot to achieve the 2" drop over the 4-1/2' or run. 2) Keep the drain where it is in the drawing and the slope as depicted, from right-to-left. Add a 2" curb at the shower entry. Not curbless, but a 2" curb. 3) A hybrid of the two previous examples. Add a 2" step up at the shower door entry, then have the floor slope away from the shower entry towards the right wall, with the trench drain on the right wall. You'll have a 2" step up but then the floor will slope down within the shower. One note: Even if you did a true curbless like in example #1, I extend waterproofing out of the shower and on to the bathroom floor for several feet. You need to account for not just the physical size of the potential pool of water, but also the wicking and capillary action that will pull water away from the pool....See Moreshower floor issues & linear drain
Comments (6)I am in the process but yet to complete the task. So I don't have the experiance to tell you exactly how to do it. We ordered our trench drain from quickdrainusa.com you can go there and pop around the web site for information. We have and existing plywood floor so had to build up the slope from the doorway to the back of the shower. I would have rather had the trench run along one of the walls. The company sells everything you will need including the styrofoam 2 percent slope material. You just order what is needed and they will help you. That goes under the waterproofing material. We ordered the blue Noble waterproofing material from them and will do the walls in Kerdi and the rest of bath with Dietra. You can visit this site I included for some info. There is a wonderful contemporary bathroom that I think I saw in here the guy who did the bathroom did all the work himself and even made the trench drains himself. He tucked the drains so you could not see them there was a gap at the base of the wall. It is a beautiful bathroom and maybe someone here will know which one I am speaking of and will post a link. Here is a link that might be useful: Trench drain...See MoreLinear drain size for curbless shower
Comments (14)Kerdi band membrane would cover the transition from shower base to heat mat. The band would also be applied to all seams in the heat mat and from mat up onto drywall around the perimeter of the room. All good with the open vanity. Check that slope!Use the product manufacturers to back up your position in writing, email etc. These folks don't like their products used improperly any more than you. I can't speak for their official stance on combined systems. If you have any photos of wallboard prior to tile that would also be helpful. Keep in mind I'm not saying combining systems won't work but you need to protect yourself with a warranty. Don't fall for the lifetime warranty BS so they can sell more product. Quality mortar manufacturers which have been around for a long time will stand behind their products over Kerdi and other systems. https://www.ceramictilefoundation.org/homeowners-guide-to-hiring-qualified-tile-installer...See Moredavidro1
11 years agoelphaba_gw
11 years agoelphaba_gw
11 years agodavidro1
11 years agolazypup
11 years ago
Related Stories

BATHROOM DESIGNThe Case for a Curbless Shower
A Streamlined, Open Look is a First Thing to Explore When Renovating a Bath
Full Story
BATHROOM DESIGNHow to Choose the Best Drain for Your Shower
Don't settle for a cheap fix when you can pick a shower drain that suits your style preferences and renovation codes alike
Full Story
BATHROOM DESIGNThe No-Threshold Shower: Accessibility With Style
Go curbless between main bath and shower for an elegant addition to any home
Full Story
CONTRACTOR TIPSBuilding Permits: 10 Critical Code Requirements for Every Project
In Part 3 of our series examining the building permit process, we highlight 10 code requirements you should never ignore
Full Story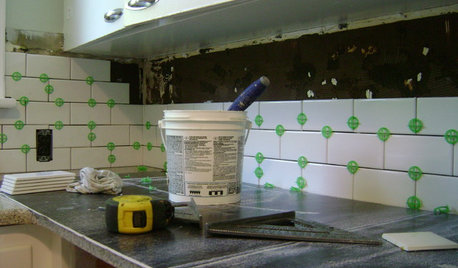
MOST POPULAR19 Kitchen Projects Every Homeowner Should Know About
Could your kitchen use a new sink, a backsplash, updated hardware, better organization, a good cleaning? Here's how to get started
Full Story
BATHROOM DESIGNConvert Your Tub Space Into a Shower — Waterproofing and Drainage
Step 4 in swapping your tub for a sleek new shower: Pick your waterproofing materials and drain, and don't forget to test
Full Story
BATHROOM DESIGNHow to Build a Better Shower Curb
Work with your contractors and installers to ensure a safe, stylish curb that keeps the water where it belongs
Full Story
BATHROOM DESIGNConvert Your Tub Space to a Shower — the Planning Phase
Step 1 in swapping your tub for a sleek new shower: Get all the remodel details down on paper
Full Story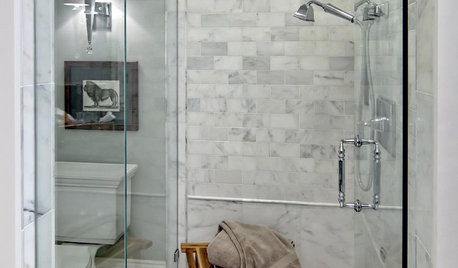
BATHROOM DESIGNHow to Settle on a Shower Bench
We help a Houzz user ask all the right questions for designing a stylish, practical and safe shower bench
Full Story
BATHROOM DESIGNHow to Pick a Shower Niche That's Not Stuck in a Rut
Forget "standard." When you're designing a niche, the shelves and spacing have to work for your individual needs
Full Story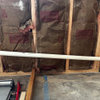


User