


Leaky flush valve seat?
UpNorthHey
13 years ago
Featured Answer
Sort by:Oldest
Comments (26)

homebound
13 years agoUpNorthHey
13 years agoRelated Discussions
leaky faucet
Comments (8)Buy a book, like a homeowners guide to plumbing problems, or Plumbing for Idiots (not that you are one), or some magazines at the library that show what makes a faucet leak. Anyone who can handle a wrench and screwdriver can remove a cartridge or valve stem. A new one can be purchased at most hardware stores for under twenty bucks. Or if it just the rubber washer at the bottom of the valve stem, it will cost under a buck for a new one. First, find out how to shut off the water to the tub. There should be an access to the valves behind the tub wall. If not, you may have to shut off the main water valve while you check/remove the cartridge etc. Is this a dual faucet or a single handle one? Check your community education center. Many have classes on minor home repairs that cost very little....See MoreHouston...we have a problem...a leaky ceiling problem
Comments (22)I have seen this type of damage a lot over the years being in the homeowners insurance business and here is my take on it. Based upon the drywall damage as seen in the photos it needs to be pulled and replaced. While it's possible some of it may be dried with fans the cost to do that versus cutting it out and replacing just isn't worth it. Plus you really need to get the framing behind it dry as quickly as possible. The entire continuous ceiling should then be painted to match. The floors may be a bit more difficult as you already have some cupping of the wood. Usually the cupping and warping will get worse before it gets better so don't be suprised over the next day or two if it looks and feels worse. The GC probably wants to wait and see if thats the case or not. If the cupping is very slight it may go back down but it usually takes a few weeks for wood floors to dry out completely after being wet enought to show cupping. Worst case scenario is the entire floor will have to be resanded and finished, the problem with that is they can't sand flooring with too high of a moisture content or it will buckle again so the damaged area should be pulled and replaced as you are not in a situation to wait a month or longer for it to dry out. You also don't want to put off the floors until after you have moved in because you then have a whole lot of furniture and contents to worry about moving etc.. Plus refinishing floors is dusty and smelly work requiring you to be out of the house for several days once it's done. Unfortunately you can't sand and refinish just the area and get it to look right. If this was a pantry or small bathroom you may get away with it but not in the middle of the kitchen. It's too bad because if you have to resand it you have just lost some of the useful life of your floor as you can only sand it so many times before it has to be replaced. Hopefully it turns out not to be too bad and it can easily be repaired but if not hang in there and work through it. The idea of getting a water mitigation company out to take a look is also not a bad idea just for a second opinion. They can use moisture meters to tell you how bad the floors are and if they can dry them or not. Good luck....See Moretoilet still leaking after changing flapper and valve
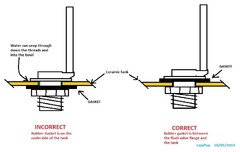
Comments (6)I have to agree with Homebound, under the general heading of "the toilet still leaks" there are a number of possibilities. You stated that you changed the flapper and the flush valve so I am assuming that you mean the water level in the tank is slowly dropping and causing the fill valve to repeatedly open momentarily. If you changed the flush valve a new flapper should have come with the flush valve kit, so for the moment we can rule out the possibility that you have the wrong flapper. There was a time when the flappers were all the same and we just carried a box of "Corky's" on the service truck, but with the advent of low-flow toilets they had to slightly redesign the flappers and flappers are now rated by the GPF (gallons per flush). (They now make universal flappers that have a rigid plastic mount and the rubber ball can be rotated on the mount to adjust for the GPF) There are primarily two different methods of mounting the flappers. Most flappers have two arms that extend to the standpipe and there are holes in the end of the arms on the flapper that fit over cast plastic fingers extending off either side of the standpipe. Check the holes in the rubber arms on the flapper to make sure there is no excess rubber in the holes that might prevent the flapper from freely swinging on the fingers, then check the plastic fingers to make sure there is no excess "mold Sprue" plastic on the fingers that would interfere with free movement of the flapper. There is a style of flapper mount where there is no fingers on the standpipe. Instead the flapper has a molded rubber ring that fits around the standpipe. This type of mount can be a real PITA to adjust because if it is even slightly too high it keeps the back of the flapper elevated above the flush valve seat, and if it is slightly too low it puts a downward force on the back of the flapper which causes the front of the flapper to be raised slightly. Personally i try to avoid that type like the plague. Lift the flapper and run your finger nail around the top mating surface of the flush valve. If you feel any slight bumps use a piece of 600grit emery paper to smooth off the seating area. Check the length of the flapper lift chain from the flush handle. Properly there should be 2 links of slack in the chain. (The flush handle lift arm should be able to move about 1/4 to 3/8" before it begins lifting the flapper.) If the chain is too tight it can hold the front lip of the flapper above the flush valve seat. If the chain is too long it will produce a sluggish flushing action. Check the tank water level. In the inside wall of the tank you will find a "Water Level" index mark either painted on the tank wall or perhaps embossed into the ceramic casting of the tank. If the water level is too high or too low adjust the flush valve float. (The index should be about 2" below the top of the standpipe.) Check the trap primer line, which is the small diameter plastic line that runs from the fill valve to the top of the standpipe. Make sure that the line is positioned so that it cannot interfere with the free movement of the flush handle chain. At this point you have covered all the common problems associated with water leaking from the tank to bowl and causing the fill valve to repeatedly cycle. If this has not resolved your problem please give us more detailed information about the type of leak your having and we can offer additional information....See MoreLeaky Delta Faucet...
Comments (7)As far as I can tell, it seems that it is the hot water part of the faucet that is leaking. Per your suggestion, I will try stretching the springs. I had not used faucet lube because Delta had told me not to. Yes, by leaking from the aerator, I mean the faucet is not shutting completely off and water is dripping from the aerator. Yes, I did buy genuine Delta parts....See MoreUpNorthHey
13 years agohomebound
13 years agobrickeyee
13 years agoUpNorthHey
13 years agohomebound
13 years agohomebound
13 years agoUpNorthHey
13 years agohomebound
13 years agoUpNorthHey
13 years agobrickeyee
13 years agoUpNorthHey
13 years agobrickeyee
13 years agoUpNorthHey
13 years agoBarryLEm
12 years agolazypup
12 years agofnayebi
11 years agoggin2000
11 years agosheliaj
9 years agoG G
8 years agomrdplace
7 years agotinsoldier1013
7 years ago
John Rutledge
3 years agoHU-377696143
3 years agolast modified: 3 years ago
Related Stories
BATHROOM DESIGNHow to Choose the Right Toilet
Style, seat height, flushing options, color choice and more will help you shop for the right toilet for you
Full Story
GREEN BUILDING6 Green-Roof Myths, Busted
Leaky, costly, a pain to maintain ... nope, nope and nope. Get the truth about living roofs and see examples from simple to elaborate
Full Story
BATHROOM DESIGNConvert Your Tub Space to a Shower — the Fixtures-Shopping Phase
Step 2 in swapping your tub for a sleek new shower: Determine your mechanical needs and buy quality fixtures
Full Story
BATHROOM DESIGN12 Things to Consider for Your Bathroom Remodel
Maybe a tub doesn’t float your boat, but having no threshold is a no-brainer. These points to ponder will help you plan
Full Story
HOME TECHMeet the New Super Toilets
With features you never knew you needed, these toilets may make it hard to go back to standard commodes
Full Story
HOUSEKEEPINGWhat's That Sound? 9 Home Noises and How to Fix Them
Bumps and thumps might be driving you crazy, but they also might mean big trouble. We give you the lowdown and which pro to call for help
Full Story
BATHROOM DESIGNSee the Clever Tricks That Opened Up This Master Bathroom
A recessed toilet paper holder and cabinets, diagonal large-format tiles, frameless glass and more helped maximize every inch of the space
Full Story
LIFEThe Top 5 Ways to Save Water at Home
Get on the fast track to preserving a valuable resource and saving money too with these smart, effective strategies
Full Story
GREEN BUILDINGHow to Harvest Rainwater for Your Garden
Conserve a vital resource and save money by collecting stormwater for irrigation in a barrel or tank
Full Story
GREEN BUILDINGWater Sense for Big Savings
Keep dollars in your pocket and preserve a precious resource with these easy DIY strategies
Full Story
UpNorthHeyOriginal Author