SHOP PRODUCTS
Houzz Logo Print
twotzus

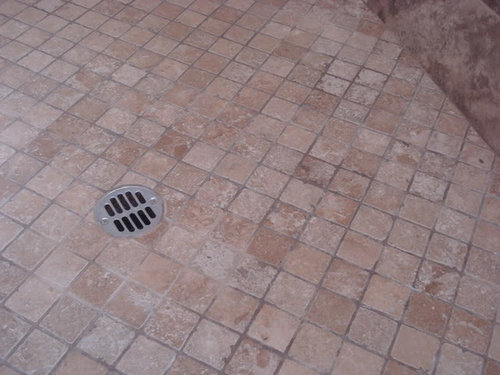
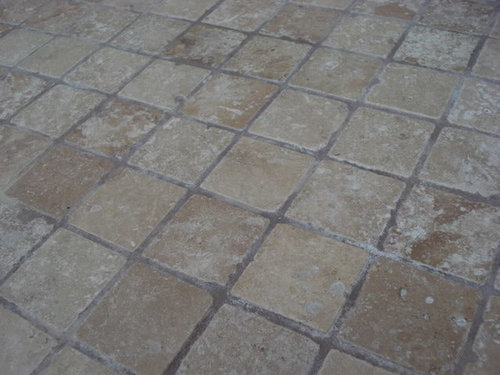
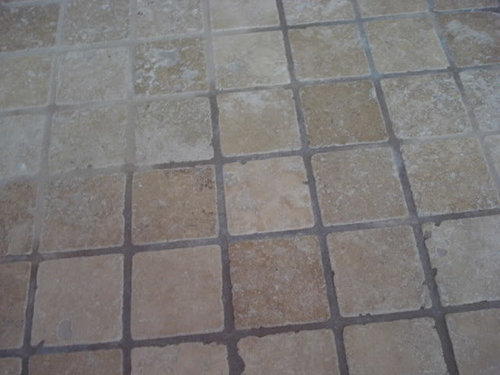
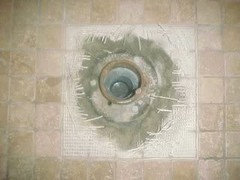
Help! Grout Discoloration on New Shower Floor

twotzus
16 years ago

I hope one of you tile and stone experts can help me. We recently remodeled our bathroom. Our shower was completely rebuilt with a hot mopped shower pan and travertine wall tiles and floor. The tiler used Custom grout color Fawn on walls and floor and I sealed it with Miracle 511 Impregnator. After the first couple of showers, we noticed that the grout on the floor darkened starting at the wall and moving toward the drain. Not all areas of this floor grout darkened; it was just in spots concentrated on the side that we used (two person shower) I thought maybe I had not applied the sealer evenly missing some spots. So we stopped using the shower, let it dry out for a few days until the grout lightened up, and then I resealed again. As soon as we started using the shower the grout again started darkening, like it was wet. The spots started spreading until the whole floor of the shower has dark colored grout, although it is not even. At this point we had used the shower daily for about two weeks and the darkening of the grout pretty much spread across the shower floor although unevenly. Our contractor called the tile guy out to have a look at it and of course he said it is normal. But why would we pick a grout color to blend with the travertine tiles only to darken when we use it. I thought it was water seeping under the tiles from the corners which were NOT caulked but grouted. The tiler insisted that it was done properly. From reading this forum, I understand from tile experts that the corners of the floor meeting the walls should be caulked instead of grouted. Is this causing the discoloration? We have not used the shower for two weeks in hopes of letting it dry out so the grout can return to the normal color and then take it from there. But now we are not sure if it will ever completely dry out as it is mottled with dark spots. I hate it since it looks like mold. What do we do now? Can our contractor dig out the grout and apply caulk now? Will it ever return to the original grout color evenly? Where it has lightened up, I have noticed a "chalky" residue on the grout. What is this? Help! I have no idea what is going on and my general contractor isn't sure what to do, although he is more than willing to fix the problem. I have taken some pictures of the floor. Any advice is appreciated. We would like to start using our beautiful new shower but want to resolve this grout issue first.

src>

src>

src>

Comments (61)

  • bill_vincent
    16 years ago
    last modified: 9 years ago

    ALL conventional shower pans are designed to accept water under the tile and in the mortar base. This is the reason there are weepholes at the base of the drain, and the reason why the Kerdi system is so revolutionary-- it's the first shower system where it IS designed not to let water get past the tile and grout.

    Now, twotzus-- you definitely have one thing going here, and probably two-- first, I would imagine your shower pan is flat bottomed, instead of sloped to the drain. I'm sure there's a slope in the tile, but there should also be what's called a "preslope" UNDER the pan membrane, so that water that DOES get through the grout joints will follow gravity to the weepholes at the base of the drain and flow out the waste pipe. For whatever reason, very few tile installers or plumbers know that the preslope's even supposed to be there, and many who HAVE heard of it just don't care to spend the extra time required to install it. The second thing is the weepholes are most likely clogged, which is why the pan is filling up, and the grout joints are staying wet for so long. You're actually lucky that you're not seeing what looks like leakage on the backsides of the walls of your shower, because what happens many times is that water, once it reaches the bottom of the wallboard where it's buried in the mud, will start whicking up the wall board, much like dipping the corner of a paper towel in a small puddle of water. The problem with that is once the water gets over the top of the pan membrane, which at most, only comes up the walls about 10", will spill over into the wall cavity, and once enough of it has spilled in, it'll begin to show as a leak in your shower, and if left unchecked, could do alot of structural damage, as well as causing mold problems. The ONLY correct remedy is to replace the shower pan, although you might be able to get away (for now) with just taking up around the drain, unclogging the weepholes, and patching it back in.

    For the benefit of your contractor, here are the codes that state the pan membrane must be presloped:

    IRC Preslope code:
    2000 IRC:
    P2709. 3 Installation. Lining materials shall be pitched one-fourth unit vertical in 12 units horizontal (2-percent slope) to weep holes in the subdrain by means of a smooth, solidly formed subbase, shall be properly recessed and fastened to ap-proved backing so as not to occupy the space required for the wall covering, and shall not be nailed or perforated at any point less than 1 inch (25. 4 mm) above the finished threshold.

    Uniform Plumbing Code related to shower pan construction.

    "412.8 When the construction of on-site built-up shower receptors is
    permitted by the Administrative Authority, one of the following means shall
    be employed:
    (1) Shower receptors built directly on the ground:
    Shower receptors built directly on the ground shall be watertight and shall
    be constructed from approved type dense, non-absorbent and non-corrosive
    materials. Each such receptor shall be adequately reinforced, shall be
    provided with an approved flanged floor drain designed to make a watertight
    joint in the floor, and shall have smooth, impervious, and durable surfaces.
    (2) Shower receptors built above ground:
    When shower receptors are built above ground the sub-floor and rough side of
    walls to a height of not less than three (3) inches (76 mm) above the top of
    the finished dam or threshold shall be first lined with sheet plastic*,
    lead* or copper* or shall be lined with other durable and watertight
    materials.
    All lining materials shall be pitched one-quarter (1/4) inch per foot
    (20.9 mm/m) to weep holes in the subdrain of a smooth and solidly formed
    sub-base. All such lining materials shall extend upward on the rough jambs
    of the shower opening to a point no less
    than three (3) inches (76 mm) above the top of the finished dam or threshold
    and shall extend outward over the top of the rough threshold and be turned
    over and fastened on the outside face of both the rough threshold and the
    jambs.
    Non-metallic shower sub-pans or linings may be built-up on the job site
    of not less than three (3) layers of standard grade fifteen (15) pound (6.8
    kg) asphalt impregnated roofing felt. The bottom layer shall be fitted to
    the formed sub-base and each succeeding layer thoroughly hot mopped to that
    below. All corners shall be carefully fitted and shall be made strong and
    watertight by folding or lapping, and each corner shall be reinforced with
    suitable webbing hot-mopped in place. All folds, laps, and reinforcing
    webbing shall extend at least four (4) inches (102 mm) in all directions
    from the corner and all webbing shall be of approved type and mesh,
    producing a tensile strength of not less than fifty (50) psi (344.5 kPa) in
    either direction. Non-metallic shower sub-pans or linings may also consist
    of multi-layers of other approved equivalent materials suitably reinforced
    and carefully fitted in place on the job site as elsewhere required in this
    section.
    Linings shall be properly recessed and fastened to approved backing so
    as not to occupy the space required for the wall covering and shall not be
    nailed or perforated at any point which may be less than one (1) inch (25.4
    mm) above the finished dam or threshold. An approved type sub-drain shall be
    installed with every shower sub-pan or lining. Each such sub-drain shall be
    of the type that sets flush with the sub-base and shall be equipped with a
    clamping ring or other device to make a tight connection between the lining
    and the drain. The sub-drain shall have weep holes into the waste line. The
    weep holes located in the subdrain clamping ring shall be protected from
    clogging.

    *Lead and copper sub-pans or linings shall be insulated from all conducting
    substances other than their connecting drain by fifteen (15) pound (6.8 kg)
    asphalt felt or its equivalent and no lead pan or liner shall be constructed
    of material weighing less than four (4) pounds per square foot (19.5 kg/m2).
    Copper pans or liners shall be at least No. 24 B & S Gauge (0.02 inches)
    (0.5 mm). Joints in lead pans or liners shall be burned. Joints in copper
    pans or liners shall be soldered or brazed. Plastic pans shall not be coated
    with asphalt based materials."

    The same language also appears in the Tile Counsil of North America's Handbook, which are the specs WE must follow.

  • twotzus
    Original Author
    16 years ago
    last modified: 9 years ago

    Mongo, I had to go tell my husband what you said about a plumbing leak because that was the first thing he suspected because the wet grout started under the plumbing wall. But then it appeared on the opposite wall where there was no plumbing and no dark in between to connect the spots. I pooh poohed that and convinced him to wait on having the plumber until we investigate this further. He After I told him about your input, he was quite mollified that his idea was entirely possible. :)

    Bill, I asked my contractor today on the phone if there was a slope built into the shower pan and he said that yes, definitely there is. I remember seeing it after it was hot mopped and it seems to me it was sloped but I wasn't sure. I asked my husband tonight and he said he remembers it being sloped. Thanks for explaining about the "preslope", which now I understand is the slope of the shower pan. I'm pretty comfortable that it was sloped. But if the weep holes are clogged with mortar, would that be enough to cause this problem even if the pan is sloped properly? And I guess the only way to fix it is to tear up the tiles and unclog them? In googling and trying to find some answers I ran across this saga. It sounds exactly like the scenario you painted above. The photos of the wet grout and tiles seem similar to mine. What I can't figure out is why there is a bathtub spigot in the shower. :)

    Here is a link that might be useful: Failed Shower Floor

  • Related Discussions

    Help! - darkened shower floor grout

    Q

    Comments (5)
    It still kills me that copper is considered the cadillac for pans in MA. I grew up in, and have worked in MA, so I'm plenty familiar with their methods. Some are so restrictive, some so lax, some so contradictory in nature. It still comes down to the pan being flat, and any imperfections in the flatness can lead to birdbaths (ponding), especially in the folded corners of the pan. While others will likely disagree, it's a failed installation in my world. The irony is that the installation is legal, and while the worksmanship, materials, and methods can be impeccable, a mud bed that retains moisture can be problematic over time. Some installations do need time to settle in. But if Bill recommended the guy, I figure your installer will give you a better analysis of what is occurring since he can put his eyes on the job, and he knows exactly how the floor and walls are detailed. I'm in Thailand now and your photos aren't loading. Probably not an issue with your photos, but with my internet connection.
    ...See More

    Discoloring bathroom shower grout, cleaning?

    Q

    Comments (6)
    It looks like it needs a good cleaning with a brush. Any number of products will work; I prefer something like Softscrub with Bleach or Comet Spray Gel Mildew Stain Remover. The scrubbing action with a brush or scrubbie should do the trick. Ventilating the area with a small fan placed on the floor and blowing into the shower stall should help slow down future mold. Here is a link that might be useful: first pic
    ...See More

    New Grout Discoloration Issues

    Q

    Comments (9)
    Hi, as a retired tiler of 25 years experience I can tell you of three grout discolour problems. Firstly however I observe that there are a number of different types of tile grout out there, and each has to be mixed, applied and cleaned up in its own way. If your tiler is an experienced tradesman he or she will know how to mix and apply the product selected. For instance, conventional portland cement based grouts can me mixed either thick or thin - from tooth paste like consistency to pourable like cream, and can be cleaned up without over concern about how much water you use or whether the clean up water is kept fresh or not. These grouts are probably the most fool proof, but will allow efflorescence to develop over time on say shower walls and floors. Grouts based on an aluminum version of cement must not be mixed too thin, rather like tooth paste, and MUST NOT be cleaned up with lots of water - the dryer the better on the sponge. Two problems I have encountered with these grouts is that if mixed too thin so as to allow troweling on rather than applying with blades and spatulas the resultant grout will be chalky and weak. I also had one job where the grout (a light grey) was patchy on drying. Consultation with the importer threw up a number of suggestions such as contaminated mix water (but why did every batch show strong variation within each batch, rather than a consistent discolouration for each batch) and inadequate mixing (definitely not as I had used the same procedure with a very great number of jobs over many years without this colour variation). Tried using store bought water - same outcome. Dud batch possibility, but the grout colour is a very popular one and the importer had had no other complaints, or so he said. Then took notice of a very stubborn waxy coating on the tiles. This was a Chinese practise to prevent the tiles being damaged in transport and handling. Tile suppliers variously reported problems getting this wax off on completion of the job, but that is another issue. The possibility was that the wax was interfering with the grout, in some way. Provided samples of the "contaminated" grout to three firms who all swore they could find out what the contaminant was, but all subsequently ran for cover and provided no analysis. In the end I cut all the old grout out (130 sq meters of it) and replaced it all with epoxy grout. Problem gone - happy customer - wiser tiler. This brings me to the third type of grout I am familiar with and that is the epoxy grouts. They are two part, need precision in mixing, and must be applied with steel blades rather like say putty. Clean up is with ample water - the more the better. Most tilers hate epoxies because they are considerably more work to apply. They have the virtues however that the colour as applied is the colour you wind up with, and they are waterproof and so will not cooperate with efflorescence and will not harbour moulds or stains. Great for bathrooms and kitchens. Ideal? Not quite. The white version of everyone's epoxy slightly yellows with age, and not uniformly. All other colours seem to be "colour fast". As to your problem I suggest you try one of the paint on epoxy grout colourants. These can work really well but you need a test area to see if it does OK over the old grout. An easy job for a home owner to do - just follow the instructions. The epoxy colourant will also help with efflorescence because it helps close up the porosity in conventional grouts. Failing this the only fix it to remove all the old grout and replace with epoxy grout. That definitely is not a home owner's job. Sorry. Hope it all works out.
    ...See More

    HELP! New floor grout color very inconsistent - regrout or color seal?

    Q

    Comments (4)
    It’s three days since it was grouted. And im somewhat familiar with effloressence — I’ve had it on other tile jobs, but that usually can be scratched off or scraped off at least partially and this does not. What i had understood about colored grout is that there is x-amount of colorant within a box and you can definitely dilute out your colorant within the powder if it’s not mixed properly... which is why there is specific mixing “recipe” on the box. If you just wing it On the amount of water added, you’re going to get different concentrations of colorant in each batch....
    ...See More
  • MongoCT
    16 years ago
    last modified: 9 years ago

    twotzus,

    I just want to emphasize one thing to make sure we're all on the same page. The "preslope" is what your membrane goes on top of, that way your membrane is sloped.

    Since your shower is hot mopped, when you saw the hot mop was that sloped?

    I have to say that guys I've known that do hot mops never preslope. They hot mop a flat surface, then pack sloped deck mud on that as their tiling base, then tile.

    "But if the weep holes are clogged with mortar, would that be enough to cause this problem even if the pan is sloped properly?"

    Yes. Your primary drainage comes from water flowing off the tiles down the drain. Grout is porous (as you now know!) and while grout normally sheds water, some does penetrate through. Other water can get through flaws in the grout (cracks, pinholes) or through porous stone or cracked stone or tile.

    Water that gets below the tile/grout now soaks into the sloped mud. If it's just a little water that gets through, it can dry back out into the bath through evaporation.

    If it builds up enough, over time the mud can get saturated. Water then flows down through to the bottom of the deck mud, hits the sloped membrane (hot mop), and then flows downslope towards the drain. When it hits the drain it flows through the sides of the drain and into the drain via the secondary weep holes that are built into the drain. The water then flows out your drain pipes.

    If your membrane is not sloped, then when the water hits the membrane it just sits there...and sits there.

    It can eventually wick UP the cement board on the walls, go above the membrane,and rot the framing in the stud bays.

    Signs of a saturated pan are dark grout on the floor, sometimes extending up the grout in the walls.

    Even with a properly sloped membrane, sometimes the installer screws up and the weepholes get sealed shut. Then the secondary water has no where to go and it builds up until the base is saturated and you get perpetually wet grout lines.

    As you know you have a problem. We don't really know what exactly is causing your problem. But the end result is that your builder has to deliver to you a properly functioning shower. If he can't figure out how to fix what's broken, then he replaces what's broken.

    Mongo

  • twotzus
    Original Author
    16 years ago
    last modified: 9 years ago

    Mongo, yes, the hot mop was sloped. The tile guys did not do the hot mops. There is a guy that is all he does, that my contractor subbed. This guy just does hot mop shower pans. He doesn't tile. The tile guy came in a couple of days later.

    This whole bathroom redo started because our old shower pan had leaked and well, you know how that goes...have to rip up the tile in the shower, so might as well put in new floor tile to match...well now we need new counters, but then we can't keep these old cabinets... and might as well get nice new sinks and fixtures...before you know it, you've spent $25,000. And it all started with a leaky shower with mold I couldn't seem to get rid of, which I now know is symptomatic of a leaking shower pan.

    I think this is going to have to be taken up and redone. Thanks for your input and advice. I appreciate it and you've all been very helpful in helping me understand the process and the potential problems that could be at the root. I'm confident that my contractor will come through for us.

  • jmibc
    16 years ago
    last modified: 9 years ago

    funny thing... i was searching online because i am a general contractor and have a job that i just finished with the SAME PROBLEM. after reading about this, i realized, this is the job that i did.
    anyway, i will confirm that the hot mopping was done correctly, sloped prior to the mortar bed being installed. the hot mopping went up the walls 10" and was water tested over night before any tiling occurred. we removed the drain plug and all of the water drained out properly and there were no puddles left. - so i am sure the sloping was done correctly. I am unsure of the mix that was used under the tile, but i will find out. I have been racking my head on this one and called customs (the grout manuf.) today and spend 40 minutes of this guy telling me that it is normal for a natural stone shower with non sanded grout to discolor and stay discolored when the shower is in use. i have a hard time believing this. i have done bunches of bathrooms and have never heard this. when i asked him if they had any literature stating this he said no, and that if they did publish such info that they would be in trouble with all their natural stone suppliers. - anyway the shower heads were capped off and charged and there was no leaking in the plumbing.
    I don't know if the weep holes were filled with mortar or not, because i was not there when they did the floating, but how much of a space is needed between the weep holes and the mortar bed?
    I don't know if it matters, but the walls were done first and the floor last.
    I am leaning toward taking up the tiles around the drain and checking the weep holes, but am trying to do all my homework first to make sure the guy at customs was not right and that it is a situation that is just common to using a porous natural product on the floor of a shower that gets 10 inches of rain a day.
    any help would be appreciated.
    Josh

  • bill_vincent
    16 years ago
    last modified: 9 years ago

    I am unsure of the mix that was used under the tile, but i will find out.

    For the problem you're having, that's completely irrelevant. I know what keeth was driving at-- with a mortar mix instead of dry pack or sand mix, there's more lime in the mix which might be leeching up. Even if that IS the case, that wouldn't be the problem-- only a symptom.

    this guy telling me that it is normal for a natural stone shower with non sanded grout to discolor and stay discolored when the shower is in use.

    Horsehockey-- that's called CYA. It's the very first thing all Custom reps are taught when they're first employed. The funny thing is in this case, I don't believe the grout has anything to do with the problem, other than showing it up! The moron just showed Custom's wonderful customer service policies for nothing.

    I don't know if the weep holes were filled with mortar or not, because i was not there when they did the floating, but how much of a space is needed between the weep holes and the mortar bed?

    What's normally done is a handfull of gravel or spacers is put over the weepholes before applying the drypack. Personally I don't se the difference. Water's going to filter thru the mortar whether it's right on top of the weepholes, or a few 16th's away from them, but that's the spec.

    I don't know if it matters, but the walls were done first and the floor last.

    Doesn't matter.

    I am leaning toward taking up the tiles around the drain and checking the weep holes...

    Seems to me that would be your best bet.

  • jmibc
    16 years ago
    last modified: 9 years ago

    thanks for the reply.

    say i take up the tiles around the drain and find the weep holes open. any other ideas of what to look for?

    do you think that the hairline crack around the perimeter is causing more water to enter than can be reasonably weeped out?

    again i am committed to solving this, i just don't want to cause the customer more hardship than is absolutely necessary. they have been through enough already.

    and i certainly don't want to re do the floor and end up
    with the same problem.

    thanks again. Josh

  • bill_vincent
    16 years ago
    last modified: 9 years ago

    do you think that the hairline crack around the perimeter is causing more water to enter than can be reasonably weeped out?

    Not at all. You'd be surprised just how much water DOES get through the grout, even in good condition. Either way, even if your supposition were correct, it CERTAINLY wouldn't take 2 WEEKS for the pan to empty out afterward.

    I have a feeling when you open up the floor, you're going to spend some time having to drain it, or every time the hammer hits (once you break thru the surface), you're going to get splashed. (been there, done that!) But once you're down to the weepholes, I'm so sure I'm almost willing to bet that they'll be clogged. Once you clear them, run the shower for a while, and see if the "well" you've created around the drain empties. If it does, put a little pea gravel or spacers over them, and remud and tile it, and you should be good.

  • keeth
    16 years ago
    last modified: 9 years ago

    Josh- if you keep the water out, the weep holes are not a key issue. (See my post on 4/8) Did everyone forget about the grout separation at the plumbing wall? The mix will prove to be the problem here- I feel strongly you will find a rich mortar mix with lime. Too much portland shrinks and pulls away from walls, also being too strong for the application and it does not have adequate permeability. Water will hold in tile/grout and maintain a wet appearance. Okay-so what we have here is a bad mud base that has compromised the finish floor. See my original recommendations. keeth

  • jmibc
    16 years ago
    last modified: 9 years ago

    there was some evidence found yesterday leading us to believe that the weep holes are indeed clogged. so..

    ill be out there tomorrow and open it up. thanks for all the info. ill take some photos and respond to what is found. thanks again.

    josh

  • scottmel
    16 years ago
    last modified: 9 years ago

    Josh - can you tell me what you did to determine that the weep holes were indeed clogged without removing the tile? Thanks Melissa

  • coachark
    16 years ago
    last modified: 9 years ago

    This problem is the same one I am having only my shower is 5 years old....can't go back to the contractor. Just had a contractor who is a stone and tile specialist come out and tell me that he will need to dig out the grout along the bottom floor walls and then caulk. We discovered that the corner seat that goes to the floor is wood under the tile. He is going to dig out the grout on the seat and up the adjoining walls where the water hits it and replace the cement grout with epoxy grout in order to prevent further water penetration because sealer would be a poor water barrier. He warned us that the epoxy grout might not match exactly, but ripping out the shower is not an option for us at this time due to another remodel we are about to begin. He told us about the possible problems with the pan installation and they match exactly what was said in this post.
    There is an art to creating tile showers and the lesson we have learned is to know the proper steps, find contractors who know these steps, and then monitor to make sure these steps are followed. We learned the hard way.

  • bill_vincent
    16 years ago
    last modified: 9 years ago

    coachark-- I'm sure you realise that the epoxy grout will only be remediation at best, that this IS going to have to come out sooner or later. Without the proper waterproofing, which would go out onto the surrouonding walls, no matter what you do that seat is susceptable to water damage.

    scottmel-- Just the fact that the shower pan fills up with water and stays wet long after the shower's been used (UNDER the tile and in the grout joints) is a pretty clear sign.

  • coachark
    16 years ago
    last modified: 9 years ago

    Thanks, Bill. We are still discussing this. After reading this post we have some more questions for our contractor before we give the okay. I believe you are correct and I just don't know if we can afford the amount it will take to do the extensive redo at this time as the next bathroom remodel is due to start in May....total regut due to plumbing leak.
    This contractor has also suggested using epoxy grout in the new bathroom. Do you have thoughts on the pros and cons of epoxy with new tile installation? We have never used it before.

  • bill_vincent
    16 years ago
    last modified: 9 years ago

    In my way of thinking, epoxy, although it's all the adds say it is, for my money, it's expensive overkill in residential applications (about 4-5 times the cost of comventional grouts, including the installation upcharge). If you need to rely on it to make sure your shower doesn't leak, then I'd say it's time to switch installers. Where abouts are you?

  • jmibc
    16 years ago
    last modified: 9 years ago

    well...

    first of all to inspect the weep holes we simply removed the drain grate and used a dental type mirror. we lowered it into the drain hole and were able to get a pretty good look at them from the back side. they looked like they had mortar in them, but not any hot mop/waterproofing.

    so we removed about 1 sq foot from around the drain. nothing looked to bad, but there was no gravel, spacers, etc.. just drypack (sand and lime free cement) right up to the drain.
    now keep in mind that the shower has not been used for 19 days at this point, and had only been used for 14 days prior to that.

    the drypack was damp, but not saturated, we were hopeful that after a day or so the water would weep through the mortar bed, be visible on the exposed waterproofing, make its way to the drain and dry out the grout etc...

    well 30 hours later the edges of the exposed mortar bed are damp to the touch, but there is no visible water, and the grout has not dried out. So I am concerned that the mortar bed does not allow adequate drainage to be used in this application.

    i am wondering first of all how long should it take a properly mixed mortar bed to weep the water out of it? secondly if it is more than a few hours, than how can it be expected to allow the floor to dry out and not cause the grout to remain wet looking?
    lastly, if the mortar is not expected to dry our very fast, i was considering two different options.
    first was to install a drainage mat below the mortar bed that would allow the water to freely trave to the drain.
    second was to install a waterproofing -like antifracture membrane to the surface of the mortar bed and just below the thinset to keep the water form getting that deep in the first place.

    any advice on if either of these solutions could work?

    if i have to remove the whole floor i am not going to put it down the same way again, trusting that the mortar was improperly mixed, because i honestly don't see how the water can drain through it that quickly no mater how much sand you put in it.

    i have done dozens of floors, always using the antifracture membrane and then thinsetting directly to that, and have never had this problem. The tiler that i used on this job prefered this method and, not knowing any better i assumed that it would work fine, but there is clearly more water in the pan than is desirable and where this might have been ok for ceramic or porcelain, it does not seem to be adequate for natural travertine.

    thanks for all the great advice so far and for any addition input.

    Josh

    here are the links for the antifracture membrane and drainage mat.

    Here is a link that might be useful: antifracture membrane

  • jmibc
    16 years ago
    last modified: 9 years ago

    sorry for not having any pics. i forgot my camera, the customer did take some, but i haven't gotten copies of them. i hope they will be posted soon.

    here's the drainage mat link

    Josh

    Here is a link that might be useful: Drainage mat

  • bill_vincent
    16 years ago
    last modified: 9 years ago

    i am wondering first of all how long should it take a properly mixed mortar bed to weep the water out of it? secondly if it is more than a few hours, than how can it be expected to allow the floor to dry out and not cause the grout to remain wet looking?

    The entire bed will take probably a few hours to dry out. However, the grout, being that it's on top, and water will follow gravity, should be dry within a matter of 15-20 minutes after using the shower. One thing I haven't seen mentioned is a good high cfm vent fan. That'll actually do more to dry out that shower pan than any drainage mat. As for the surface membrane, I'm familiar with Protectowrap, and it's a good product, as well as another one exactly like it called ECB. The problem, in this case, is there's no way to attach it to the drain. If this is the route you want to go, look into a product from Schluter called Kerdi. part of the system is a PVC drain that has a halo that the membrane attaches to ON TOP of the mud bed, so that the only thing that gets wet is the tile and grout. EVerything else stays perfectly dry, and then there's not even a NEED for weepholes.

    As for the mud bed, the only reason it would be holding water is if there was an additive used in mixing, and I can't see that happening.

    The tiler that i used on this job prefered this method and, not knowing any better i assumed that it would work fine, but there is clearly more water in the pan than is desirable and where this might have been ok for ceramic or porcelain, it does not seem to be adequate for natural travertine.

    What your tile installer is doing is a conventional mud pan, with a twist-- very few who know the membrane has to be presloped, which means you're ahead of the game from most. From everything you've told me so far, I can't find fault with what he's done, other than no gravel or spacers around the weepholes. He used dry pack, so there's not excess lime in the mix, the membrane was presloped-- just about everything was done right, and there should be MORE than enough drainage for travertine or any OTHER kind of tile or stone.

  • twotzus
    Original Author
    16 years ago
    last modified: 9 years ago

    Josh, Sorry, I used my daughter's camera yesterday and she took it with her on a sleepover tonight, so...I dragged out my old clunker Sony, and these are the pictures I took tonight.

    Melissa, in this picture you can see a weephole at 7 o'clock. If you take the drain cover off and shine a flashlight down, you might be able to see if they are clogged.

    src>
    Here's one closer up of the mortar bed. You can see that it is damp and feels somewhat wet to the touch.
    src>
    And here is an even closer one. You can see the darker grey damp and lighter areas which are drier. I wish this old clunker took better close-ups!
    src>

    Thanks again for all your help!

  • keeth
    16 years ago
    last modified: 9 years ago

    Josh,
    Put some water in that drain-what is the resting water depth from the bottom of the pan? If the p-trap is hugging the bottom of the pan you may not have a good potential of clearing the drain. Next try some dynamics. Run a hose with the shower head flow rate (2-3 gpm) in the drain. Hold the hose about 12 inches from the drain (you want volume not velocity). Does the water move effectively throught the drain or does is seek a level above the pan elevation? Ask yourself this question: when the shower is running which way is water moving though the weep holes? Was the mud base hard or soft to breakout? Did it crumble? You are getting closer. keeth

  • jmibc
    16 years ago
    last modified: 9 years ago

    thanks for all the help figuring this out.

    the p trap is about 6-8" below the pan. the water level in the drain sits at about 3" below the pan level. you can actually see the water level in the top photo from the demo photos that were posted.

    I am sure that the pan was not level and that both the surface of the tile and the surface of the pan were adequately sloped to keep water from puddling or collecting anywhere.

    the mud base was pretty hard though. i first tried to dig it out with a hammer and chisel, but it seemed that i had to hit it pretty hard to dig at it, and i was afraid of causing the rest of the floor to crack, so i used my electric chipping hammer to remove it. if you hold a piece of it in your hand and really work at it you can get it to break apart, but i would not say it is crumbly.

    does this sound like the right mix?

    josh

  • coachark
    16 years ago
    last modified: 9 years ago

    Bill, thank you for your thoughts on the epoxy. We live in the Pacific Northwest and we have really hard water with lots of mineral build-up issues. I believe the contractor thought the epoxy might be less upkeep due to our desire to stay in our home as long as possible as we age plus the fact that we are now raising a young grandson who will be using this new bathroom. Perhaps I should start another post asking if the cost of epoxy really was worth it in the end for home owners?

    Former issue: After continuing to read the posts, we are going to ask the contractor what the cost would be to tear out the bench and pan in the exisiting shower and put in a proper bench. I also believe we may have a similar pan/ drain issue just like the original poster described....could be weeping hole problem or incorrect pan installation. My sleepless nights are increasing:)

  • jakkom
    16 years ago
    last modified: 9 years ago

    Slightly OT - Bill, I hope you never leave this board. It's amazing how much we have all learned from you! Thank you for the enormous amount of time you so generously spend helping people here. It's truly amazing!

    That said, I have to confess, until we find some way of cloning Bill V so that there's at least half a dozen of him in every single major city, we copped out and got a solid surface showerpan in our master bath shower ;))

  • keeth
    16 years ago
    last modified: 9 years ago

    Josh,
    It is difficult to say if the mix is too rich. You can put some breakout in a bucket of water and see how much absorbs. A good mud base will hold nearly it's weight in water. It should drain quickly. You should be able to take a screwdriver and twist through it. A rich mix will hold little water and drains poorly. Did you check the drain with water flow? Does the water maintain a level below the pan? From your photos it appears the top half of the drain assembly was sealed to the membrane- can you confirm? keeth

  • jmibc
    16 years ago
    last modified: 9 years ago

    the top of the drain was installed after the waterproofing was dry, the weep holes are completely open and were not even attached while the hot mopping took place.

    i have not been back to check the water flow, but am fairly confident that it is not an issue. the trap was replaced and the drain was kept plugged until the tiling was completed.

    i have to say that unless you were to put all of your weight on it and really work it, you could not get a screwdriver through the mortar. i have a small piece of it and will weigh it , soak it and weigh it again, and see how long it takes to get back to the original weight.

    thanks again,
    josh

  • scottmel
    16 years ago
    last modified: 9 years ago

    Am I in the same boat as Josh, Bill???? My shower floor is the same type as this person's - I don't have that odd white discoloration though and no cracked grout along edges. What I do have though is darkened grout near the middle of the shower - size of a dinner plate. Shower is 6 months old. I am shaking in fear that the weep holes are plugged. HOW can I determine if they are? I took off the drain and used the little dental mirror down there, hard for me to tell. I too am a PTA president and clueless on tile talk!!! :) Is there a sure fire test to run to see if I have this issue? I am in Western Pa - any recommendations you have on anyone out this way that could determine if I have an issue and fix it? The discolored grout has me uneasy. Not A TON of it but enough around the drain area, etc. to have me nervous...thanks melissa

  • bill_vincent
    16 years ago
    last modified: 9 years ago

    Hi Melissa--. It sounds like it might be a possibility. There's no real way to check without opening up right around the drain. Let me ask you-- do you have another shower you can use for a few days?

  • scottmel
    16 years ago
    last modified: 9 years ago

    Thx for the note back, Bill. Yes I do have another shower. How many days should I let this dry out? Give me my WORST case - calm my fears - IF there is water under there - is this a 1k repair job or am I jumping the gun? ASSUME I have problems - do you know anyone in Western PA to help? I will stop using the shower now and await further instructions!!! Thanks Melissa

  • bill_vincent
    16 years ago
    last modified: 9 years ago

    Let it go for about a week. In the mean time, shoot me an email with your town. I know you've told me once before, but it's this old age CRS syndrome thing. :-) I think I just might be able to locate someone for you, and then you can have someone right there to check it out.

  • scottmel
    16 years ago
    last modified: 9 years ago

    Thanks Bill! Hope you get this message. I did email you direct with my problem about a week ago but I know you are ONE busy man!!!! So when I didn't hear back I posted here...I will email you again but if for some reason I am ending up in your spam folder my email is SCOTTMEL@ZBZOOM.NET - thanks a million. Your awesome...Melissa

  • bill_vincent
    16 years ago
    last modified: 9 years ago

    Melissa-- you have mail. :-)

  • jmibc
    16 years ago
    last modified: 9 years ago

    well,

    today i met with a forensic tile expert.

    he examined everything and deducted that the mortar bed was
    incorrectly mixed (probably to wet and without any antihydro?). (see keith's message from 4/11)

    to confirm this we removed another tile one of the furthest ones from the drain, chipped out the thinset, and filled the spot with water. (this was maybe 3/8" deep). the water did not soak in for about 5 minutes and was never seen at the drain. i was told that the water should soak right in and be seen at the drain after only a few minutes.

    so after confronting my tile setter with this information,
    he has agreed to come back, remove the tile and mortar bed,
    re water test overnight (to make sure there was no damage from the removal of the tile, and re install the floor with the correct mixture. he swears that he always uses this mixture (30 years experience) and never has any problems.
    (maybe not with dense porcelain, but i bet there would be with porous natural stone, especially since his initial reaction was "this always happens, it is normal, and nothing can be done to fix it")

    so we will get the recommended mixture from the forensic specialist and have him use that.

    ironically, this is the first bathroom that i subbed out the tiling on, because of this exact issue. i have never had a problem in the past, but i don't have the experience to be able to get the floor to drain perfectly. At lest i know alot more now than when i started, and according to an old boss of mine "the only bad day is a day that you don't learn something". i should have known better than to trust anyone who claims they "know everything about their trade, and never makes mistakes".
    thanks for all of the help on this, it is greatly appreciated.

    Josh

    and for anyone who is wondering, i got 2 estimates on the forensic work one was $800. and the one i hired was $180.

  • keeth
    16 years ago
    last modified: 9 years ago

    Josh,
    Good work, perserverence has paid off. This problem got my attention from the very start since I have seen this problem in tear-outs. Many "professionals" use pre-mixed mortar or sand mix as a shortcut instead of using the correct sand and portland ratio. Although my business includes bath remodels, my background is engineering. That, and 21 years experience led me to suspect that the problem revolved around the mix and not the weep holes, sealer, preslope or any of the other possibilities suggested. I'm sure your customer appreciates your work and is justly confident that you've taken care of them well.

  • coachark
    16 years ago
    last modified: 9 years ago

    Well, this post and the advice from many of you led us to rethink having the epoxy grout fix done. Bill V. warned us that it was a temporary fix and the pictures teotzuz posted looked similar to our grout problem on the floor. Our contractor just gave us an estimate of $3,400. to tear out the bench, floor, and 18" up the walls in order to do a complete replacement. He will put in a new waterproof pan(the correct way), new cement block bench, new cement board, and install the tile. We have been impressed with his knowledge as it has matched the advice on this post.
    Bill and Mongo, can you please tell me if the estimate sounds in the ball park? It is a 4.5'x 6.5' shower.

  • bill_vincent
    16 years ago
    last modified: 9 years ago

    For a shower that size, it's well within reason.

  • coachark
    16 years ago
    last modified: 9 years ago

    Many thanks, Bill. We are going ahead with the complete repair and it is great to have had this kind of support from you as well as others.

  • weedyacres
    16 years ago
    last modified: 9 years ago

    This has been a fascinating thread. Thanks for sharing, everyone. And I'm glad it had a happy ending. :-)

  • twotzus
    Original Author
    16 years ago
    last modified: 9 years ago

    And thank you all for all of your advice. Especially Bill, Keith and Mongo. Josh has been great through this (I already told you this, Josh) and I know there are alot of contractors out there who would not have spent the time or effort to get to the bottom of this. But we always had complete confidence that it would get resolved. And I hope this topic can be helpful to anybody who thinks they might have the same problem. Thanks again!

  • scottmel
    16 years ago
    last modified: 9 years ago

    Well as I posted earlier in this thread, I was fearing I was holding water in my shower bed. I have not used the shower for 8 days and nothing has really changed. Is this good or bad? When I put that grout sealer all over the floor in July - I really feel I followed those directions well - a metalic haze of sorts made the floor look glossy. If this is just cosmetic I can handle it but I wanted to make sure it was not a bigger problem. Last week - before I halted use of the shower, I used Posforic Acid (spelling?) to address a rust stain I got in the shower due to water sitting in the hose of the handheld. So I called Aquamix today and they told me I should have treated the ENTIRE shower floor with this acid just to keep the floor consistant. THEN I should use the nano product they sell to scrub it really good in case I have some left over grout sealer, etc. on the floor. My question now is this - I have already gone thru 7 days of not using that shower. SHould I continue not using it and keep watch over it or get it wet with the acid and nano treatment? I would prefer for peace of mind for someone to look at the shower to confirm all is ok but am afraid to get ill advice from someone out of the yellow pages....So should I go for the aqua mix experiment or keep letting it dry? THanks! Melissa

  • bill_vincent
    16 years ago
    last modified: 9 years ago

    If there's no change at all by now, I'd be inclined it's not a problem with the pan, but rather a discoloring problem, especially being that you used the acid on the floor. Go ahead and try Aquamix's trick and see what happens.

  • scottmel
    16 years ago
    last modified: 9 years ago

    I might give it 2 more days Bill to be certain. I just can't tell. Put it to you this way there is not OBVIOUS change that jumps out. It is like watching grass grow...I still see areas of discoloration and I guess it is the same as before. I even took pics before and still can't tell. Nothing jumps out as "oh it looks different"...By your best guess, if it was a pan problem, after how many days would you assume it all to be TOTALLY dry....I get paranoid, you know. Now I look up the sides of the walls and there is slight marking on the grout lines where the shower floor meets the shower walls - but it might have been there from day one and I never noticed it. Now I study this shower...Just let me know at what point you are comfortable saying "shower is dry, all grout should be dried, water is gone and any markings you see on the floor or side walls are discoloring"....THANKS!

  • scottmel
    16 years ago
    last modified: 9 years ago

    And just so I am clear, Bill, the funny hazy looking problem was there from the get go. The rust issue was recent but I still noticed the odd discolored grout joints BEFORE using the rust treatment. But it is like once I used this rust treatment it really lightened the grout in the areas where the rust was making this area of the shower jump out at you. The problem with the discolored grout/shiny tiles was pretty much in the center of the floor. Which this still remains....I just wanted to be clear that the ACID remedy happened even after I noticed the discoloration on the grout - meaning I didnt' do the Acid THEN notice the discoloration...Just made it jump more!

  • diyhandyman
    16 years ago
    last modified: 9 years ago

    looking for answers to my own problem i stumbled across this posting. i have the same "wet spots" in my shower. i did all the work myself folowing the home depot how to book, but i didnt slope the floor under the shower pan(my brother in law said it wasnt nessesary) it drys up in about a week but of course as soon as we use it it looks like crap. i was told the same "thats just how it is " , but now were noticing a moldy smell. could this just be that i clogged the weep holes or am i gonna have to tear it up and do it over? any help or suggestions would be greatly appreciated!

  • scottmel
    16 years ago
    last modified: 9 years ago

    Diyhandyman - I hope you find this thread useful. It hhas helped me quite a bit!There is another site that is great for shower info: www.johnbridge.com It is strictly about ceramic tiling so naturally you will see a lot of stuff on that site you may not see on this site. I frequent both sites (bridge and here..) and both are amazing sources of information!!!

  • margomia
    15 years ago
    last modified: 9 years ago

    I've tiled my own two bathrooms and my kitchen backsplash, so when my adult daughter's shower sprung a leak at her "new" (circa 1950) home, DH & I came to the rescue. Ripped out the whole tub surround (it gave up without a fight), fixed the plumbing, reinsulated, added backerboard, taped, mudded and commenced to tiling. Got complicated around the tub; being an old steel tub, it has about a 1" flange around the top edges as though it's supposed to bolt to something? We ran the backerboard down to within 1/4th" of that flange, did the tape /mud/dry time thing and then commenced to tiling. When I got to the grout, I must say, the grout was a tad drier than I'd liked for it to be, but I worked quickly and thought I'd done okay. We spaced the bottom row of tile to cover that backerboard/flange gap, which it did okay. Then I left my daughters to finish grouting the normal 1/4th gap around the edge of the tub. I would have used caulk, but since the gap varied some, the girls used the regular grout to finish off that bottom edge and the corners. Are you with me so far? It looked really nice. Now I notice a lot of little tiny cracks in the grout all over and I'm thinking I'll be okay to just smash in another coat of it. (She hasn't used any tile sealer, yet.) EXCEPT.........she called tonite to say the whole bottom row of that grout is soaking wet, coming out in big soggy clumps and some of the tile with it. My thoughts are that she didn't let the tile cure enough before going in and using it, so now we need to pull out all the soggy stuff and redo it from there. So, the questions are: did we handle the backerboard/tile/grout around that flange right? Or is there just enough movement in a steel tub to disallow a grout (vs caulk) to flex. If that makes any sense.......And the second question is: am I on the right track to fix it? How long does it REALLY take for tile to cure enough to take a shower? Please tell me I don't have to take down this whole job.....this is a single mother with a TEENAGE daughter who will just DIE if she doesn't get to shower.
    Thanks for reading this far.............
    mm

  • snulton
    15 years ago
    last modified: 9 years ago

    I find it interesting that all the reasons indicated are that something other than the grout itself is the problem.

    There may be no one who reads this but, let me give my feedback anyway.

    Three years ago our company did a bath remodel with new stall shower on a hot mopped pan. Travertine tile with Custom sanded Quartz grout and matching sanded calk at the horizontal to vertical joints. We had a licensed tile contractor perform the work and after the grout dried and was sealed the grout all looked consistant until the owner showered in it. The original thought was that the grout wasn't mixed correctly. after the grout was removed, the pan was allowed to dry for one week (summer in Sacramento) and re-grouted. The same thing happened again.

    I considered that the pan although sloped properly may not have been mopped smoothly.

    Fast forward to today. We just completed a bath remodel with stall shower using a ceramic tile that is the same color as travertine and using Custom sanded Faun grout. This time the pan and wall system are Wedi. the pan is presloped and in plane (no variations in the surface), the tile installer is an employee who does all our tile work, and after the tile was set and a 2 day drying time was allowed. After the tile was grouted and allowed to dry, it was sealed. After drying for one week the grout was a consistant color. The owner took the first shower and the crout was mottled after it dried. There are no plumbing leaks causing this and the pan system works as it was designed.

    I think that this is a flaw in the formulation of the Custom light tan colored grouts.

  • reeder_nancy_gmail_com
    13 years ago
    last modified: 9 years ago

    I have a new tiled shower floor and walls and bathroom floors and appears as there was no sealer applied. Now the shower grout,after drying out for a week has darked areas where water gets to while in use. Can the contractor clean grout now and seal? Would no sealant cause discoloration in the grout? When wiping grout there is dusty powder residue and is this because he did not seal the grout? He also did not wipe all grout off tiles so it has hardened. How can this be removed without scratching tile?

  • Janie2K
    9 years ago
    last modified: 9 years ago

    Glad to find this forum on bathroom tile. I too am questioning the install of our new shower tile. It seems to discolor in areas, Some parts never dry completely. I thought it was dirt, it isn’t. See the drain photo, yes I am aware a piece chipped out two days after it was done. Would this make water go under tile? Non sanded grout was used, installer claims he sealed it. He floated the tile, the squares were on a sheet. I saw him with a sponge and small cup, 5 minutes later he was done with “sealing it”. I chose light color grout for a reason, I wanted it to look light, clean and new. This doesn’t look right to me. Called my general contractor, who did not do the work. He said he would come look, the first time I asked him about it when on the job he said it just “needs to dry after shower”. I do not know what to do. Should I have them come back and rip it out? Or should I get another company to give me an opinion first? Please advise. I need to post two more photos in next post. Thank you, please help ASAP...

  • Janie2K
    9 years ago
    last modified: 9 years ago

    Here is another photo from previous post…
    Notice the drain has grout missing.

    Jane

  • maddy127
    8 years ago
    last modified: 8 years ago

    1-13-15 Hello everyone! Oddly enuf I was on line looking for the reason why our less than one year old shower which was installed by pros has uneven and discolored grout. Our tile is gray light on walls and dark on the floor. We were told in the beginning that this was normal and would even out. That it was self sealing grout - ugh no.....We thought it was our water in Charlotte being so heavily chlorinated - we installed a filter on the shower head. No plumbing was done when the new shower was installed so we knew nothing was leaking. After multiple attempts at trying to clean what I thought was mildew stains - nothing worked, I continued to call the installer of the shower. Having not heard back from him after multiple calls - he's always busy! - I called the company where we purchased the tile and whose sub did the work. I just sent him photos of the mess and he called me immediately stating he would come by in a couple of days for sure. The funny thing is - exactly what is described above in this thread is exactly what my shower looks like, right down to the chip of tile and no grout at the drain site! Our little "foot" stool (triangle shaped) has also falled apart - the grout apparently came out while we showered. I sure hope that this problem can be figured out and resolved soon!