


How Often to Sharpen Chainsaw??
cmego2_thunder
16 years ago
Featured Answer
Sort by:Oldest
Comments (11)

joecool85
16 years agoRelated Discussions
Electric Chainsaw Sharpener???
Comments (21)I had bought the Harbor Freight grinder and found the same sloppy tab that is suppose to stop and position the cutter for clamping. It also has enough side to side play that you would have to re-adjust for doing the left side and right side cutters. I tweaked mine and it made a big time improvement. First remove the clip from the plastic pivot and then remove the chain stop. I put it in a vice and slightly tightened the curl. I then clamped it in the vise to hold the curl and could see the arm was pointing to one side. I nudged the arm so that it was squared to the curl. Removed some of the burrs from inside the curl with a round file and put it back on the grinder. The stop tab now stays near enough to center that I don't adjust for each side anymore. I'm using my saw for clearing stumps around my few acres and I rock the chain constantly. I ran an Oregon grinder in my uncle's shop many years ago and while there is no comparison, this grinder does a good job to bring the chain back to usable condition. To help your sharpening technique, learn to always grip the grinder in the same place and pull the grinder down with the same arm motion and you won't flex the plastic housing mounts to get noticable variations in the chain. I do have multiple chains and if I were to be going somewhere to cut, I'd take a few. But for stumping work I use only one chain therefore the sharpener is already set waiting to grind without having to reset and re-adjust all the stops. I make a few extra trips back and forth to my garage this way but I'm getting old and need to take the extra breaks anyway....See MoreSharpening chainsaw chains
Comments (40)Hi Jakester, Sorry to hear about the loss of your son. You don`t really need a manual for your Nick. As I recall the only adjustments on your Nick are for the topplate angle, wheel depth, and tooth length. Adjust the topplate angle to something between 25 and 30 degrees, this angle isn`t crucial but maintain symmetry on both sides. Then set the depth so that the radius on the wheel edge goes into the sideplate but the inside of the topplate is just contacted by the straight side of the wheel. From the outside of a perfectly ground tooth it will be imperceptible but from the inside the junction between the top and side plates, which is known as the "working corner", will be bisected by the straight line formed by the side of the wheel. If you don`t set the wheel deep enough it will form a topplate that is very sharp but fragile on the leading edge but blunt just beyond. Set the wheel too deep and you will get too much hook which makes the chain grabby and power hungry. Start grinding on your most damaged or shortest tooth. Take a very light cut on each tooth on that side, reset the length stop, and grind each tooth on that side again. Repeat this process until all damage or dullness is ground from each tooth then start the process on the other side. To check that the teeth or even length from side to side simply fold a chain in your hand and place the backs of a couple of teeth together. It is completely unnecessary to first grind one side, pivot the vise and grind the other side in a mostly futile attempt to grind both sides to an even length. Only the best grinders like a Silvey 510 will reliably grind evenly from side to side. Just accept the limitations of the Nick and work accordingly. Don`t forget to dress the wheel to maintain the shape and expose sharp crystals as you grind. You will probably be able to do a complete side on a chain before dressing if you take a light cut. If the teeth turn blue while grinding you are either using a dull wheel or trying to take too much off the tooth in one pass. Also remember to lower your depth gauges periodically....See MoreHow long should a chain on a chainsaw last in oak please?
Comments (50)Dirt and fine saw dust mixed with oil will eventually plug up the bar and oil feeder holes. Even if you don't hit dirt, dirt still inbedded in the bark. Caked up debri will also lodge in and around the clutch area and cover. The other BIG mistake is not keeping the slack adjusted out of the chain. Which usually has to be done about every tank full of gas. You must clean you chain and bar regularly, Now for me thats at least every other use. I can't stand a dirty saw. You can look at the chain and if the wood is burnt on to the teeth and you have to take a pocket knife and scrape it off you chain getting little oil. even if I am very careful not letting my chain hit dirt it still needs to be cleaned after a days use. this included removing the bar running a wire or small screwdriver down the bar groove knocking all the stuck junk out. I use carb. cleaner it works great for me. I also hang my chain up and spray it down then scrub it with a nylon or brass brush, now that I got the bar and chain pristine clean, I crank up the air compressor and blow out the clutch, clutch cover, around the cooling fins, and exit slot on the pull rope side. Now I reassemble, adjust the chain tension, and hit the chain teeth about 3 or 4 strokes with a file. Now the saw is clean, sharp, and ready for storage till my next cutting job. IMO the worse thing you can do is put your equipment up dirty, especially if it's not used often. We've all seen them the mower decks with the big grass lumps on top of them, chain saws with the big burnt spots on the bar ect.... Now to answer the question how long the chain will last????? Till you sharpen the teeth off of them or they get sharpen down to a nub and break off. that's how long the will last. some will say this is overkill, but for me I like a well preforming piece of equipment, just makes the job easier IMO....See MoreIs adjusting Mid Grade Chainsaw’s chains with a depth Gauge normal?
Comments (5)Thanks! On my scale of cutting, I have never had this issue with my 16” saws. Not only do I have the gauge and know the process since the 70s I have never seen a need. We have files and we were taught to use them. But! Both of us spoiled ourselves in 1984 by purchasing electric Dermal type sharpeners. I started making and adjusting my chains about 84 for economical reasons. It was not unusual to ruin a chain and bar cutting wood that was cleared and pushed to cause dirt to be in the bark. If I got 2-3 cords out of a chain and bar I felt I broke even. I did minimal cutting in the fields and would let it Rain on the wood 2-3 weeks before cutting to 16” at home. Then I struck oil “In Texas”! When a close Rancher had many trees on his Small Horse Ranch I was free to cut all the standing dead oaks or Dangerous oaks to his horses I needed or wants. The property was loaded due to not draining well and causing root rot. He kept his horses inside during storms because the wind could take some down. Some were not as alive as they looked, which was not a fun lesson. I had learned to purchase good used chains, New chain stock and make up my own chains. Plus Purchase only Laser tip bas vs bearings. On one Flea Market Purchase I found a bargain of new stock to make 6 chains, 6 chains that adjusted to my saw for 2.00 “Total”. My local Chain Vender/Friend had a Closing Sale. I wanted to purchase 6-8 links to make or adjust chains to my size chains. For the sale price of the 6-8 links, he passed me the entire sorted case for that price. I have been teaching the process to friends since because I will never use all the Links. Too much to spell check or believe. LOL!...See Morebarbedwire
16 years agorcmoser
16 years agobiglumber
16 years agojbopp14
16 years agocomputeruser
16 years agogiventake
16 years agossewalk1
6 years agologer_gw
6 years agolast modified: 6 years agossewalk1
6 years ago
Related Stories

PRODUCT PICKSGuest Picks: Sharpen Your Home's Look With Sea Urchin Decor
Get right to the point with accessories and fabrics inspired by these prickly, spiny sea creatures
Full Story
GARDENING GUIDESRocky Mountain Gardener's September Checklist
Sharpen your spade and grab your gloves — warm days and cool nights in the garden mean it's planting time
Full Story
WINTER GARDENINGPruning Secrets for Exquisite Roses
Encourage gorgeous blooms year after year with this time-tested advice on how to prune your rosebush in winter for health and shape
Full Story
NORTHWEST GARDENINGPacific Northwest Gardener's March Checklist
Prepare for edible harvests and invite feathered friends to the garden — offering them slugs for lunch is entirely up to you
Full Story
SOUTHWEST GARDENINGSouthwest Gardener's May Checklist
Let May's warm temperatures guide your edible and flowering garden plantings, and don't forget to protect and prune your picks
Full Story
LIFETop 10 Unsung Organizing Tools
Look no farther than your drawers, closets or purse for the best and cheapest ways to keep your home neat and organized
Full Story
KITCHEN DESIGNCreate Your Own Checklist for a Well-Stocked Kitchen
Personalize the kitchen with your own must-haves from our list of top cooking tools, small appliances, pots, pans and more
Full Story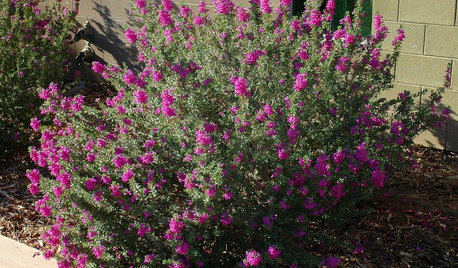
GARDENING GUIDESGreat Design Plant: Texas Ranger Explodes With Color
If purple is your passion, embrace Leucophyllum frutescens for its profusion of blooms and consider the unfussiness a bonus
Full Story
BEDROOMSHow to Decorate Your Small Bedroom
Dreaming your tiny bedroom had space for more than a bed? Or your guest room was more than a dumping ground? Then read on
Full Story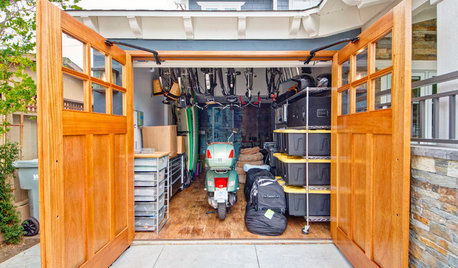
GARAGESHouzz Call: How Do You Put Your Garage to Work for Your Home?
Cars, storage, crafts, relaxing ... all of the above? Upload a photo of your garage and tell us how it performs as a workhorse
Full Story
tomplum