


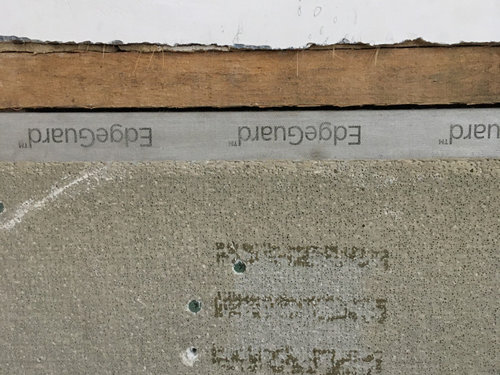
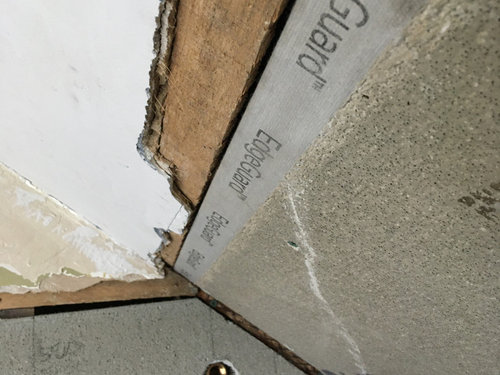
Durock meets lath prepping for tadelakt plaster bathroom
jeremy hyman
3 years ago
last modified: 3 years ago
Featured Answer
Sort by:Oldest
Comments (7)
Related Discussions
Membranes . . .
Comments (14)Katie have your install review this video from Quick Drain USA. A self curing mortar like Granirapid should be used in my opinion if you plan to set the Quick Slope and Nobel TS in one day. With a wood subfloor installation some extra framing or "Back Framing" can stiffen up the assembly and you should insure your floor meets a L/720 deflection rating if natural stone or large format tile will be used. Mapei's Mapecem Screed Mortar is a wonderful premium shower pan mortar that can be covered with sheet membranes in as little as 16-18 hours. This with a proper slurry coat makes an excellent filler for those waffles in my opinion. I have used a few roofing nails as well and these can help pin the Quick Slope in position but are not spec'd nor require I believe. With a gently "Love Tap" from a hammer they should be set below the finished height of the panel. Good Luck. Here we set the Nobel TS to the Quick Slope with Rapid Set thinset and the remain shower received Mapecem Screed Mortar - Fast Set. Remember when you measure to slope with a one way pitch any "level check" parallel to the drain needs to measure so the level is the same distance from the drain. With the install above my subfloor was a little out of wack so I fine tunned the grade with my Magnesium Float. When working with Mapecem Screed Mortars a Magnesium Float works best as it tends to stick to a wooden float. Here is a Nobel TS install. You can notice a couple of patches where i found a slight puncture mark. I did not do a good job of checking my screed mortar and believe I rolled the membrane to hard over a tiny stone. Always check for anything that looks suspect and patch as needed. A simple swatch of Nobel TS and some Nobel Sealant 150 and your good to go. Let your install dry out for 24-48 hours and then flood test. Here I used a 2" inflatable test plug. We flooded this shower out for 3 days. JW Here is a link that might be useful: Quick Drain USA Installation...See MoreBathroom tile and prep questions
Comments (5)"I have put the blue drywall behind where the vanity will go, I'm satisfied it's not going to get that wet, but around the shower and above it, I want to tile and thought I'd use backerboard or whatever the fibrecement sheeting is called....which leads to a couple of more questions -" "Blue" drywall...is that blueboard, or drywall typically used for veneer plaster applications? It can be finished with paper tape and joint compound, so it'll be fine in non-wet areas (wet areas being a shower or tub surround). For shower and tub surround walls, below 72" or below the height of the shower head, you don't want to use a drywall-type product. As you mentioned either a fiber-cement (hardieboard) or a true cement board (durock or wonderboard) would be used for the wet walls. The seams get finished with thinset and mesh-type fiberglass tape. In wet areas, above the 72" from the floor height, you can transition to a drywall-type product and paint the surface. Or continue the cement board and tile to the ceiling. Where you transition from the cement board to the drywall board, hide the horizontal seam behind the top course of wall tile. "1) I understand some drywall mud is suitable for tiling and some isn't, what's best, and should the backerboard stuff be mudded at all?" This will hopefully be an all-in-one reply: In wet areas, use cement board or fiber-cement board as the tile backer. For those seams use thinset and mesh tape. When you tile in a wet area, use thinset to adhere the tile to the cement backer board. In non-wet areas, the tile backer can be the items listed above, or you can go with regular drywall. Since the drywall will not be getting wet, those joints can be finished with joint compound and paper tape. For adhering ceramic tiles in non-wet areas, you can use thinset or mastic to adhere the tiles to the drywall. For adhering a natural stone in non-wet areas, you should use thinset, do not use mastic. Mastic can bleed through and discolor or stain the stone. "2) Can said mud be used for a transition join between the drywall and the backerboard? Can I tape the join, or is fibreglass tape (the mesh stuff) better?" For that transition seam you can use either; joint compound and paper tape, or thinset and joint compound. "4) I'm (ideally) keeping the original door jamb which means it finishes more or less flush with the drywall. Around the rest of the house I've used a plain, chunky square 4"x1" trim/skirting/doorframe. I figure I have to either affix the trim *before* the tiling because I assume the tiles will butt up against them. I thought about using parchment paper or similar to protect the trim edges when tiling then remove paper and silicone seal the edge (and maybe not attempt to grout up to the edge of the trim)" An easy way is to tack a scrap piece of wood in place where the trim will go. If your trim is 4", set the edge of the scrap piece of wood at the 4-1/8" line. Now tile right tight up against the piece of scrap wood. When tile is set, remove the scrap piece of wood. Install your 4" trim. You should now have a very nice 1/8" gap between the edge of the tile and the trim. Caulk that gap, as wood may move seasonally and the movement would cause grout to cracks. There are color and texture (sanded vs unsanded) caulks made to match most grout colors. "5) Am I crazy to leave the vinyl flooring when I'm doing virtually everything else? Vinyl is in good shape despite the work etc that went on around it, and it continues out into the hall unbroken so I'd have to redo a fair amount of flooring. I'd love to tile it but I figure walls are hard enough (haven't tiled a wall before) so floors might be a it much...besides, I'm thinking as long as I'm prepared to remove skirting, vanity and toilet, the floor could be redone later, if necessary....?" That's your call. If you think you might tile down the road, then plan for it now. Think of how thick your tiled floor might be. Example, if your existing subfloor is 3/4" plywood, there is probably something like 1/4" luan over that and your vinyl is on top of that. So on top of your existing subfloor you have maybe 1/4" plus 3/16", or just under a half-inch of "flooring". If you tile, you might need to remove all that half-inch of "flooring" and add half-inch underlayment, then either 1/8" ditra or 1/4" cement board, then your thinset and tile (1/8" plus 3/16"). So sort of worst case (and a total supposition) you'd be looking at adding 1/2" ply underlayment + 1/8" thinset + 1/4" cement board + 1/8" thinset + 3/16" floor tile, or about 1-3/16" total. But before you add that thickness you'd be subtracting the already installed 1/4" luan and 3/16" vinyl. 1-3/16ths minus 7/16ths means the height of your finished tile floor will be 3/4" higher than the finish of your existing vinyl floor. (I think!) So, if you want a 1/8" gap between your wall tile and your floor tile, set the bottom edge of your bottom course of wall tile 7/8" above the height of your existing vinyl floor. Now, all that figuring and ciphering is nothing more than a crap shoot. So what I'd recommend in a case like yours is to plan on eventually having a tiled floor, tiled walls, and a wood baseboard as a transition between the two. If down the road you wanted a 5" tall baseboard, set a 6" tall baseboard in place now, and set the top of the baseboard level. Tile the walls with the bottom course of wall tile sitting on top of the baseboard. When you eventually finish your floor, remove the baseboard, tile the floor, then rip about an inch off the baseboard to make it 5" instead of 6", and it'll fit nicely. A lot of "what if's" and made up numbers in my post, but it's a start. Mongo...See MorePrep for tile install. Please shed some light!
Comments (9)"So what do you think about me putting a thin coat of drywall mud up in the vanity area so the tile will grab?" - I think that is a really bad idea. I found this old post searching what info was online (Houzz/Garden Web) in relation to "Scratch Coats". There is so many versions of a scratch coat it is hard to tell what one is right or wrong for each job your tackling. Installing tile over drywall mud (finish, all purpose or joint) is a bad idea. Installing tile over drywall that has not been covered with drywall mud is often OK as long as the area is not in the shower or around the tub. Installing tile over painted drywall is done all the time but the strength of this assembly relies totally on how well the paint was applied and what type of paint there was. Your question (top of page) was answered well I think by the fellow coming to look at the job. Adding a 1/4" of cement board would make for a much stronger wall than skimming out an old wall with fresh drywall mud. I put a few pictures together showing a simple scratch coat and hopefully this will help you understand what a cement board (CBU) sheet look like scratch coated. The CBU is Wonderboard lite. The thin-set Laticrete 253 Gold. The waterproofing membrane on the left wall (Laticrete Hydro Ban Sheet Membrane) and the inside of the niche was done wit Ardex 8+9. I realize the post is years old but it is the first hit on a google search.......See MoreGreenboard or Cement Backer for Tub/Shower?
Comments (36)Just a comment on this 10 year old post, but about 10 years ago, I had the same problem that the OP had - failed drywall causing tiles to fall in. I used cement board around the tub and shower and green board everywhere else. I didn't find the cement board much more difficult to use than the green board (or any other drywall) so I don't see what the OP's objections to it are. An interesting aside, this bathroom was not original to the house. The non-shower side of the room had been a closet wall (not a bathroom wall). I removed the "drywall" which turned out to be a gypsum board based lath 3/4" thick with plaster over it. On the back of the gypsum board was printed "patented 1885". The house was built in 1890. A cross section showed three layers of plaster between thin sheets of paper....See More
jeremy hyman
3 years ago
Ashley Michele
3 years agojeremy hyman
3 years ago
Related Stories
BATHROOM MAKEOVERSWhat I Learned From My Master Bathroom Renovation
Houzz writer Becky Harris lived through her own remodel recently. She shares what it was like and gives her top tips
Full Story
KITCHEN BACKSPLASHESHow to Install a Tile Backsplash
If you've got a steady hand, a few easy-to-find supplies and patience, you can install a tile backsplash in a kitchen or bathroom
Full Story
DECORATING GUIDESHow to Remove Wallpaper in 4 Steps
Learn the best way to remove wallpaper with only water (and elbow grease) so your next wall treatment will look great
Full Story
DECORATING GUIDESFrom Queasy Colors to Killer Tables: Your Worst Decorating Mistakes
Houzzers spill the beans about buying blunders, painting problems and DIY disasters
Full Story
MOST POPULARHow to Get Rid of Household Mold
Find out how to work with a pro to stop mold from damaging your house and health — and how to prevent it from forming
Full Story
MOST POPULAR11 Things to Expect With Your Remodel
Prepare yourself. Knowing what lies ahead during renovations can save your nerves and smooth the process
Full Story
KITCHEN DESIGNShow Us Your Fabulous DIY Kitchen
Did you do a great job when you did it yourself? We want to see and hear about it
Full Story
HOUZZ CALLWhere Did You Stay During Your Remodel?
Did you live through the noise and dust during your project, rent a place or camp in your backyard? Tell us your story
Full Story
HOUZZ CALLHow Are You Passing the Time at Home Right Now?
Share your thoughts about how you are coping with stress and staying grateful during this difficult time
Full Story
BEFORE AND AFTERSHouzz TV: See Recycled Walls and Cool Cassette Art in a Woodsy DIY Home
Walnut countertops join hardwood floors and pieces made from leftover framing in a bright Spanish colonial
Full Story

Mint tile Minneapolis