


Las Vegas Rose Neighborhood
User
4 years ago

Featured Answer
Sort by:Oldest
Comments (12)
Related Discussions
Las Vegas
Comments (3)You win some, you lose some? Luck of the draw? Roses are always a cr@pshoot? ;) Viva Las Vegas!...See MoreSucessful Citrus of Las Vegas
Comments (7)Thanks Evan and Patty for the compliments and suggestions. I'll definately paint the trunks white to avoid sunburn. Satsuma and Goldnugget are on my wishlist, and I'll likely get them in the Spring from Costco who supplies the Willits and Newcomb (my Page and Kishu came from them). I had my 1st Gold Nugget fruit at a farmers market in Santa Barbara last year .... amazing! I actually intially planted my eureka and kumquats in the ground, but I couldn't seem to get the soil conditions/drainage right and they kept loosing leaves and looked sickly. Both the kumquat and eureka are semi-dwarf so I figured they would be ok for now in pots. After transplanting, these plants stablized quickly as so I left them in the potted soil. If you guys have any tips on how to prepare the ground soil, please let me know as I'd love to have a few citrus in the ground. I might just replant the potted ones, unless you all would recommend against it. The cinder block wall has generally served the plants well, but the dang wind still gets to them :(. I'm still trying to figure out ways to get around these wind issues. Well thanks again! Zach...See MoreLas Vegas wind and winter freeze questions
Comments (5)Hello, It sounds like you have a couple of questions. About the plants in the pot getting blown out. When you first put the plant into the pot it is not going to be well attached but if you could put it in a sheltered position for a couple of months it will hopefully give it enough time to spread its roots and fill in the pot which should keep it firmly attached to your container. About the stuff that died this winter. I am looking for a tree and went to moon valley nursery and was surprised at all the plant material they were selling that is not hardy in a cold winter here. When I commented about it I was told that it was okay because they have big oil heaters they use to keep thier plants alive through cold spells. Hmmm, do they give a heater along with every frost sensitive tree they sell? I think not. Where your branches on your tree are dry start breaking them off and look inside, if it is all brown it is dead there but if you have green inside it is still alive. Keep breaking until you hit the green. If you don't your tree is dead. Do you know what kind it is? I have two trees that have not broken dormancy yet but thier branches are pliable not stiff so I know they are alive. They are acacia pendula a. shafneri and everything else is going like gangbusters. A lot of stuff sold here either isn't hardy to the cold, doesn't like the heat and sun, or dislikes the alkaline soil and water we have. That said there are a lot of plants that love it here and if you plant those you can enjoy the beauty that comes with healthy, happy plants. But your yard won't look like a Chicago or Florida landscape. Maria...See MoreNew to Las Vegas, what will grow here?
Comments (51)The dowel or other object has to go up through the BOTTOM of the pot into the perched water there - a dowel in the top of the pot won't affect drainage, even if it's stuck way down into the soil. Think of it as making a bridge for the water at the bottom of the pot to cross. We're talking about drawing the water DOWN and out, from the bottom. Here is a picture of someone who was using yarn to wick perched water out of her pots: I looked and looked for a picture of someone using the stick-through-a-drainhole-to-drain-more-water-out trick, but couldn't find one. I'll try to stage one in the next week. It's amazing when you're not expecting it, LOL! Cotton is a good wicking material, the problem with it is that it will rot pretty quickly. As long as you don't mind replacing those wicks regularly, it will work. I would replace a cotton wick every year, because though you MIGHT get 2 years out of it before it starts to rot, you also might not, and end up with nonfunctional wicks halfway through the 2nd year. However, you might be able to get cotton t-shirts for free or cheap from local thrift stores - they often toss damaged or stained items, or sometimes even stuff they just get too much of. T-shirts these days are usually a 50/50 cotton-poly blend - so wicks made from this will probably be a little bit longer lasting than 100% cotton. I'd still replace them every spring, especially if you're getting them free or for super cheap. Just be sure you don't end up with t-shirts somebody was working on their car in, soaking up oil with, or using while painting and/or cleaning their paintbrushes! Some people use strands from Rayon mop heads. These also tend to break down (they're made from wood fibers, cellulose) but they are cheap and effective. Al, of Al's gritty mix fame, uses them. Go to the following post and search on "Tue, Jan 1, 13 at 13:24" to go down to the post where he talks about wicking to remove perched water. Container Soils - Water Movement and Retention XVI Here is a picture showing the kind of wicking you need to do to drain off that perched water, from the thread above: Now, if we're talking about drawing water UP from the bottom (wicking UP rather than down and out) here are some pictures illustrating that. You can use almost anything that will absorb water for the wicking - I bet even cut up strips of "super towel" might work, though I don't know how long they might last. But nylon clothesline is a good choice that is cheap and easy to find. You could also buy capillary matting (which comes by the yard in widths up to 72") and cut that into strips. I think that is mostly polyester felt (THICK polyester felt, you won't find it at JoAnn's). Anyway here are some pictures: Here's one who used cut up capillary mat: Here are her directions for how she made her pots: DIY self watering pots A lot of folks swear by using soil wicking systems. There is a reservoir (or several sometimes in commercially built self watering containers that use this) into which you firmly tamp soil, which will be partly below the water line of the water reservoir in the bottom of the container. Here is a picture showing the system: The air space between the water reservoir and the soil is important to this design, and its what makes it different from sitting your pot in water and doing what we think of as conventional "bottom watering". As for the video links you posted - there are problems with that guy's system. First is the soil medium. Straight MG garden soil is a TERRIBLE medium for a container. That needs to be mixed 1:1 with peat, or even 1:2. Even so, in our conditions here that isn't an ideal potting medium by a long shot. I've used it for years and so far I am getting away with it here- but I'm not sure I would be getting away with it in a tall container like that, wicking or no wicking. Second is the way he planted that tomato. Firstly, a 5 gallon bucket is really too small for most tomato plants. Still you can manage with that more or less, if you take a little extra care. When I plant tomatoes in the ground (or in a raised bed), I snip off all but the top two or three leaves/stems and plant it in a trench with the root ball at least 8" to 10" deep, angled up from there so the top two leaves come out just an inch or two above the soil. I also plant in water catchments (a depression so water is guided to the plant. Because a tomato will root all the way along the stem, and this is one of the best ways to drought-proof your tomato plants. When planting in a container, I do something similar - I will snip off all but the top 2 or 3 leaves/stems and plant it with just a couple of inches of soil below the root ball, then fill just to where those top few stems are poking up. This will likely be way below the level of the top of the container. Then as the plant grows, I remove lower stems and add planting medium. This way the tomato roots all the way along that stem and you aren't waiting for the roots to grow down into the bottom of the container - they are already there, and strong and healthy to boot! when I get to within about 3" of the top of the container, I mulch (about 2" of bark). Then there is your selection of plants. For a 5 gallon bucket, a determinate variety is a must. Also, look for varieties specifically bred as "patio tomatoes" or for containers, such as Celebrity, Bush Champion, Bushsteak, Bush Early Girl, etc. Burpee's has a bunch of varieties specifically for container growth - probably other seed sellers do as well. I grow determinate paste varieties in small spaces in raised beds when possible, though this year I ended up with Early Girl because that was all that was left by that time (mid-July, we moved at the end of June so my garden went in VERY late). When I was growing tomatoes in containers, I grew them in cut-off garbage cans instead of the 5 gallon buckets. I just don't feel those are really big enough for tomatoes. Garbage cans were a lot cheaper back then ... but if they go on sale, you might grab some for your tomatoes next year. I use the garbage cans because they are UV stabilized, intended for outdoor use. Other plastic containers usually break down pretty quickly in the sun. I HAVE grown them in 5 gallon buckets but they were hard to stake, hard to keep from falling over in a wind, and didn't yield as well as when they're in larger containers. I put the garbage cans up on spaced pavers or concrete brick to improve drainage - but that might not be as much of an issue in LV, with the right potting medium. Just make sure the drainage holes are good sized - like 1/4". Cover with soil fabric or coffee filters to keep the soil from washing out. You can also build mini-raised beds out of concrete blocks - a raised bed doesn't HAVE to be 4' wide and 10' long. Bonus - for me anyway - is having that thicker edge to sit on when I get tired, LOL! A concrete block "container" 24" square (internally) would need 2 courses (16 total) of standard 8x8x16" concrete blocks, and you'd then have a 16" tall raised bed to work with which will NEVER wear out (well not in OUR lifetimes). The soil dynamics in a raised bed are MUCH more forgiving than in container growing. The bricks run about $1.50 here when they're not on sale - if you keep your eyes peeled, watch craigslist and your local freelist, etc, you might catch them for less. A concrete block raised bed takes no real skill to build - just lay them out so the corners alternate. With no frost heave you'll be good to go to just lay them out on a level piece of ground. Hope there are some ideas that might be of use to you....See More
User
4 years ago
sultry_jasmine_nights (Florida-9a-ish)
4 years agoUser thanked sultry_jasmine_nights (Florida-9a-ish)Plumeria Girl (Florida ,9b)
4 years agolast modified: 4 years agoUser thanked Plumeria Girl (Florida ,9b)User
4 years agolast modified: 4 years ago
Related Stories
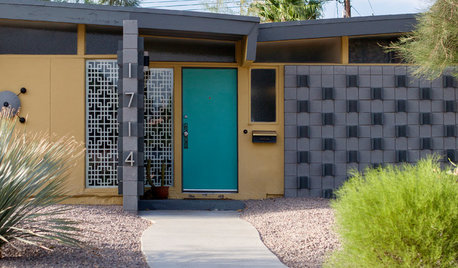
MIDCENTURY HOMESMidcentury Exterior Charm in Las Vegas’ Paradise Palms
A midtown neighborhood is a treasure-trove of 1960s architecture and vibrant curb appeal
Full Story
DECORATING GUIDESTop Design Trends From the Winter 2015 Las Vegas Market
Interior designer Shannon Ggem is tracking finishes, motifs and design combinations at the 2015 show
Full Story
ARCHITECTUREBlue Heron’s Modern Desert Design in Las Vegas
See 2 homes from the award-winning design-build firm that were highlighted at this year’s AIA conference
Full Story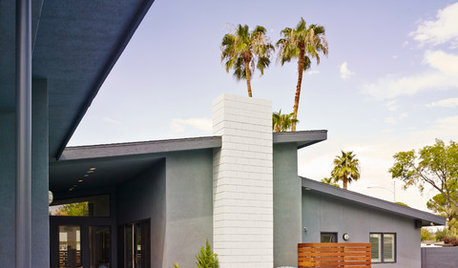
HOUZZ TOURSHouzz Tour: From Burned Down to Done Up in Las Vegas
A fire gutted this midcentury home — and laid the groundwork for a beautiful new floor plan
Full Story
STUDIOS AND WORKSHOPSStudio Tour: An Art Salon in the Heart of Las Vegas
Two friends create a shared space for all things art in a light-filled 1940s bungalow
Full Story
EVENTS6 Hot Decor Trends at Las Vegas Winter Market 2018
Designers see curvy sofas, pastels, polished woods and more black and gold coming our way
Full Story
EVENTS6 Standout Design Trends at the Las Vegas Summer Market
Heavy metal accents, winter white upholstery, pleated looks and faux shagreen show up in featured products
Full Story
KITCHEN MAKEOVERSKitchen of the Week: French Bistro Style With Industrial Touches
After their home flooded, these Las Vegas homeowners got the chance to design their dream kitchen
Full Story
LIFEHow to Decide on a New Town
These considerations will help you evaluate a region and a neighborhood, so you can make the right move
Full Story
HOUZZ TOURSHouzz Tour: Lovingly Resurrecting a Historic Queen Anne
Dedication and a keen eye turn a neglected eyesore into the jewel of its Atlanta neighborhood
Full Story


User