


Master and Guest Bath Remodeling - Clean slate
jillybean103
5 years ago
last modified: 5 years ago
Featured Answer
Sort by:Oldest
Comments (19)

jillybean103
5 years agolast modified: 5 years agoRelated Discussions
does the guest bath need to match master bath
Comments (13)None of my baths are remotely the same. I suppose the only similarities they have is white toilets and tubs (because I believe plumbing should be white). My powder room is venetian plaster in a soft green with dark empredor marble floor with crema marfil insets. Victorian music stand with an onyx sink in green. The fixtures are gold (shiny brass) as is the antique lighting. DS's bath is done in a mid color cherry with a very fancy cabinet. His wall is a mix of antique golf posters which I made into wallpaper. His counter is black marinache (looks like dinasour eggs) and the tub is surrounded with nordic black antique and travertine. Chrome fixtures. My bath is in crema marfil, chocolate croc and white (tub and toilet) with chocolate cherry cabs. ORB fixtures. All of the tiles have individual designs, on purpose. I personally hate a home where all rooms are done in the exact same finises. Even subtle differences make a huge difference in the overall look of the room and are necessary in good design. Fancy, I'm having trouble with the white on white on white. Have you considered any colors in your tile or counters?...See MoreMy DIY Guest Bath Remodel - progress
Comments (6)Hey we have the same faucets for our yet to be installed double vanity. I installed one temporarily in another bathroom and we LOVE it. The handle feels nice and solid in motion and the stream of water that flows out is strong yet smooth - it just coats your hands without splashing or any bubbly aeration. Great price too. - D...See MoreMaster Bath Remodel - 4 questions
Comments (2)By "minimum square footage for a walk-in shower" do you mean a doorless shower? Because the minimum size for a shower stall is only 32x32". :-) IIRC I have seen doorless showers as small as 3x4' in magazines and it seems to be a popular retrofit for the replace-tub-with-shower scenario because it can be fitted in a standard 32x60" space. The location of the plumbing bits in relation to walls and openings is potentially more important than the size. Think about having the crack in the tub repaired; now would be better so that the little crack does not become a big crack, but at the very least do it when you plan to put the house on the market. As a buyer it would be a red flag for me. Bath showrooms, auto-body specialists, and marine suppliers can all point you toward someone who can repair fiberglass or acrylic and do it pretty much invisibly. And yes, you can replace the tub filler as long as you can get access to it from underneath. I'll put the fourth question about adding a second sink here instead of last since third question's answer is long. This can be very easy or rather difficult depending on where the sink is going and where the existing plumbing lines are in both bathrooms. You're going to gut to the studs, right? That will make it easier to see what you have where for rough plumbing; your plumber is likely to tell you that unless money is no object, you can't really make the firm decision until you can see what's where. Demo... demo is pretty easy and can be lots of fun - talk about getting rid of your stress! It does take some physical strength and endurance though, so couch potatoes or people with physical issues like arthritis may have a difficult time of it. It's good to have friends come help, if you can, especially a friend who knows what s/he is doing! Promise them pizza or steaks on the grill :-) and buy a few cases of Gatorade and beer if you/they drink it. (It goes without saying that no one gets beer until afterward!) Although I almost entirely supervised (since I was the only one who knew what we were doing LOL), three of us demolished an 8x8' bathroom to the studs and the subfloor in 3 hours. You will need to borrow or buy some tools if you don't have them already, and I've listed what we found useful below. Buying them will reduce your savings, but you'll have them for the next project, or you can resell them on Craigslist or eBay and get back a little of what you paid. Useful tools include: *a three- or five-pound sledgehammer with a short handle (easier to control where it goes), whichever size is more comfortable to handle. This may be called a "drilling hammer" or "engineer hammer" in some stores. 10+ pound sledges with long handles feel more macho but they are harder to control and the user gets tired faster. *a short wrecking bar (24" was good for us), the kind with one hooked end and one straight end. *reciprocating saw with more blades than you think you will need (save the recipt so you can return the extras; it'll cost a bit more but get the individually packaged ones rather than the bulk pack), because it seems like you always break a blade or it goes dull just when you're eyeballs deep in something and can't take the time to go get more. Try to borrow this if you don't have one, because good ones are expensive. *a wide tile or masonry chisel for getting up the floor tiles (the kind with the wide plastic collar at the top of the handle are safest) and a hard rubber or wooden mallet - If you have large amounts of floor tile and it's being a real beyatch to remove, hie thee to the tool rental place and rent an air-powered chisel and compressor. It'll be about fifty bucks a day. Yee-hah! What we did was bashed at the tiles with the sledgehammer and used the chisel to break the pieces off the subfloor. We were able to get the subfloor clean enough to put the new underlayment right over it, which saved money. *the usual selection of screwdrivers, wrenches, etc. for disassembly. When you can, disassemble and recycle rather than destroy! *heavy leather work gloves that actually FIT - write your name on the backs or cuffs with a Sharpie marker. If they don't fit you will get blisters. If you have ethical objections to leather, there are some good non-leather ones out there like these Work Crew gloves but the thin cotton ones don't do much for you. *dust masks (the ones with the valves are most comfortable and won't fog up glasses as much) *safety goggles (crucial! conventional eyeglasses are not enough) *earplugs or sound-proof earmuffs *kneepads - try on a bunch at the store and get the ones that are the most comfortable *even if it's hot wear jeans to protect your legs and workboots if you have them. If you don't have workboots, wear sturdy sneakers for better footing. Do not do as my friend did and attempt to demo a kitchen in Birkenstocks. :-) *a rented dumpster and a bunch of trash cans to get stuff out to it It is best IMO to have an electrician and plumber come in and disconnect everything before you start so you don't accidentally punch through a pipe or hit a live wire. Our electrician just disconnected the bathroom's two circuits at the box and everyone involved used heavy-duty extension cords run in from the next room. If the toilet is being reused it should be taken out of the bathroom and moved to a safe place, because it is very, very easy to break a toilet. Don't ask me how I know this because I will start swearing. :-( By the way, if your walls are drywall and you're doing major tear-outs, we discovered that it was easier/cheaper to strip the drywall off the entire wall so that the drywall guy could use full (or as close to full as possible) sheets instead of cutting smaller pieces to fill in holes here and there. It cost more in materials but a LOT less in labor. A bit of unsolicited advice - if you are planning on selling the house in 5-10 years, do not do ANYTHING that is currently trendy. It will be dated by then and your potential buyers may not want to have to embark on a renovation! Not everyone thinks remodeling is fun. :-) Think about staying on the plain side for stuff that is hard to replace, like tile and major fixtures, and getting your groove on with easy-to-replace items like lighting fixtures, accessories, cabinet hardware, paint, etc....See MoreOne bath down, one to go -- Vintage inspired guest bath remodel
Comments (105)Lovely sense of style! Bravo! We investigated porcelain marble look-alike tile but we decided on real marble which we will have to care for without any acidic products. Beware that there is a repeating pattern in marble look-alike porcelain tile like (on wall paper which will give away the secret.) We found great deals on Amazon and at Lowes for Bianco Carrara subways, pencils, chair rails and floor and shower floor hexes (1/3 the price of tile stores). We found a gorgeous remnant for our shower bench at a marble and stone shop at an amazing price. I can't wait until it's done to post photos! But back to your house... it's gorgeous!...See Morejillybean103
5 years agojillybean103
5 years agojillybean103
5 years agolast modified: 5 years agojillybean103
5 years ago
saratogaswizzlestick
5 years agojillybean103
5 years ago
aprilneverends
5 years agoUser
5 years agolast modified: 5 years agotyrone10
last year


Related Stories
INSIDE HOUZZTop Styles, Colors and Finishes for Master Bath Remodels in 2018
Contemporary is again the No. 1 style, but farmhouse is gaining steam, according to the U.S. Houzz Bathroom Trends Study
Full Story
INSIDE HOUZZTop Styles, Colors and Upgrades for Master Bath Remodels in 2019
Transitional becomes the No. 1 style as farmhouse loses steam, according to the U.S. Houzz Bathroom Trends Study
Full Story
BATHROOM MAKEOVERSFamily Tackles a Modern Farmhouse-Style Master Bath Remodel
Construction company owners design their dream bath with lots of storage. A barn door with a full mirror hides a closet
Full Story
HOUZZ TOURSMy Houzz: A Midcentury Remodel and New Master Bath in Dallas
A family of 4 enlist a professional designer to help them tackle multiple long-term projects
Full Story
INSIDE HOUZZTop Colors and Materials for Master Bath Remodels in 2020
White remains the top color, and ceramic and porcelain are trending, the 2020 U.S. Houzz Bathroom Trends Study shows
Full Story
INSIDE HOUZZWhy Homeowners Are Remodeling Their Master Bathrooms in 2018
Priorities are style, lighting, resale value and ease of cleaning, according to the U.S. Houzz Bathroom Trends Study
Full Story
BATHROOM DESIGNTry These Bathroom Remodeling Ideas to Make Cleaning Easier
These fixtures, features and materials will save you time when it comes to keeping your bathroom sparkling
Full Story
BATHROOM DESIGNBath Remodeling: So, Where to Put the Toilet?
There's a lot to consider: paneling, baseboards, shower door. Before you install the toilet, get situated with these tips
Full Story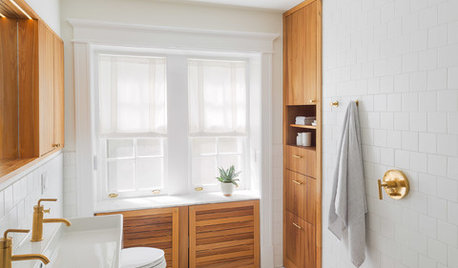
ROOM OF THE DAYRoom of the Day: Clean and Simple Master Bath With Lots of Storage
Custom cypress cabinets, basic tile and clever storage solutions turn a cramped and crumbling 1912 bathroom into a spacious gem
Full Story
BATHROOM MAKEOVERSRoom of the Day: Clean Style in an 80-Square-Foot Master Bath
Functional storage, smart details and beautiful materials make this Toronto bathroom a winner for a couple with a baby
Full Story


jillybean103Original Author