


Biggest lesson from redoing your floors?
Emily H
6 years ago

Featured Answer
Sort by:Oldest
Comments (9)

jck910
6 years ago PRO
PRODiana Bier Interiors, LLC
6 years agoRelated Discussions
What was your biggest gardening mistake...
Comments (28)Virginia, I have to agree with you. My new resolutions are: 1) Never visit a nursery right after watching a garden show, reading a gardening magazine or going on a garden tour. ;O) 2) Never buy a plant unless I know exactly where I'm going to plant it. ... And where it's most likely to live. 3) Try harder to come up with an overall plan to integrate what I have with what I want. 4) Try for more perennials and fewer annuals. (I call this last resolution 'buying vs renting'.) 5) Spend more time developing edible landscaping. Now let's see if I can *keep* these resolutions......See MoreKitchen Remodel: Lessons from the Veterans?
Comments (29)The #1 and #2 most neglected items in a kitchen redo are venting and lighting. Venting costs can be almost as much as that prosumer range you may be considering. That's especialy true if there is only a recirculating vent there now and will need to create new penetrations into your home correctly. Most in a northern climate will require the use of makeup air and an ERV to make sure you're not exhausting that expensive conditioned air to the outside. Those costs aren't something that folks think about on the front end, and they become an expensive surprise that eats up any contingency very quickly. Be sure to consult a good HVAC firm to handle the details in conjunction with a knowledgable appliance salesperson who can guide you on the needed CFMs your cooking appliances will need. Lighting is often neglected. The absolute worst form of lighting in a kitchen is a single central fixture, but because many have a big honking fluorescent in that spot that puts out hospital glare, they think they have lighting covered. You need a mix of task (undercounter) general (recessed) accent (pendant) and "mood" (all dimmable) to be able to see all of the beautiful details in your kitchen and to be able to safely work in that space. If you think it looks too bright, then you've probably added enough! Our eyes need much more light as we age, and what's "enough" at 30 isn't at 50, and is positively dim by 70. So, if everything is on dimmers and is airport runway bright, then you or any future buyer will be OK aging in place without modification to the lighting scheme. The third thing that most people don't consider enough is their budget. Materials costs and transportation costs are up for most manufacturers and contractors. Most appliance makers have just had a price increase. Translate that to all suppliers. Even if your area is in a "down" cycle for remodels, don't expect that to be reflected too much in any quotes you may get. If you've got a guy willing to give you a quote for 40% less than another, then he's probably not a good enough businessman to be able to be around next year at this time or he's deliberately misstated his "allowances" to be falsely low and you'll end up paying tons of change orders to upgrade. FInally, there's one quote I want to leave you with. It's from Richard Trethewey, the master plumber that works on most of THis Old House's projects. He said, "Comfort is invisible, and it's not sexy." And that's so true! Many people get excited about the pretty granite countertops and quarter sawn oak trim, and the hand forged knobs, but it's really hard to get excited about upgrading your electrical panel or increasing the insulation in your ceiling. Those details are boring. But they are those invisible "bones" that everyone talks about. Finishes are easy to upgrade later. You can put in that granite countertop later and settle for a laminate one now if that means you are able to actually put in a usable ventilation system into your kitchen. Those are the type of unsexy tradeoffs that will keep your home clean and comfortable long after that $150 per gallon paint has had to be changed out because you don't like the color anymore....See MoreLessons Learned From My First Time Staining A Deck
Comments (0)I am a regular guy with no special skills, experience, or knowledge. I feel the most amazing sense of accomplishment when I do so much as change a light fixture. I figure there are many of you out there like me who aren't scared to do a TON of research and then do a project you've never done, especially if it saves you money. So then, I thought I'd share my experiences and lessons learned staining our deck, which we just finished yesterday. CLEANING The biggest thing I learned here is that all power washers are not created equal. We borrowed our neighbor's power washer, and it did just ok because it wasn't strong enough. If I had it to do over I'd have sought out a pro-level power washer, even if it meant paying to rent it. I think it would've been must faster and would've done a way better job. There are spots on the deck that got cleaner than others, and yeah, I could've gone back and redone it all and made it perfect but it would've taken days, and I just had to move on. LESSON: Get a powerful power washer to do your cleaning. CAULKING/PAINTING Our railings and pickets are painted so I went over them and caulked the gaps before painting. But the big thing I learned was that if you're going to caulk, make sure you paint pretty soon after so you seal up the whole job. It'll last longer and you won't have to do it over like I did. LESSON: Caulk, prime, paint within a short amount of time (no more than a few days). STAINING We went back and forth a million times about how to actually do the staining. Do we use a garden sprayer? A brush? Roller? We decided on one person using the garden sprayer and then the other person going back over and smoothing out puddles and generally brushing in what got sprayed on. For tight spots we sprayed stain on the brush and brushed it on. It worked great and was honestly pretty darn fast. One thing that was super helpful was that I took the time before starting staining to tape up painter paper over parts of the house and painted railings that I didn't want to spray with stain. This saved a ton of cleaning and heartache. If I had it to do again, I'd use plastic instead of the paper. LESSON: Use a garden sprayer to spray a few boards at a time and then go back over quickly with a brush to smooth it out; and be sure to tape up plastic drop sheets to protect areas you don't want stained. CONCLUSIONS Lots of good lessons learned, and even though the job was not perfect I still feel great about having it done. The bottom line for me on all jobs I've never done before is research research research, plan plan plan, then knock it out. I hope this was helpful. I know how much I appreciate how much you all share of your own experiences and knowledge. Have a great one!...See MoreWhat's the biggest lesson you learned while landscaping?
Comments (96)My main lesson is: Know when you need help and do not be ashamed to ask for it. I admit, initially I found having to hire someone to be a bit demoralizing. As someone who takes great pride in doing all of my own gardening and landscaping, it took a bit out of me to realize I could not transform my front yard 100% on my own. Due to my status as a single working mother of three, a super busy schedule the month I wanted to tackle my landscaping, and a physical ailment that restricts my free movement at times, calling in back up was the right thing to do. By doing so, I knew I’d get my flower bed looking the way I wanted quickly and with less mental stress and possible physical ailment. best regard bestezy...See Moreterrimi
6 years ago PRO
PROLori A. Sawaya
6 years ago PRO
PROBeth H. :
6 years ago
Joe
6 years ago- PRO
Diana Bier Interiors, LLC
6 years ago  PRO
PROLars/J. Robert Scott
6 years agolast modified: 6 years ago
Related Stories
KITCHEN DESIGN11 Enduring Kitchen Ideas From the Industry’s Biggest Event
We visited the Kitchen and Bath Industry Show and found that many familiar kitchen features appear to be here to stay
Full Story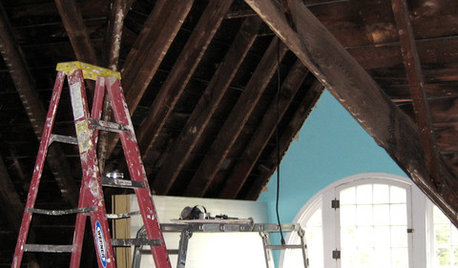
REMODELING GUIDES8 Lessons on Renovating a House from Someone Who's Living It
So you think DIY remodeling is going to be fun? Here is one homeowner's list of what you may be getting yourself into
Full Story
REMODELING GUIDES6 Must-Know Lessons From a Serial Renovator
Get your remodel right the first time, with this insight from an architect who's been there too many times to count
Full Story
SELLING YOUR HOUSEA Moving Diary: Lessons From Selling My Home
After 79 days of home cleaning, staging and — at last — selling, a mom comes away with a top must-do for her next abode
Full Story
HOUZZ TOURSDesign Lessons From a 10-Foot-Wide Row House
How to make a very narrow home open, bright and comfortable? Go vertical, focus on storage, work your materials and embrace modern design
Full Story
SMALL SPACESLife Lessons From 10 Years of Living in 84 Square Feet
Dee Williams was looking for a richer life. She found it by moving into a very tiny house
Full Story
CONTRACTOR TIPS6 Lessons Learned From a Master Suite Remodel
One project yields some universal truths about the remodeling process
Full Story
SMALL SPACESLesson From Paris: Her Must-Haves for Living in 400 Square Feet
A recent trip abroad prompted this home organizer to ponder what she’d need to be content living in a small apartment
Full Story
COLORNature’s Color Wisdom: Lessons on Earth Tones From the Great Outdoors
Look to the land for hues that are grounding, soothing and endlessly versatile
Full Story
BEFORE AND AFTERS5 Lessons From My Parents’ Master Suite Makeover
A Houzz editor gleans remodeling wisdom from the interior designer behind her childhood home’s recent overhaul
Full Story


Lars/J. Robert Scott