


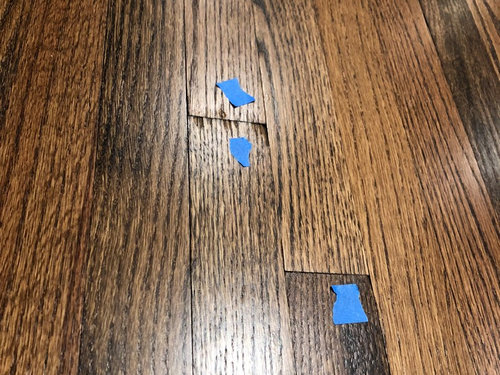
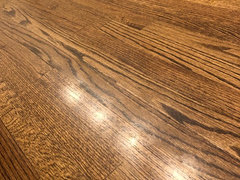
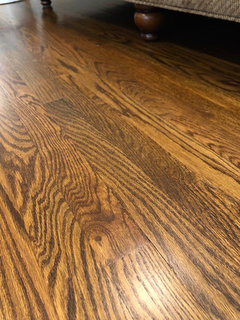
Bad sanding job or unacceptable installation?
sunshine3943
6 years ago
last modified: 6 years ago


Featured Answer
Sort by:Oldest
Comments (20)

gregmills_gw
6 years agolast modified: 6 years agosunshine3943
6 years agoRelated Discussions
Sanding gaps in paver patio--what is "bad" install???
Comments (0)how consistent should the amount of sanding between pavers be? there are some on our newly repaved-with-pavers-lanai that look like they have almost no sand between pavers and other areas where the sand is flush to the pavers' edges... more gap areas than flush areas on the lanai edges are on either a poured footing or something that won't move like pool coping or house and are mortared down so "creeping" will be minimal but aesthetics and ability to trap moisture/dirt is increased with more gapping to my mind... the driveway done at the same time with same brand of pavers (but different color and style/pattern) has much more consistently fully sanded seams between pavers than the lanai... the lanai was laid over the original concrete patio which was not cracked/buckling so there is smooth base under the pavers... can't post photos here--don't upload to any site to link to but just want to know what the tolerance for gaps is with granite I know some people accept larger gaps in seams-- I had great granite guys that did my home remodel and seams were minimal--1/4 inch or less... had friend who had her kitchen done and she has noticeable seam that is maybe 3/8 of inch--and was told that was "good" job......See MoreHelp: bad tile install going from bad to worse
Comments (8)Big edit for this post, you posted the Kerdi shot while I was typing. So... 1) The flex in the floor that is causing the grout to crack: It's possible that the Kerdi Tray was not properly bedded in thinset, so as the slightly flexible tray flexes, the inflexible grout is cracking. It's also possible that the small size of the penny rounds is resulting in point loading on the foam tray. The foam compresses ever-so-slightly, the tile moves, the grout cracks. The floor...Is your guy using thinset as grout? Grout as thinset? With the penny rounds, it almost looks like he's doing an all-at-once installation. Setting the tile, promoting between-the-tile-squeeze-through, then grouting. All at the same time. A negative with that is that he's grouting and cleaning the grout before the thinset has fully cured. When I grout I'm pretty aggressive with the grout float in order to get grout into every nook and cranny. I don't want to leave any voids. If your guy took it easy when grouting so as to not displace the unbonded sheets of penny rounds, he could have left a few voids beneath the surface. If he wanted to be gentle while cleaning the grout, he might have used too much water during cleanup, that can also weaken the grout. I don't know why the floor is being grouted piecemeal. That's an easy way to get uneven grout color on a floor. As he continues to tile, he'll have to chip out parts of the hardened thinset/grout at the edges fo the already installed sheets to get the subsequent sheets of tile to mesh with the already installed sheets. He'll need to be careful to not ding the Kerdi membrane. It's also a recipe for mismatched spacing at the edges resulting in being able to see the individual sheets of tile versus the floor being one harmonious surface of penny rounds. With him sliding the floor tile under the bottom course of wall tile, I do hope he's not leaving any unfilled voids in the floor-wall corners. 2) Bullnosing. He bullnosed the tile after they were on the wall? Yeah. Probably not going to get a good outcome. Should be an easy remove and replace. The bowed wall? The tiler tiles on what he gets. If he gets a bowed wall courtesy of the framers, he can put the blinders on and tile right over it...or he can address the bowed walls with whoever hired him...the GC? The homeowner? Then the tiler can either tile right over the bowed wall, OR he can have the contractor fix the wall before he tiles, OR he can repair the wall himself and then tile. One added item...I can't tell what exactly is going on int he bottom left corner of the already installed tile. Could simply be that the tile spacing is skewed and he lost the pattern. After this floor is done and everything cured, I'd recommend having the GC pull the drain grate, install a plug, and flood the floor. As the floor tile is covered with water, watch for air bubbles. They'll indicate voids under the tile or in the corners. Once flooded, pull the plug to see how the floor drains. Make sure it drains completely and that water is not held in the corners. With a Kerdi Tray, the slope of the floor and a properly draining floor should be a no-brainer. But based on what I'm seeing and what you described regarding the bullnose, this could be a "no brain" installation. Sorry for that. Remediation after-the-fact is always a tough spot to be in. Good luck....See MoreTerrible sanding job or just the wood floor?
Comments (16)So the answer is in: the floors WERE still spotted with old finish. And that the refinishing company applied new finish RIGHT OVER the old. It is all falling into place. The sanding didn't get everything up. To get rid of the orange finish means you need to get rid of the orange finish. I know. Seems logical....but these guys may have found this was more than they could handle and simply stopped sanding. They tried to put down new finish to see if they could hide the old finish...but it was caught but the homeowner. I'm going to guess their quote wasn't nearly high enough. Instead of "breaking even" they tried to salvage some income and start the refinish before they had taken off all the old finish. I would have a sit down and find out HOW MUCH MORE they SHOULD HAVE quoted in the first place. I would go ahead and offer that to them (offer to pay them the RIGHT amount of money for the job) and then make them start again. These old darlings are down right beasts to deal with. I would guess the floor guys had NO IDEA as to what they were getting into - and to be fair neither did you. In such a situation it isn't wrong, or bad, or dishonest to sit down and reconfigure the quote. In fact it is smart and respects BOTH parties. More money offered = more work done. They "eat" the couple of coats of finish and some of the labour (material costs + sweat equity) yet still make some profit on the EXTRA SANDING that should have been accounted for in the process. You get the finish you want (and should have paid for in the first place) and THEY learn their lesson without losing their shirts. It is a win-win (learn-learn) for everyone. Good luck. Sit down and see where to go from here....See MoreBad subway tile job?
Comments (46)I made be a little late to the conversation and didn't realize this had already been solved pretty much but just to add my 2 cents: I like that look (at the moment) and think it looks exactly like it's supposed to. It should resemble imperfect, handmade tile. This is definitely something that should've been sorted out during material selections phase and I hate to say it but I believe the onus would be on the homeowner to pay for these changes. It sounds to me like the designer just assumed you were familiar with the trend which shouldn't have happened. And also probably should've not suggested this tile on such a large space! So don't get too upset with the tile guys:/ I should also add that stacked tile is also a big thing at the moment which gives the tile the appearance of being stacked with little to no grout line visible. Here's an article on the trend...See Moresunshine3943
6 years agosunshine3943
6 years agogregmills_gw
6 years agogregmills_gw
6 years ago PRO
PROJoseph Corlett, LLC
6 years agosunshine3943
6 years agosunshine3943
6 years agosunshine3943
6 years agosunshine3943
6 years agosunshine3943
6 years agosunshine3943
6 years ago
Related Stories

REMODELING GUIDESContractor Tips: How to Install Tile
Before you pick up a single tile, pull from these tips for expert results
Full Story
FENCES AND GATESHow to Install a Wood Fence
Gain privacy and separate areas with one of the most economical fencing choices: stained, painted or untreated wood
Full Story
GREAT HOME PROJECTSWhat to Know About Installing a Walkway of Pavers and Pebbles
Find out how to get started, whom to hire, materials to use and costs to expect when adding a path of pavers and gravel
Full Story
FLOORSWhat's the Right Wood Floor Installation for You?
Straight, diagonal, chevron, parquet and more. See which floor design is best for your space
Full Story
ARTWitness a Fantastic Chihuly Glass Sculpture Installation
Ever wonder what goes into a design that includes a major — and highly breakable — artwork? Here's your chance to find out
Full Story
KITCHEN DESIGNHow to Add a Kitchen Backsplash
Great project: Install glass, tile or another decorative material for a gorgeous and protective backsplash
Full Story
HOUZZ PRODUCT NEWSPro Tips for Handling Remodeling ‘Uh-Oh’ Moments
When you discover something has been incorrectly installed, it’s time to double down and make it right for your client
Full Story
TILE3 Key Steps for Grouting That Looks Its Best
Get your grout right to keep your tile beautiful and for an installation that will last
Full Story
KITCHEN DESIGNShow Us Your Fabulous DIY Kitchen
Did you do a great job when you did it yourself? We want to see and hear about it
Full Story
MATERIALSInsulation Basics: What to Know About Spray Foam
Learn what exactly spray foam is, the pros and cons of using it and why you shouldn’t mess around with installation
Full Story


Joseph Corlett, LLC