


Hurricanes, landlines, and hot water
writersblock (9b/10a)
6 years ago
last modified: 6 years ago
Featured Answer
Sort by:Oldest
Comments (32)
Related Discussions
Hot water treatment complete & surprise
Comments (4)All my amies will be moved to the shelter of the enclosed porch for the storm. Recall that I did build there own little skylight roof to prevent them from getting doused with rain (this after we got 7 inches in 1 day). Darn old Ike looks like he's heading straight for us! I will most likely have the day off tomorrow to get all the plants situated and secure. Trimmed tree limbs with my "rent-a-husband" (the neighbor's hub) the other night, so we're in good shape there. Keep the Houston list members in your thoughts. Ike is a bad storm and is gaining strength! K...See Morehot hot and more hot
Comments (67)Well we are starting to get into our late summer weather pattern where it can be cool one day and scorching the next. We had a cold front push through last night and brought a good rain to my area. today we are having what I call a "california day" 60's in the morning and mid 80's during the day. Ive never been to CA but I imagine thats what its like, LOL The next 7 days are forecasted to be like this. Its such a welcome relief but also a reminder that I need to get the greenhouse ready and start making plans for overwintering. Our first frost isnt until October so I have time. Our weather here can be so crazy that it made me think of a few things. Those who live or lived here may relate and those who may visit might take this advice. You really have to be like a boy scout to live here. In the middle of winter we will have days in the 80's and then the next day it can snow 6-8 inches. The opposite is also true, snow in the morning and mid 50's to 60's by afternoon. In the summer it will get to 110 and the next morning it can be in the 60's. I have left for work in the morning and it was colder by 20-30 degrees when i left in the afternoon. anyways it keeps you on you toes. Mike...See MoreHot water heater just went!
Comments (3)If you are replacing the water heater with another of the same size it is generally a pretty easy job. 1.Turn the Gas off. (Should be a shutoff within 6' of the water heater.) 2.Connect a hose to the drain valve and run it to a suitable drain or outdoors. 3.Sometimes its hard to get the flow started through a hose. I like to open the drain valve and use the water pressure to begin the flow but once you have flow to the drain, then turn the water heater supply cold water valve off and open a hot water faucett to allow air to vent in as it drains. 4.While the tank is draining you can disconnect the flue pipe from the draft hood. Inspct the pipe carefully. If it is severly rusted you should plan on replacing the damaged portions. 5. Disconnect the Temperature & Pressure Relief Valve discharge line. (If it is a soldered copper line you will need a tubing cutter to cut the line. Cut the line about a foot away from the tank. By doing so you won't need to worry about overheating the valve when you later reconnect the line by soldering a coupling. -You may also use a compression coupling here) Once the line is cut remove the threaded section from the T&P valve and clean the threads. You will need this section to attach to the new T&P valve on the male thread adapter, then set this pipe aside. 6. Disconnect the Gas line. Some codes require the gas line to be iron pipe all the way to the water heater gas regulator while others will permit a short flex line. If you have iron pipe it will have a union on the line. Begin by disconnecting the union then remove the pipe from the water heater regulator and set aside. NOTE: Whenever you are connecting or disconnection iron pipe fittings for gas or water you should use two (2) wrenches. One to turn the piece you desire to turn and a second wrench to hold the opposite piece steady. This prevents the possibility of the whole pipe rotating and loosening another joint upstream where it might go unnoticed and result in a leak. 7.Examine the hot & cold water lines on the top of your water heater. There should be a union within 12" above the tank. Carefully loosen the unions but remember that you are draining the entire hot water system in the house. Make sure it has drained down below the unions before you disconnect them completely. (If you are under the Uniform Plumbing Code both the hot and cold water lines are required to be insulated within 6' of the tank so you will need to remove the insulation before disconnecting the water lines. 8. As soon as its drained down sufficiently you can remove the hot & cold water lines from the old water heater. Set these aside because you will be using them on the new water heater. 9. With the flue pipe, gas line, T&P discharge line and both water lines removed you can now remove the old water heater and set the new one in place. (You may have a pair of Seismic brace support bands surrounding your old water heater. They are steel bands that surround the tank and are firmly secured to the house frame to prevent the water heater from moving in an earthquake, tornado or hurricane. They are not required everywhere, but if you live in an earthquake or hurricane region you may have them.) NOTE: If your water heater is sitting on a floor that can be damaged by water, I.E. On a wood floor, or wood sub-floor or in an attic space you are required to have a drip pan. If you require a drip pan but do not have one now, you need to set a drip pan in place before setting the new water heater in. Drip pans are required to have a " discharge line routed outdoors or to a suitable indirect waste receptor (floor drain). The drip pan MAY NOT be connected to the T&P discharge line. 10. Set the new water heater in place and align it correctly. If you have seismic straps tighten them in place. CONNECTING THE WATER LINES: 1. If you have copper water lines the plumbing codes prohibit directly coupling copper to iron pipe or an iron vessel and a water heater has an iron vessel so you will be required to first install Dielectric Nipples. Dielectric Nipples look like a 4" long piece of galvanized pipe with a plastic internal liner. Apply Pipe dope or Red Teflon tape to the male threads of the nipples and screw then into the tank tightly. (I much prefer pipe dope). You may then apply pipe dope or Teflon tape to the threads on the top end of the nipple and attach the copper risers you saved from the original water heater. With a bit of luck they should match up with the unions and you can just tighten everything in place. If not, you will have to cut or add pipe as necessary. 2. If you have PEX or CPVC water lines the plumbing codes prohibit plastic lines within 6" of the draft hood or the flue pipe. An easy solution here is to first install a 12" galvanized iron pipe nipple as a riser then attach the CPVC or PEX to the top of the galvanized pipe. (Be sure to apply pipe dope or Red Teflon tape to the male threads of the nipple before installing).- If you have plastic pipe you do not need the dielectric nipples. 3. In some jurisdictions you may use the Flexible copper lines to connect a water heater but if you use the flexible copper lines you will need to install the dielectric nipples before attaching the copper lines. CONNECT THE FLUE LINE 1.Install the draft hood per manufacturers instructions. 2.Connect the flue pipe to the draft hood. (Some codes require the flue to be screwed to the draft hood with a minimum of three self-tapping screws through the flue pipe and into the draft hood flange). CONNECT THE TEMPERATURE & PRESSURE RELIEF VALVE DISCHARGE LINE. CONNECT THE GAS LINE: Careful here- In some jurisdictions you must be a licensed plumber or gas fitter to make gas connections. In fact, in some jurisdictions even plumbers cannot make gas connections unless the hold a separate gas endorsement. 1. If your code requires pipe all the way to the water heater regulator begin at the regulator and work backwards towards the union. Make sure you apply pipe dope to all male pipe threads before tightening. (You may also use RED triple density Teflon tape or Yellow Double Density Teflon tape but be careful here. Originally all they made was single density Teflon tape then they came out with the double density type and many codes made it mandatory to use double density on gas lines. Later they changed the specs on Teflon tape so that single density is white, double density is yellow and triple density is Red. While the red is slightly heavier and is rated for gas many local codes still require double density for gas lines and often the double density Teflon tape is actually labeled as "Gas Tape". (Personally I find it much simpler to just use pipe dope) 2. If you gas is connected by means of a flexible connector for added safety I prefer to always discard the old flex line and install a new one. Some Flex lines have a ½" male NPT thread on the water heater end and a flare fitting on the opposite end while others have flare fittings on both ends. Just remember that all NPT (national pipe taper) threads require a thread sealant, pipe dope or Teflon but DO NOT apply any dope or Teflon to a flare fitting. Flare fittings are finely machined fittings that are made to seal directly and any attempt to apply a sealant interferes with the intended design of the fitting. Once you have the gas line connected you need to test all the gas line connections from the gas valve on down to the water heater. To test the fittings take a 1/2cup of water and add about two to three tablespoons of liquid dishwashing soap and mix it lightly. You then turn the gas on and brush that solution on all joints and fittings and look for bubbles. (ChildrenÂs bubble blowing soap makes an excellent solution for testing gas lines.) At this point you should have everything connected so you are ready to fill the tank. First make sure the drain valve is closed then open the cold water supply valve. You should still have a hot water faucet open which will allow the air to vent out as the tank fills. Continue filling until you have a full flow of water at the faucet. After you have a full flow at this faucet you will also need to go to each hot water faucet in the house and bleed off any residual air in the lines. After the gas line has been tested and you are sure the water heater is full of water you may then light the pilot and adjust the temperature on the thermostat. You are done at this point, so pick up the mess, put your tools away and write a bill for a couple hundred, then take the cash out of the household maintenance fund, grab your significant other and head out for a night on the town. Hopefully this was descriptive enough....See MoreHurricane Sandy - Preparations/Pictures/Cooking?
Comments (56)Checking in late to this party. We are in NJ, directly west of NYC in southern Morris County. Here, we experienced brutal, 80+ mph winds Monday night. It was terrifying. Strange, colored "glow" lightening. Huge trees snapping in the woods like gunshots. Power is out. Generator is on. Spotty Internet access. Cell phones and landlines completely down, still. We lost power Monday afternoon at 5pm. We're expected to be without power for up to 3 weeks. Thank goodness for the generator, though! We have coffee, heat, water, and lights. Now the problem seems to be procuring gasoline - exactly zero gas stations are open because they're literally out of gas. We will siphon from our cars as needed to keep the generator running. But we are being super conservative. We haven't ventured out far, because 95% of the roads in my township are currently barricaded from downed trees and power lines. 100% of my town is without power. Compared to the destruction we saw in a 2-mile radius of my house yesterday, we are extremely lucky. We only lost 6 big trees, and thankfully none hit the house or any outbuildings. Our fence is destroyed in many places, but that's nothing. Many of my neighbors did not fare so well. The devastation is unbelievable, and pictures do not convey the sense of loss. I cried when we drove around town. I cannot imagine what those down the shore are feeling right now. Below are a few photos I took of my immediate surroundings and my neighbors. Not as bad as down the shore, but still the worst storm and destruction I have ever personally experienced. We're trying to help in the clean-up efforts around town. It's going to be a long road ahead. Surreal. Here is a link that might be useful: Hurricane Sandy photos - my town...See More
writersblock (9b/10a)
6 years agolast modified: 6 years agowritersblock (9b/10a)
6 years agolast modified: 6 years agowritersblock (9b/10a)
6 years agolast modified: 6 years agowritersblock (9b/10a)
6 years agowritersblock (9b/10a)
6 years agolast modified: 6 years agotrickyputt
6 years agowritersblock (9b/10a)
6 years agolast modified: 6 years agowritersblock (9b/10a)
6 years agowritersblock (9b/10a)
6 years agowritersblock (9b/10a)
6 years agowritersblock (9b/10a)
6 years agolast modified: 6 years ago
jerzeegirl (FL zone 9B)
6 years agolast modified: 6 years agowritersblock (9b/10a) thanked jerzeegirl (FL zone 9B)writersblock (9b/10a)
6 years agolast modified: 6 years ago
tinam61
6 years ago
Related Stories
DISASTER PREP & RECOVERYRemodeling After Water Damage: Tips From a Homeowner Who Did It
Learn the crucial steps and coping mechanisms that can help when flooding strikes your home
Full Story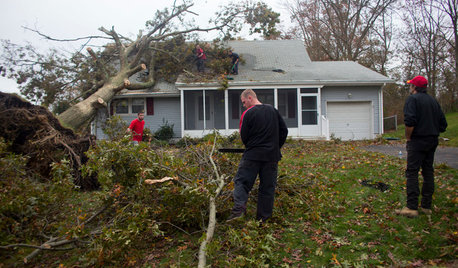
MOST POPULARWhat to Do After a Hurricane or Flood
How you treat your home after a natural disaster can make all the difference in its future livability — and your own personal safety
Full Story
DECORATING GUIDESHow to Cool Down a Room in Hot Weather
Here are 15 tips for staying cool and comfortable without an air conditioner or a ceiling fan
Full Story
REMODELING GUIDES11 Ways to Hurricane-Proof Your House
From smaller tasks you can do right now to bigger renovation projects, these strategies can help keep you high and dry at home
Full Story
ARCHITECTURE4 Things a Hurricane Teaches You About Good Design
When the power goes out, a home's design can be as important as packaged food and a hand-crank radio. See how from a firsthand account
Full Story
DISASTER PREP & RECOVERYRecovery Tips From a Hurricane Survivor
Redefining ‘normal’ is key when you’re dealing with any kind of damage from a natural disaster
Full Story
HOUZZ TOURSHouzz Tour: Ready for Hurricane Season on the Jersey Shore
This family home was designed to stand up to storms. See how the architects built resilience into the design
Full Story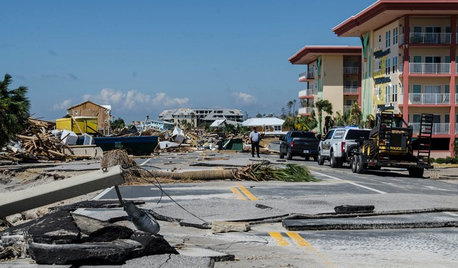
DISASTER PREP & RECOVERYHurricane Michael: How You Can Help
Find out how you can donate to groups providing disaster relief and recovery assistance to storm victims
Full Story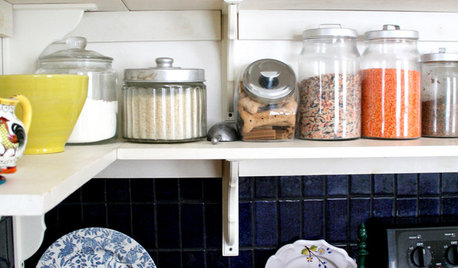
KITCHEN DESIGNDisplaying Kitchen Supplies — Hot or Not?
Do some kitchens just beg for a cozy row of canisters and gear for all to see? Have a look and let us know what you think
Full Story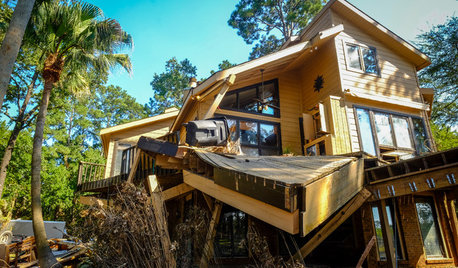
DISASTER PREP & RECOVERYHouston Renovation Spending Up 60 Percent After Hurricane Harvey
California cities top the list for priciest places to renovate a home, according to the 2018 Houzz & Home Report
Full StorySponsored


olychick