


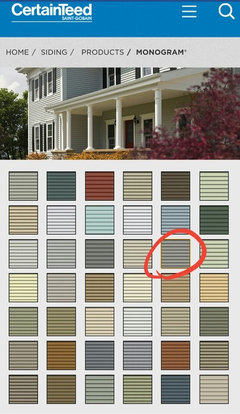
Struggling to select a roof - need to make a decision by end of week!
nlmackay
6 years ago


Featured Answer
Sort by:Oldest
Comments (53)
Related Discussions
Making A Tough Decision
Comments (9)Dave, streams are lovely though they do incresase water losses to evaporation. My stream is about the same length as the one you are planning. I used one piece of liner and it is not joined to the main pond liner but is overlapped. My stream has three drops or small falls (about 6 to 10 inches) with small pools at the base of each fall to increase the sound effects and to allow for some water retention in the stream when the pump is off (makes start up quicker and gives the wildlife a place to stay wet until the stream is restarted). A fourth drop of about two feet is into the main pond. I ran the liner from the pond up under the liner for the stream behind and under the rocks that form the waterfall. The liners are not joined together but are overlaped about 4 to 5 feet, just to be sure that if there were any capillary action I would not loose any water. The stream bed liner should not extend below the water line in the main pond. You could use this same method to allow you to use two seperate pieces of liner in your stream. For this to work you must have enough slope in the stream bed to prevent water from running backward between the two liners and it works best if it is done at a drop at a falls where water sheets off a flat rock over a edge into a pool. Of course, joining the liners is best and works great as long as the seam is done right. I have another stream between two ponds, that has no slope kind of like a canal, where I joined two pieces of liners. The first time I did it I did not purchase the correct stuff to do the seam and after about two or three years it leaked. You can bet I got the right stuff the second time. Remember, everything settles with time and the wieight of snow or people ( standing admiring your beautiful strem, nothing keeps them back from the edge:>:) so be sure to keep the sides of your stream bed higher than the water level by quite a bit and do not cut off any excess liner, fold it under to hide it. Good Luck....See MoreStruggling with insulation/roofing options and energy efficiency.
Comments (13)To elaborate on thermal bridging since it was brought up again... there are several ways to calculate it, but to keep it as simple as possible, here is how it affects your total wall's insulation. First thing, if you put in r20 rated insulation product, you are certainly not getting an r20 wall for cavity walls. Other products such as ICF and SIPs (some SIPs even have thermal bridges) are nearly thermal bridge free and have what is called continuous insulation. My home is an ICF house from the footings to the roof, and there are no thermal bridges anywhere until the roof line. This gives me an r28 continuous insulation. However with wood frame structures, you have a framing reduction to take into account. Most new homes, studs, heads and plates take up anywhere from 18-25% of the wall area. (lets keep the numbers whole and rounded for easy math) Say you select blown fiberglass in a 2x6 wall, gives you roughly r20. You have 1000sqft of wall surface. That r20 is only for the stud bays, and every 16" roughly you only have an r1 due to the stud (framing factor) So you have 800 sqft of wall at r20 and 200 sqft of wall at r1. . Your "r20" wall is performing at an r16 on average with the studs acting like heat sinks. Add just 1" of XPS foam to the exterior (r5). Your r20 turns into r25, and your r1 turns into r6. Now 200 sqft of your wall is an r6 vs an r1 and reduces the heat sink effect.The materials to add that 1" XPS would be roughly 500-600 for that 1000 sqft wall. The upgrade from blown fiberglass to open cell foam is typically more than that. For adding exterior foam, details are pretty simply up to about 1.5" thick. After that, the details change and become more costly. Luckily for you, in zone 4. 1.5 is about as thick as you need to go. 1" would be a good start, and your details really do not change. I have detailed 1" foam and windows 1 of 2 ways. Either install the sheathing and foam and then the window. Or with 1" foam, most window flanges are 1 1/8"+ wide, so you can install the window and then install the foam. This gives them about 1/8"+ lap for a caulk joint for trim to hide the foam. The trim stands proud of the window with this detail obviously. 1.5" adds another step. I like to detail a frame out around the windows and butt the foam into it. So frame the wall as normal, install sheathing, then rip a 2x4 in half to give them 1.5x1.75 furring to frame out around the window RO. Install the foam, butt into the furring around the window, and then set the window, nailing into the furring. Everything planes out, and quite simple. Obviously this can also be done with 1" foam too, its just not necessary. There are lots of details floating around out there. Check out green building advisor as well. You can also checkout my blog for more details and nerdy building information. Again, a very untechincal explaination, but you get the idea hopefully. Here is a link that might be useful: home building blog...See MoreHELP needed asap with roof color selection
Comments (15)THANK YOU very much for the input and confirming that the Burnt Sienna was not a good idea. We are going to go with the Colonial Slate. The shingles have not been ordered yet, so not a problem. We called our sales agent, and DH will send a fax. Obviously, this is a decision we'd have to live with for a very long time. Plus, if we eventually change the exterior colors (but won't be painting the brick) the slate will match pretty much anything else we choose. Some neighbors have used a light sage-y green on their trim, and I'd really like that, too. At least that's a few years off, though....See MoreI need to make proposal decision long distance and fast
Comments (14)Celtic, I live in Miami so am somewhat familiar at least with the basics of HVAC needs in Florida. I tend to agree it's not a good idea to feel rushed about putting in a whole new system. I'd recommend you get onto the Tampa/Sarasota Angie's List and find a well recommended AC source there. Down here there are many, many AC vendors from quasi-corporate firms to individuals who are licensed and resell major brands. And a unit that was installed in 2005 shouldn't be on the verge of complete failure I'd also suggest you ease up on immersing yourself in the intricacies of HVAC systems. Really, unless you are going into the business yourself trying to do a crash course on the technology just isn't necessary. You know you want a heat pump which I agree is smart; although we don't get chilly weather often it's nice to have when we do. I'd strongly suggest you place higher weight on good energy efficiency. AC down here runs almost every single day of the year, for decades. That monthly electric bill is important to consider and a high SEER will more than pay for itself in the long run. I think the most important facet is a good vendor. Trane is pricey because of the name. There are a lot of companies who make very good central systems at a lower cost. For comparison, I am finishing the renovation of a rental property I inherited. It had a Carrier central system that was installed in 1998(!). The AC was working when I got the house but knowing it would need to be replaced I got several estimates. They came in ranging from $3500-$5000. I got one last referral from my contractor, who turned out to be a young guy just starting out on his own. He quoted me for the same system at $2500! Did a great job and everything is running fine. So my long winded response is: don't panic, don't feel you need to turn into an HVAC expert. Get the thing running now, find a good vendor source, have a solid energy efficient system put it in, and you'll be fine....See More
nlmackay
6 years agonlmackay
6 years ago PRO
PROMSDG
6 years agorockybird
6 years agonlmackay
6 years agostrategery
6 years agonlmackay
6 years agonlmackay
6 years agonlmackay
6 years agodbrad
6 years agonlmackay
6 years agonlmackay
6 years agonlmackay
6 years agolast modified: 6 years ago PRO
PROMark Bischak, Architect
6 years agonlmackay
6 years ago
ILoveRed
6 years agonlmackay
6 years agoILoveRed
6 years ago
cpartist
6 years agonlmackay
6 years ago
alishaes
6 years agoRobert Roche
6 years agonlmackay
6 years agostrategery
6 years ago
Denita
6 years agotdp310
6 years agoegirrrl
5 years agonlmackay
5 years ago PRO
PROCentury 21 Classic Gold Realty
3 years ago PRO
PROCelery. Visualization, Rendering images
3 years ago- PRO
Century 21 Classic Gold Realty
3 years ago 
Rose Star
3 years agoKathryn Ufferman
last yearKathryn Ufferman
last year


Related Stories
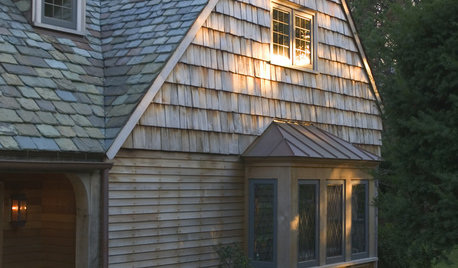
EXTERIORSRoofing Materials: Slate Makes for Fireproof Roofs That Last
It stands up to weather and fire without losing its high-end look. But can your budget handle it?
Full Story
ROOFSWhat to Know Before Selecting Your Home’s Roofing Material
Understanding the various roofing options can help you make an informed choice
Full Story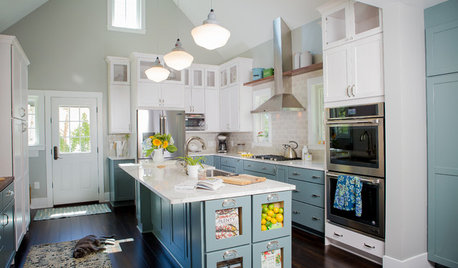
KITCHEN ISLANDSNew This Week: 4 Storage Ideas for the End of Your Kitchen Island
See the ways to design drawers, shelves, racks and more for this island area
Full Story
SMALL KITCHENSNew This Week: 3 Ways to Make Your Kitchen Feel Bigger
Using lighter colors, bringing in more sunshine and a few other tricks can help you visually enlarge your kitchen
Full Story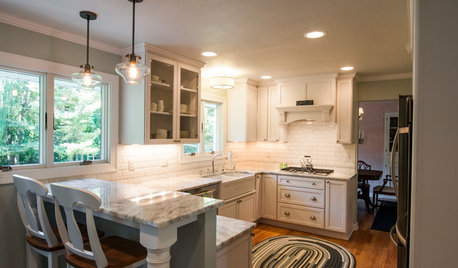
KITCHEN OF THE WEEKKitchen of the Week: 27 Years in the Making for New Everything
A smarter floor plan and updated finishes help create an efficient and stylish kitchen for a couple with grown children
Full Story
KITCHEN ISLANDS10 Decisions to Make When Planning a Kitchen Island
An island can serve many purposes. Here’s what to consider for one that works best for you
Full Story
KITCHEN DESIGNKitchen of the Week: Double Trouble and a Happy Ending
Burst pipes result in back-to-back kitchen renovations. The second time around, this interior designer gets her kitchen just right
Full Story
COLORExterior Color of the Week: 5 Ways to Make Orange Work for You
Whether you opt for a little or a lot, bold orange will bring drama to your home
Full Story
MOST POPULARKitchen of the Week: Broken China Makes a Splash in This Kitchen
When life handed this homeowner a smashed plate, her designer delivered a one-of-a-kind wall covering to fit the cheerful new room
Full Story
KITCHEN DESIGNKitchen of the Week: What a Difference Paint Can Make
A bold move gives a generic Portland kitchen personality without a major overhaul
Full Story


alishaes